
本文适用于甲骨文ARM架构的机器,开始前你需要具备一点Linux的基础知识。
使用下面的方法你可以重装到一个完美兼容甲骨文并且完全纯净的Debian10系统,彻底告别甲骨文官方系统内各种乱七八糟的监控,后台服务等。
此方法不需要VNC,实际上如果你懂原理,这个方法可以在任意VPS上实现Debian重装,这里就不多废话了,直接进入正题。
首先拿到root权限:
sudo -i
执行下面的命令查看你的机器有几块硬盘,以及/boot分区的编号,一般情况下也就一块硬盘,除非你还挂载了额外的卷:
lsblk
这里假设回显如下:
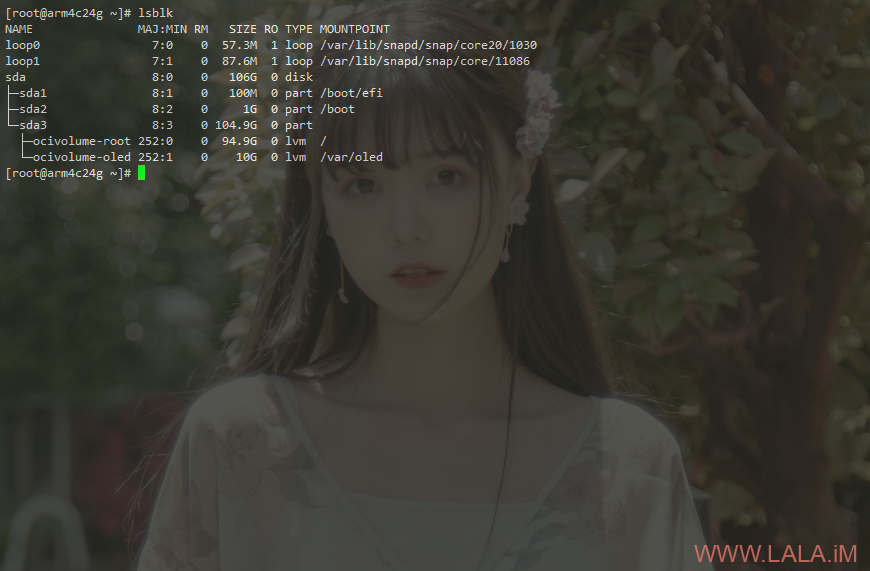
sda是第一块硬盘,/boot分区的编号为2。记住这些,后续会用到。
在/boot分区下创建一个名为debian的目录,然后在此目录内下载debian网络安装的initrd和内核:
mkdir /boot/debian && cd /boot/debian
wget http://ftp.nl.debian.org/debian/dists/buster/main/installer-arm64/current/images/netboot/debian-installer/arm64/initrd.gz
wget http://ftp.nl.debian.org/debian/dists/buster/main/installer-arm64/current/images/netboot/debian-installer/arm64/linux
解压initrd:
gunzip initrd.gz
新建一个预配置文件:
nano preseed.cfg
写入下面的配置:
# 配置语言
d-i debian-installer/locale string en_US
# 配置键盘
d-i keyboard-configuration/xkb-keymap select us
# 使用自动的方式配置网络(DHCP)
d-i netcfg/choose_interface select auto
# 配置hostname和domain
d-i netcfg/get_hostname string unassigned-hostname
d-i netcfg/get_domain string unassigned-domain
d-i netcfg/hostname string imlala
# 配置软件源
d-i mirror/country string manual
d-i mirror/http/hostname string ftp.jp.debian.org
d-i mirror/http/directory string /debian
d-i mirror/http/proxy string
# 开启root登录并设置root密码,关闭普通用户创建
d-i passwd/root-login boolean true
d-i passwd/make-user boolean false
d-i passwd/root-password password 123456
d-i passwd/root-password-again password 123456
# 设置时区为东八区
d-i clock-setup/utc boolean true
d-i time/zone string Asia/Shanghai
d-i clock-setup/ntp boolean false
# 硬盘分区,注意/dev/sda这里的设备名,要改为你自己的设备名,一般虚拟机如VMware/VirtualBox都是这个设备名
d-i partman-auto/disk string /dev/sda
d-i partman-auto/method string regular
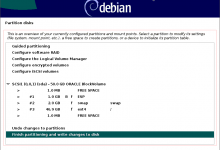
# 手动划分分区大小
d-i partman-auto/expert_recipe string \
boot-root :: \
1 1 1 free \
$bios_boot{ } \
method{ biosgrub } \
. \
256 2 256 fat32 \
$primary{ } \
$iflabel{ gpt } \
$reusemethod{ } \
method{ efi } format{ } \
mountpoint{ /boot/efi } \
. \
512 3 512 ext4 \
$primary{ } \
$bootable{ } \
method{ format } format{ } \
use_filesystem{ } filesystem{ ext4 } \
mountpoint{ /boot } \
. \
1024 5 1024 linux-swap \
$primary{ } \
method{ swap } format{ } \
. \
1 4 -1 ext4 \
$primary{ } \
method{ format } format{ } \
use_filesystem{ } filesystem{ ext4 } \
mountpoint{ / } \
. \
# 因甲骨文的机器是efi引导,所以这里强制使用gpt分区表
d-i partman-efi/non_efi_system boolean true
d-i partman-partitioning/choose_label string gpt
d-i partman-partitioning/default_label string gpt
# 如果硬盘内之前有lvm或是raid的分区,全部删除
d-i partman-md/device_remove_md boolean true
d-i partman-lvm/device_remove_lvm boolean true
# 下面的这些配置可以做到没有交互式的完成硬盘分区
d-i partman-partitioning/confirm_write_new_label boolean true
d-i partman/choose_partition select finish
d-i partman/confirm boolean true
d-i partman/confirm_nooverwrite boolean true
# 禁止在安装的时候弹出CD/DVD扫描提示
d-i apt-setup/non-free boolean true
d-i apt-setup/contrib boolean true
d-i apt-setup/cdrom/set-first boolean false
d-i apt-setup/cdrom/set-next boolean false
d-i apt-setup/cdrom/set-failed boolean false
# 软件包选择
tasksel tasksel/first multiselect standard
# 安装额外的软件包,不更新系统
d-i pkgsel/include string openssh-server
d-i pkgsel/upgrade select none
# 禁止在安装的时候弹出popularity
popularity-contest popularity-contest/participate boolean false
# grub安装
d-i grub-installer/only_debian boolean true
d-i grub-installer/with_other_os boolean true
d-i grub-installer/bootdev string default
# 安装完成之后不要弹出安装完成的界面,直接重启
d-i finish-install/reboot_in_progress note
# 允许ssh服务使用root用户登录
d-i preseed/late_command string in-target sed -i 's/#PermitRootLogin.*/PermitRootLogin yes/g' /etc/ssh/sshd_config
这里有几个需要注意的位置,下面的/dev/sda改为你之前用lsblk看到的硬盘名:
d-i partman-auto/disk string /dev/sda
设置你的root密码,默认这里是123456,务必修改为一个高强度的密码:
d-i passwd/root-password password 123456
d-i passwd/root-password-again password 123456
配置和你机器连通性最好的源:
d-i mirror/http/hostname string ftp.jp.debian.org
源列表:https://www.debian.org/mirror/list
完成之后把preseed.cfg内嵌到initrd里面去:
echo preseed.cfg | cpio -H newc -o -A -F initrd
重新压缩initrd:
gzip initrd
新建一个grub菜单:
nano /etc/grub.d/40_custom
写入如下配置:
menuentry 'debian 10 install' {
insmod part_gpt
insmod xfs
set root='hd0,gpt2'
linux /debian/linux
initrd /debian/initrd.gz
}
注意这里的hd0,gpt2,如果你的机器就一块硬盘那么hd0保持不变,后面的2改为你之前在lsblk看到的/boot分区编号。
更新grub配置,使之前的配置生效:
grub2-mkconfig -o /boot/efi/EFI/redhat/grub.cfg
设置下一次重启的时候从我们新建的菜单来引导系统:
grub2-reboot "debian 10 install"
这样配置的好处是如果你的grub配置错误,不会让机器失联,你只需要在甲骨文的后台重启系统即可进入之前的系统。
重启机器,即可开始自动安装:
reboot
一般情况下,只要你的源配置的没问题,网络也是通畅的话,3分钟就装好了,下面是我装好的一台,简单验证一下:
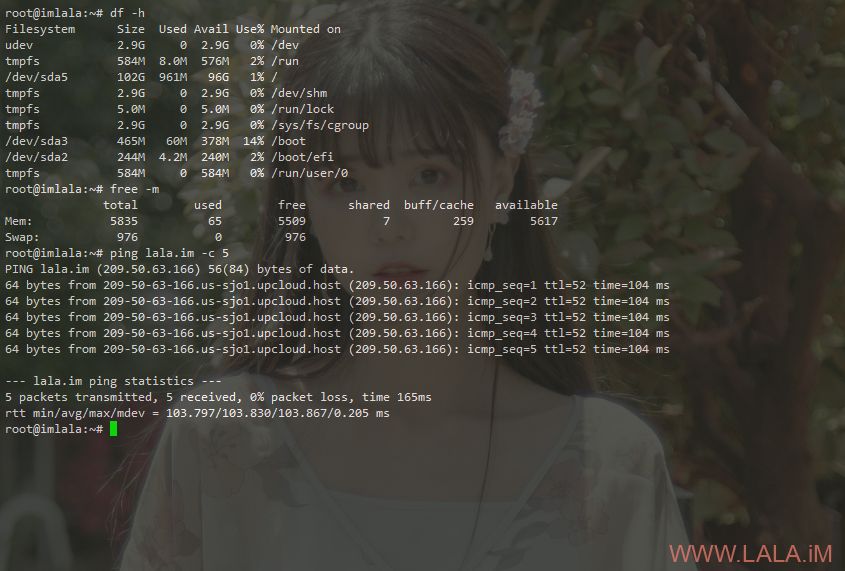


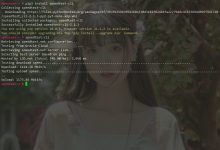


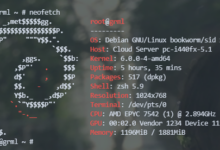


内核版本是?驱动全吗?dmesg有什么报错吗?
对我有意见,看不爽就直接说呗,拐弯抹角问这些有的没的有啥意思?
不就是前两天自己在这里装逼不成,觉得自己很没面子?想找点自信回去?
认为自己懂点LiNuX,想来这里指点江山,结果发现自己其实是个垃圾。
往上一点估计就只会敲个aPt UpDatE,往下一点估计还能操作一下,毕竟会用063清个系统垃圾对吧?位置及其尴尬,上又上不去下又下不来,不谦虚又不愿意掉下去虚心的学。
你说是啥就是啥吧,你都是对的,毕竟是大脑升级人。
这就厉害了
大佬为啥 \ 复制过去变成了RMB的一个钱的符号。。。。
好吧,我傻B了,是finashell的问题,用CRT就没问题
搞定了,可惜不支持v2-ui。。。
出个甲骨文arm怎么挂到机场后端的教程!
请问如果没有挂载/boot怎么办呢
没有/boot分区那就把initrd和内核直接下载到/root目录下面吧,然后把grub菜单内的hd0,gpt2改为/分区的编号,initrd这些路径也改到/root/initrd.gz。其他步骤不用变。
完了,我的没有/boot这个分区,只有sda1 8:1 0 200M 0 part /boot/efi,这个,hd0,gpt1,其他按您的文章一字不漏的粘贴了,现在失联了,改怎么搞啊。。
重启后可以进原来的系统。但是VNC里键盘不能用,也不指导启动命令怎么写。。。
已经死翘翘了。。。。VNC里看只有光标一闪一闪,等了10来分钟没变化强制重启,然后引导没了。。。。。只有UEFI SHELL了。。。键盘还不能在VNC里输入
键盘不能用是甲骨文VNC控制台的BUG。我不知道你是如何操作的,就算GRUB没配置正确,你在甲骨文手动重启也能进原来的系统。
没有/boot应该就是OracleLinux7.9,默认的版本,所以当时我看到这个教程就不敢装。
没有/boot就用/,改一下grub配置就行了。
学到了 学到了
我是从ubuntu升级到debian的,也狠简单,几分钟完事。
也适合于Oracle Linux7.9吗?
适用,但是配置不能照搬,需要根据你机器的分区信息来配置grub。
OracleLinux7.9的版本能DD成debian吗?我觉得安装时要不主动去选ubuntu,要不就是默认OracleLinux7.9。。。所以7.9行吗?
[root@instance opc]# lsblk
NAME MAJ:MIN RM SIZE RO TYPE MOUNTPOINT
sda 8:0 0 46.6G 0 disk
├─sda2 8:2 0 8G 0 part [SWAP]
├─sda3 8:3 0 38.4G 0 part /
└─sda1 8:1 0 200M 0 part /boot/efi
OracleLinux7.9 请问 为啥没有boot分区
成功了,感谢
啦啦大佬牛逼,我是默认7.9 看大佬评论回复的操作 已成功更换 感谢
7.9更换系统成功,谢谢大佬
重装 Debian11 成功,只需要将本文开始的
wget http://ftp.nl.debian.org/debian/dists/buster/main/installer-arm64/current/images/netboot/debian-installer/arm64/initrd.gz
wget http://ftp.nl.debian.org/debian/dists/buster/main/installer-arm64/current/images/netboot/debian-installer/arm64/linux
更换成如下即可,其它不变
wget http://ftp.nl.debian.org/debian/dists/bullseye/main/installer-arm64/current/images/netboot/debian-installer/arm64/initrd.gz
wget http://ftp.nl.debian.org/debian/dists/bullseye/main/installer-arm64/current/images/netboot/debian-installer/arm64/linux
arm oracle linux的换成
menuentry ‘debian 10 install’ {
insmod part_gpt
insmod xfs
set root=’hd0,gpt3′
linux /boot/debian/linux
initrd /boot/debian/initrd.gz
}
不知道是我不会弄还是咋的,d完以后能用root密码登陆,但是开启秘钥登陆后,用创建时上传的秘钥没法登陆,是我的问题还是d完自动清空了秘钥
系统都完全重装了之前的密钥当然不能用了,你得重新生成密钥对。
已经成功,谢谢大佬!