
首先在kimsufi的后台用他们提供的系统模板把机器重装一次,随便用哪个linux发行版都可以,我这里重装的是debian11。目的只是为了获取机器原始的ipv6网络配置信息。
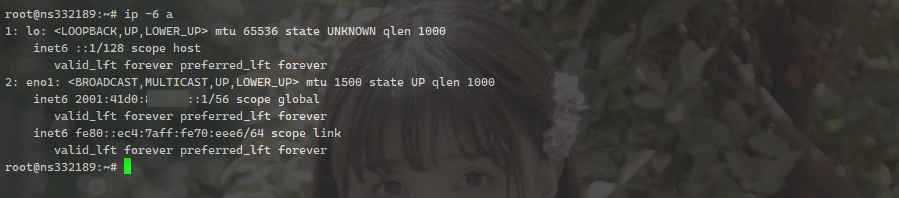
登到机器内查看机器的ipv6地址:
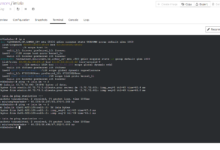
ip -6 a
回显类似:
查看机器的ipv6网关:
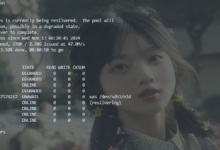
ip -6 route list
回显类似:

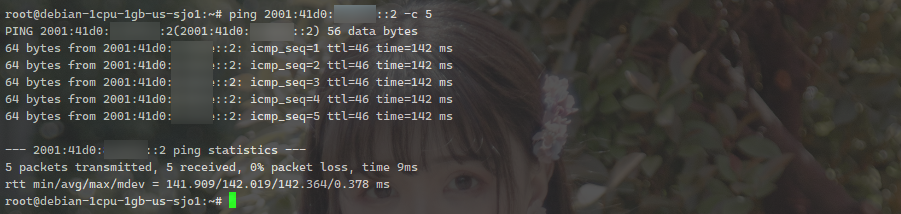
kimsufi的网站上虽然标明每台机器只有/128的ipv6,但实际可用应该是/64,为了后续的步骤能够正常进行,这里先简单检查一下机器到底能用多少个ipv6,可以先往机器的主网卡接口添加一个ipv6测试:
ip addr add 2001:41d0:x:xxxx::2/128 dev eno1
在别的机器上能ping通刚添加的地址就说明可用的ipv6不止/128:
那就可以继续下面的操作了,按照我先前这篇文章的步骤安装好proxmox:
编辑网卡配置文件:
nano /etc/network/interfaces
在先前这篇文章的配置基础上,加入ipv6相关的配置:
auto lo
iface lo inet loopback

iface eth0 inet manual

auto vmbr0
iface vmbr0 inet static
	address xx.xx.xx.xx/24
	gateway xx.xx.xx.xx
	bridge-ports eth0
	bridge-stp off
	bridge-fd 0

iface vmbr0 inet6 static
        address 2001:41d0:x:xxxx::1/64
        gateway 2001:41d0:x:xxxx:ff:ff:ff:ff

auto vmbr1
iface vmbr1 inet static
        address 192.168.0.1
        netmask 255.255.255.0
        bridge_ports none
        bridge_stp off
        bridge_fd 0
        post-up echo 1 > /proc/sys/net/ipv4/ip_forward
        post-up iptables -t nat -A POSTROUTING -s '192.168.0.0/24' -o vmbr0 -j MASQUERADE
        post-down iptables -t nat -D POSTROUTING -s '192.168.0.0/24' -o vmbr0 -j MASQUERADE
重启网络服务:
systemctl restart networking.service
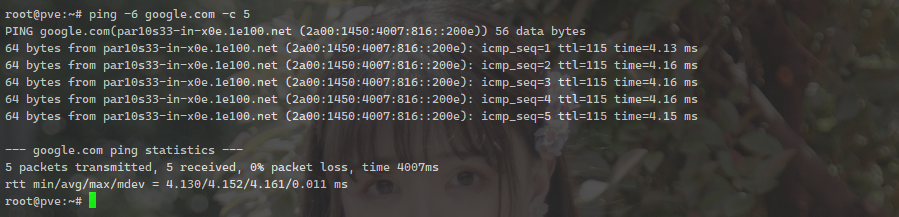
正常的话,现在母鸡的ipv6就通了:
为了让小鸡也能用上ipv6,现在还需要做一系列的配置。首先开启ipv6转发:
echo "net.ipv6.conf.all.forwarding = 1" >> /etc/sysctl.conf && sysctl -p
然后安装ndppd:
apt -y install ndppd
编辑ndppd的配置文件:
nano /etc/ndppd.conf
写入如下配置,ipv6地址块换成你自己的:
proxy vmbr0 {
  rule 2001:41d0:x:xxxx::/64 {
    static
  }
}
重启ndppd服务使其生效,并设置开机自启:
systemctl restart ndppd.service
systemctl enable ndppd.service
现在开小鸡的话ipv6实际上就能用了,但是只能手动设置小鸡的ipv6地址,每台都手动设置的话太麻烦,重复劳动浪费时间,所以这里可以配置radvd实现slaac。
安装radvd:
apt -y install radvd
新建radvd配置文件:
nano /etc/radvd.conf
写入如下配置,ipv6地址块换成你自己的:
interface vmbr0 {
  AdvSendAdvert on;
  MinRtrAdvInterval 3;
  MaxRtrAdvInterval 10;
  prefix 2001:41d0:x:xxxx::/64 {
    AdvOnLink on;
    AdvAutonomous on;
    AdvRouterAddr on;
  };
};
重启radvd服务使其生效,并设置开机自启:
systemctl restart radvd.service
systemctl enable radvd.service
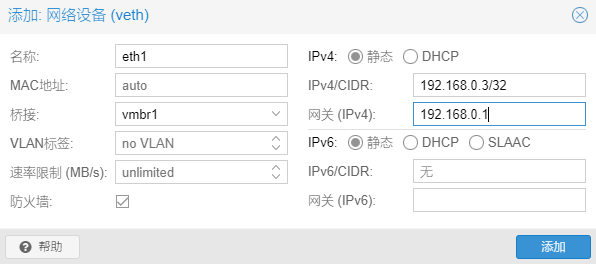
下面是开小鸡时的设置,注意不论是lxc还是kvm架构的小鸡,我这个配置统一都需要添加两个网卡。
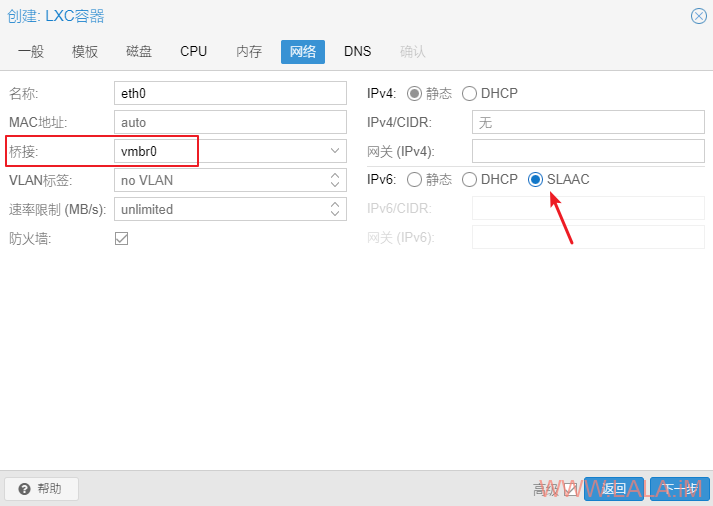
对于lxc小鸡,在创建的时候可以先添加一个用于ipv6网络的eth0,桥接vmbr0,ipv6选择slaac:
等小鸡创建完成后再添加一个用于ipv4网络的eth1,桥接vmbr1,手动配置ipv4的地址和网关:
正常情况下,小鸡现在就是natipv4+ipv6双栈网络了:
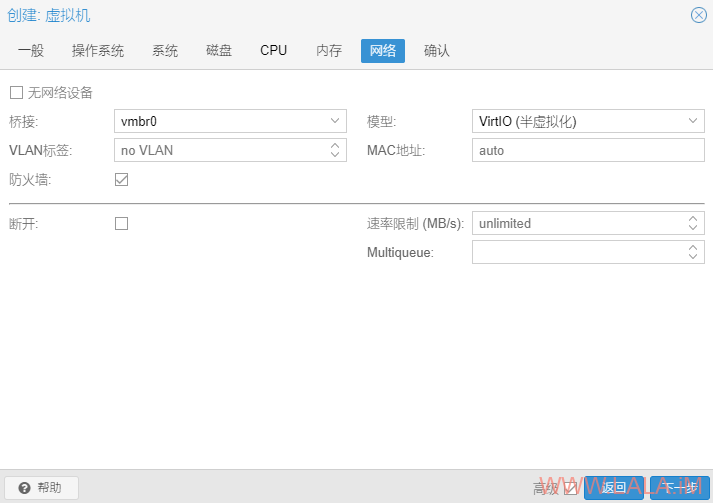
对于kvm小鸡,实际操作大同小异,这里我就开个debian11的小鸡演示一下配置。
创建的时候先添加一个桥接vmbr0的网卡:
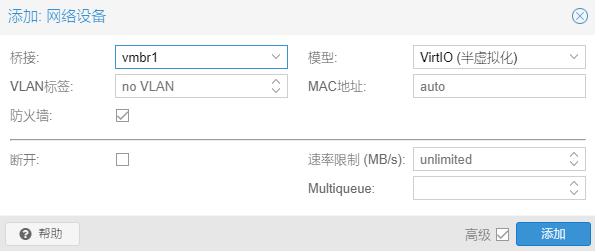
等小鸡创建完成后再添加一个桥接vmbr1的网卡:
打开vnc控制台开始安装系统:

这里有两块网卡ens18和ens19,实际ens18对应vmbr0,ens19对应vmbr1,这里选择ens18就可以实现ipv6的slaac:
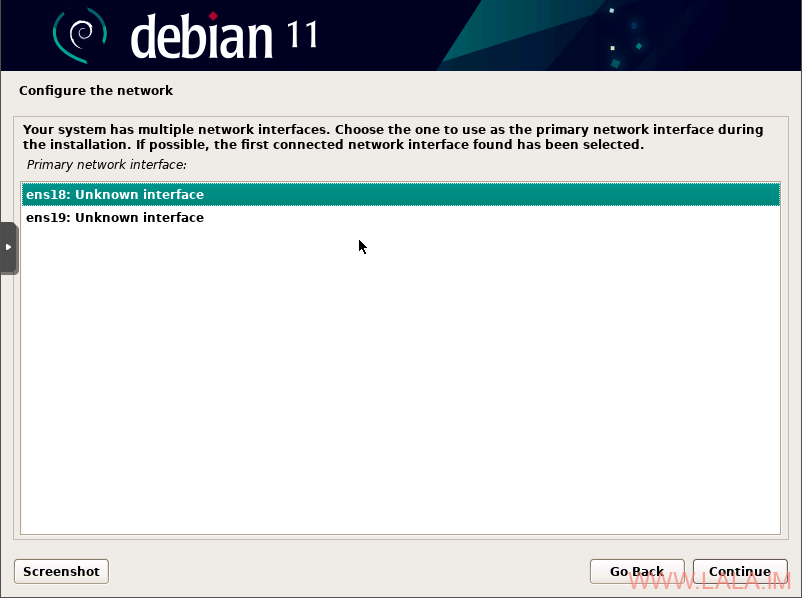
至于ens19那块对应vmbr1的网卡,等待系统安装完成后手动配置ipv4即可。
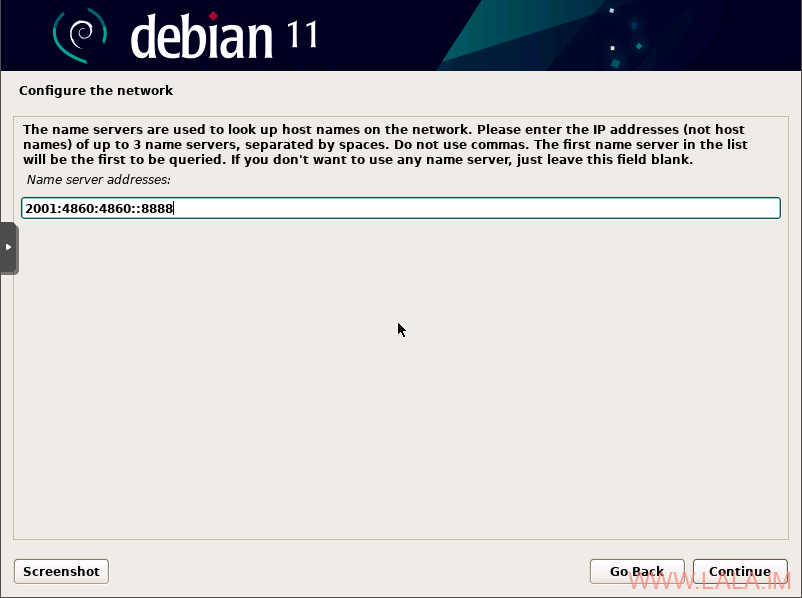
接下来需要配置一个dns:
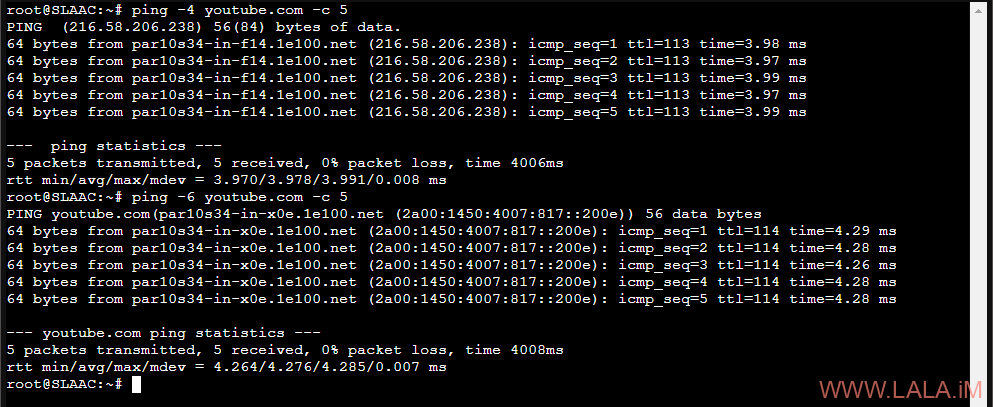
剩下的就是设置root密码,创建普通用户,还有分区这些了,这里就不多说了。等系统安装好,登录进去后,测试ipv6是否正常:

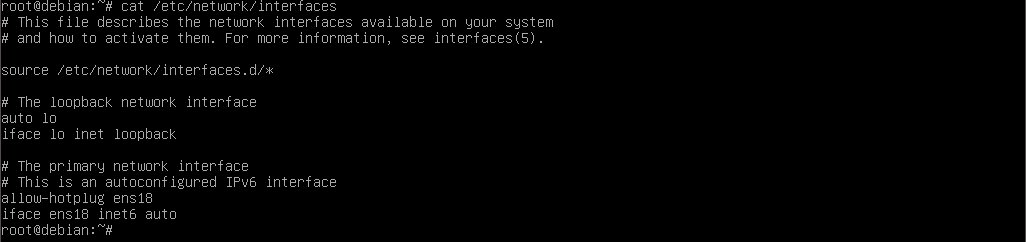
现在这台小鸡只有ipv6,如果还需要natipv4的话就得修改网卡配置文件,默认的配置是这样:
只需要在文件的尾部添加ens19网卡的ipv4配置:
auto ens19
iface ens19 inet static
	address 192.168.0.4/32
	gateway 192.168.0.1
然后添加一个dns服务器:
nano /etc/resolv.conf
写入如下配置:
nameserver 8.8.8.8
重启机器即可。
在母鸡上做dnat,把小鸡的ssh端口暴露出来:
iptables -t nat -A PREROUTING -p tcp -m tcp --dport 16823 -j DNAT --to-destination 192.168.0.4:22
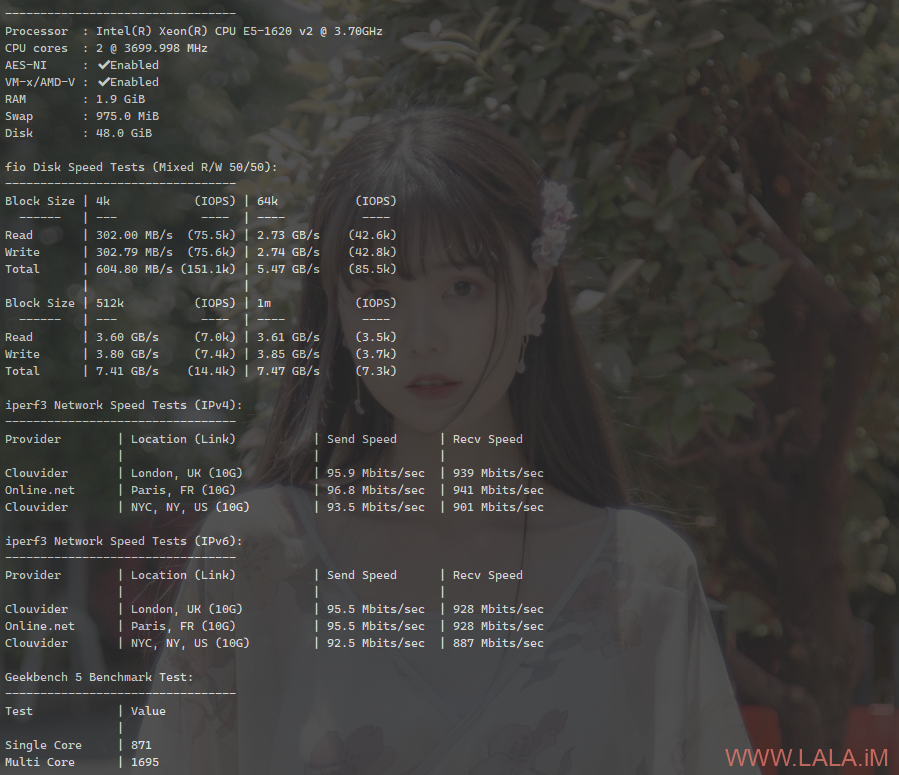
最后在这台kvm小鸡内跑个bench,简单测试一下各项配置:


有冇办法可以让vmbr1完成这两件事呢?Windows加两块网卡很难看
你可以试下用ndppd代理vmbr1看看,理论是可行的。。Windows网卡不都是自动识别的吗,我装了个11,没觉得哪里难看了。。
这样就太棒了啊。
ipv6战未来
反正只有v6的话实在不行套cf喽。。。
还可以套个warp。。
想要分租给其他小伙伴,就得需要ipv4了吧,这就难了,所以还是自己玩。。。
可以开nat给小伙伴啊,多给几个端口就行了。
lala要出小鸡了嘛
来给你生一个小鸡仔
多谢大佬的教程,目前搞定双栈,但是外网无法通过小鸡的ipv6链接,ssh在母鸡上登录后提示Permission denied, please try again.
求教
你开的是lxc还是kvm?lxc的话,系统模板用的什么?你这个问题似乎和网络没啥关系,只是小鸡的sshd配置有问题。
lxc系统模板用debian11的话,默认是禁止root登录的,修改sshd配置文件里面的PermitRootLogin yes来允许root登录。
lxc的centos7 我要用bug塔
我刚开了一台lxc的centos7测试,你按着下面这个步骤来配置sshd就可以了:
yum -y update
yum -y install openssh-server
systemctl enable –now sshd
vi /etc/ssh/sshd_config,把PermitRootLogin yes这个配置前面的#号去掉。
systemctl restart sshd
谢谢大佬
博主 你好 你开的小鸡怎么说母鸡的cpu ,我开的小鸡显示 kvm ,这个如何修改啊
创建小鸡的时候,cpu选项里面有个类别,改成host就行了。
大佬,编辑网卡配置文件加入ipv6那步,网关地址是5个ff,不是4个ff
参考地址https://docs.ovh.com/us/en/dedicated/network-ipv6/#debian-and-debian-based-operating-systems
我这个机器的网关确实是5个ff,只是文中用xxxx隐去了一部分,建议还是以在本机用ip -6 route list命令查看的为准。
虚拟机里面开虚拟机装小鸡
开小鸡 ipv4设置为什么是 192.168.0.3/32 不是192.168.0.3/24啊 默认不是都是225.225.255.0吗
大佬 开windows 小鸡 怎么设置啊 两个网卡 随便哪一个设置 ipv4 和dns吗
如果你配置了radvd那么其中有一个网卡会自动拥有ipv6地址,这个网卡就对应ipv6,另外那一个就对应ipv4。
我用“ip -6 route list”查到的结果是:
::1 dev lo proto kernel metric 256 pref medium
fe80::/64 dev vmbr0 proto kernel metric 256 pref medium
这种,用的官方debian10的模板,哪里出问题了?
这说明你这个系统内根本就没有配置ipv6,所以查不到默认网关。重装成debian11试试吧。或者你可以按评论上面那个老哥给的ovh配置ipv6文档,自己推算出网关地址。
大佬,如果NAT转发443到母鸡的443怎么办? 母鸡的443被登录地址占用了
那看你母鸡的443端口被什么占用了,如果是nginx占用了443可以先把小鸡的443端口转发到别的端口,比如8443,再用nginx去反代8443。
奇怪是检查了母鸡80和443都没被占用,但一NAT转发443和80端口给小鸡,其他小鸡网站什么的都打不开了,感觉是小鸡和母鸡的443和80冲突了,奇怪
你的意思是说现在你母鸡开了多个小鸡,你把母鸡的80/443端口转发给了其中某一台小鸡后,其他小鸡内的80/443端口就访问不到了,是这个意思吗?
我理解没错的话,那这就是正常的,因为母鸡就一个80/443端口,只能转发给其中一台小鸡用,其他小鸡就只能用母鸡上别的端口来转发,比如8443。
如果多台小鸡内都有web服务要暴露出来,你可以在母鸡上装nginx,让nginx监听80/443,然后nginx再反代用于转发的端口,比如上面说到的8443,这样就可以实现多台小鸡内的网站同时访问了。
另外如果母鸡和小鸡的网络是互通的,连转发端口都不需要配置了,直接用母鸡的nginx反代小鸡的ip地址就行。
大佬 只开 固定IPV6小鸡 网络如何设置呢
按照这篇文章一样的设置,省略掉ipv4nat相关的配置即可。
lala,遇到个问题。就是我用pve,nat开了macos的小鸡,但是mac安装时必须要联网,但是恢复系统的时候是没有网络设置的,也就是说要小鸡网卡自动分配地址v4给系统,有什么方案能解决么
在pve上面配置dhcp服务就可以实现ipv4自动分配,可以装isc-dhcp-server或者dnsmasq来实现。
小鸡开出来ipv6能分配上地址,就是没网怎么办