
做任何事情都要适度,懂得把握分寸。。这种东西当个兴趣玩玩就好了,当然如果你要做的话,小打小闹,没赚多少钱一般也没人去找你,条子抓人还要经费呢。。如果你搞的又大,人还膨胀,那恭喜你了,引用一下下面这张图:

我折腾这个主要是想把自己用的小鸡全线换到V2Ray,用这个面板就能集中管理了。虽然我现在SSR用着也挺好的就是了。。没办法闲着蛋疼。。
安装PHP7.3:
yum -y install epel-release yum-utils
yum -y install http://rpms.remirepo.net/enterprise/remi-release-7.rpm
yum-config-manager --enable remi-php73
yum -y update
yum -y install php php-fpm php-zip php-xml php-gd php-mbstring php-pdo php-mysql php-bcmath
安装Nginx/Supervisor等一些常用工具:
yum -y install nginx supervisor nano unzip wget socat
修改php-fpm配置文件:
nano /etc/php-fpm.d/www.conf
用户和组改为nginx,另外把连接方式改为套接字:
user = nginx
group = nginx
listen = /run/php-fpm/imlala.sock
listen.owner = nginx
listen.group = nginx
启动php-fpm:
systemctl enable php-fpm
systemctl start php-fpm
安装Mariadb10.4:
nano /etc/yum.repos.d/MariaDB.repo
写入:
[mariadb]
name = MariaDB
baseurl = http://yum.mariadb.org/10.4/centos7-amd64
gpgkey=https://yum.mariadb.org/RPM-GPG-KEY-MariaDB
gpgcheck=1
安装:
yum -y install mariadb-server mariadb-client
启动:
systemctl enable mariadb
systemctl start mariadb
初始化数据库:
mysql_secure_installation
注意下面这项选n(虽然没什么卵用):
Disallow root login remotely? [Y/n] n
下载SSRPanel项目文件:
mkdir -p /opt/wwwroot && cd /opt/wwwroot
git clone https://github.com/ssrpanel/SSRPanel.git
mv SSRPanel ssrpanel
创建数据库/导入数据库文件/修改数据库允许远程连接:
mysql -u root -p
CREATE DATABASE ssrpanel CHARACTER SET utf8mb4 COLLATE utf8mb4_unicode_ci;
GRANT ALL PRIVILEGES ON ssrpanel.* TO 'root'@'localhost';
GRANT ALL PRIVILEGES ON *.* TO 'root'@'%' IDENTIFIED BY '你的数据库root密码' WITH GRANT OPTION;
USE ssrpanel;
SOURCE /opt/wwwroot/ssrpanel/sql/db.sql
FLUSH PRIVILEGES;
quit
让Mariadb监听到外网:
sed -i 's/#bind-address=0.0.0.0/bind-address=0.0.0.0/g' /etc/my.cnf.d/server.cnf
重启Mariadb使改动生效:
systemctl restart mariadb
复制一份SSRPanel的配置文件并编辑:
cd ssrpanel && cp .env.example .env && nano .env
我修改掉的部分如下:
APP_DEBUG=false
APP_NAME=ssrpanel
APP_URL=http://example.com
DB_PASSWORD=example
MAIL_HOST=smtp.gmail.com
MAIL_USERNAME=example@gmail.com
MAIL_PASSWORD=example
MAIL_FROM_ADDRESS=example@qq.com
MAIL_FROM_NAME=example
修改SSRPanel文件的组和权限:
chown -R nginx:nginx /opt && chmod -R 755 /opt/wwwroot/ssrpanel
安装依赖并生成KEY:
php composer.phar install
php artisan key:generate
添加计划任务:
crontab -u nginx -e
* * * * * php /opt/wwwroot/ssrpanel/artisan schedule:run >> /dev/null 2>&1
新建一个supervisor的配置文件:
nano /etc/supervisord.d/ssrpanel.ini
写入:
[supervisord]
nodaemon=false

[program:ssrpanelmail]
user=nginx
directory=/opt/wwwroot/ssrpanel
command=/usr/bin/php /opt/wwwroot/ssrpanel/artisan queue:work database --queue=default --timeout=60 --sleep=5 --tries=3
autorestart=true
启动supervisord:
systemctl restart supervisord
systemctl enable supervisord
现在关SELinux,不然Nginx反代不了,会报权限问题:
sed -i 's/SELINUX=enforcing/SELINUX=disabled/g' /etc/selinux/config
setenforce 0
不关的话可以尝试用这个命令解决(我没试过):
setsebool -P httpd_can_network_connect 1
我记不清这个程序和V2Ray需要用到什么端口,总之很多,我很懒,我选择关闭防火墙:
systemctl disable firewalld
systemctl stop firewalld
新建一个nginx站点配置文件:
nano /etc/nginx/conf.d/ssrpanel.conf
写入下面的内容(http访问):
server {
    listen       80;
    server_name  panel.koko.cat;
    index        index.html index.htm index.php;
    root         /opt/wwwroot/ssrpanel/public;
    client_max_body_size 128g;

    location / {
		try_files $uri $uri/ /index.php$is_args$args;
	}

    location ~ .*\.(gif|jpg|jpeg|png|bmp|swf)$
	{
		expires      1h;
	}

    location ~ .*\.(js|css)?$
	{
		expires      1h;
	}

    location ~ \.php$ {
        fastcgi_pass   unix:/run/php-fpm/imlala.sock;
        fastcgi_index  index.php;
        fastcgi_param  SCRIPT_FILENAME  $document_root$fastcgi_script_name;
        include        fastcgi_params;
    }
}
重启nginx:
systemctl restart nginx
如果需要https访问,首先安装acme并签发一个证书:
curl https://get.acme.sh | sh
cd ~/.acme.sh && ./acme.sh --issue -d panel.koko.cat --nginx
mkdir -p /etc/nginx/certs/panel.koko.cat
然后安装证书(这样是可以实现自动续期的,不用担心证书过期的问题):
./acme.sh --install-cert -d panel.koko.cat \
--key-file /etc/nginx/certs/panel.koko.cat/panel.koko.cat.key \
--fullchain-file /etc/nginx/certs/panel.koko.cat/fullchain.cer \
--reloadcmd "systemctl force-reload nginx.service"
编辑之前的配置文件:
nano /etc/nginx/conf.d/ssrpanel.conf
修改为下面的配置(https访问):
server {
    listen       80;
    listen       443 ssl http2;
    server_name  panel.koko.cat;
    index        index.html index.htm index.php;
    root         /opt/wwwroot/ssrpanel/public;
    client_max_body_size 128g;
    if ($server_port !~ 443){
        rewrite ^(/.*)$ https://$host$1 permanent;
    }

    ssl_certificate    /etc/nginx/certs/panel.koko.cat/fullchain.cer;
    ssl_certificate_key    /etc/nginx/certs/panel.koko.cat/panel.koko.cat.key;
    ssl_protocols TLSv1 TLSv1.1 TLSv1.2;
    ssl_ciphers ECDHE-RSA-AES128-GCM-SHA256:HIGH:!aNULL:!MD5:!RC4:!DHE;
    ssl_prefer_server_ciphers on;
    ssl_session_cache shared:SSL:10m;
    ssl_session_timeout 10m;
    error_page 497  https://$host$request_uri;

    location / {
		try_files $uri $uri/ /index.php$is_args$args;
	}

    location ~ .*\.(gif|jpg|jpeg|png|bmp|swf)$
	{
		expires      1h;
	}

    location ~ .*\.(js|css)?$
	{
		expires      1h;
	}

    location ~ \.php$ {
        fastcgi_pass   unix:/run/php-fpm/imlala.sock;
        fastcgi_index  index.php;
        fastcgi_param  SCRIPT_FILENAME  $document_root$fastcgi_script_name;
        include        fastcgi_params;
    }
}
这里我简要说一下为什么我在这里给出了两个Nginx配置文件,一个是普通的HTTP访问,一个是强制HTTPS访问。我可以百分百告诉你GFW墙域名的方法多数情况是基于下面这个套路:
1.域名没有上SSL,那么一般只是普通的阻断,这时候你用国内机器还能给这个域名做301跳转,把你的流量导到新域名上面。简单点说就是这个域名还有救,给你判的不是死刑。
2.域名上了SSL,一般存活的比普通的没上SSL的要久一些,但是只要被墙了,基本上都是DNS污染。这种方法是直接死刑,域名没的救。
怎么选择看个人,要是我肯定选第二种。。不说废话了,前端面板到这里就部署好了,接下来是后端的V2Ray插件。
下载v2ray插件,我推荐用这个go版本:
mkdir -p /usr/bin/v2ray && cd /usr/bin/v2ray
wget https://github.com/ColetteContreras/v2ray-ssrpanel-plugin/releases/download/v0.2.5/v2ray-linux-64.zip
unzip v2ray-linux-64.zip
rm -rf v2ray-linux-64.zip
chmod +x v2ray && chmod +x v2ctl
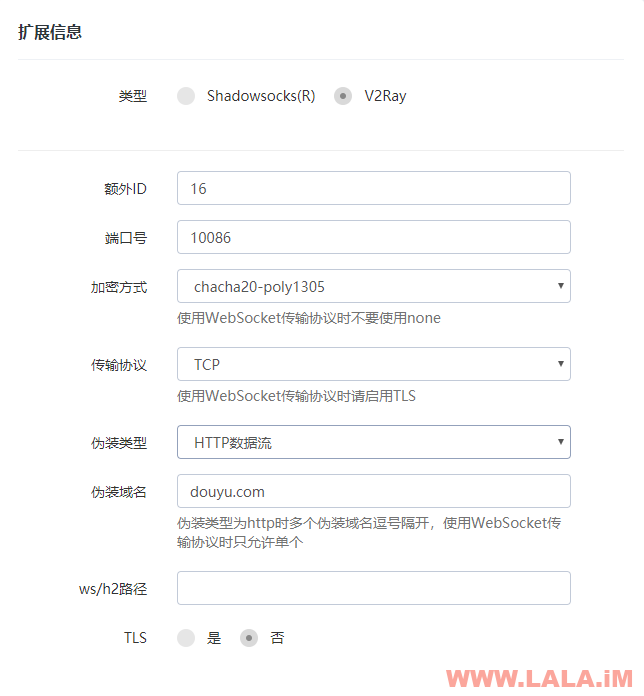
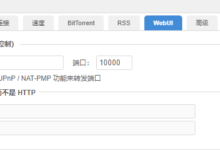
现在打开你的面板添加一个节点,首先你要确定你需要用哪种连接方式,如果是最常规的TCP方式,参考下图添加:
KCP参考:

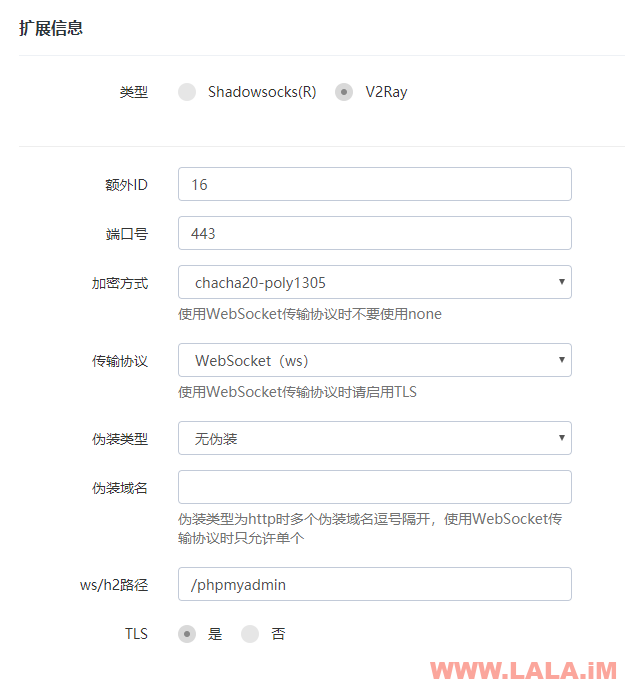
WebSocket参考:
现在编写v2ray的配置文件:
mkdir -p /etc/v2ray && nano /etc/v2ray/config.json
如果是只需要单纯的TCP连接模式,则使用下面的配置:
{
  "log": {
    "loglevel": "debug"
  },
  "api": {
    "tag": "api",
    "services": [
      "HandlerService",
      "LoggerService",
      "StatsService"
    ]
  },
  "stats": {},
  "inbounds": [
    {
      "port": 10086,
      "protocol": "vmess",
      "tag": "proxy"
    },
    {
      "listen": "127.0.0.1",
      "port": 10085,
      "protocol": "dokodemo-door",
      "settings": {
        "address": "127.0.0.1"
      },
      "tag": "api"
    }
  ],
  "outbounds": [
    {
      "protocol": "freedom"
    }
  ],
  "routing": {
    "rules": [
      {
        "type": "field",
        "inboundTag": [
          "api"
        ],
        "outboundTag": "api"
      }
    ],
    "strategy": "rules"
  },
  "policy": {
    "levels": {
      "0": {
        "statsUserUplink": true,
        "statsUserDownlink": true
      }
    },
    "system": {
      "statsInboundUplink": true,
      "statsInboundDownlink": true
    }
  },
  "ssrpanel": {
    "nodeId": 1,
    "checkRate": 60,
    "user": {
      "inboundTag": "proxy",
      "level": 0,
      "alterId": 16,
      "security": "none"
    },
    "mysql": {
      "host": "面板所在机器的公网IP",
      "port": 3306,
      "user": "root",
      "password": "数据库ROOT密码",
      "dbname": "ssrpanel"
    }
  }
}
如果是KCP,则使用下面的配置:
{
  "log": {
    "loglevel": "debug"
  },
  "api": {
    "tag": "api",
    "services": [
      "HandlerService",
      "LoggerService",
      "StatsService"
    ]
  },
  "stats": {},
  "inbounds": [
    {
      "port": 10086,
      "protocol": "vmess",
      "streamSettings":{
      "network":"kcp",
      "kcpSettings": {
        "mtu": 1350,
        "tti": 20,
        "uplinkCapacity": 50,
        "downlinkCapacity": 100,
        "congestion": false,
        "readBufferSize": 2,
        "writeBufferSize": 2,
        "header": {
          "type": "dtls"
        }
      }
    },
      "tag": "proxy"
    },
    {
      "listen": "127.0.0.1",
      "port": 10085,
      "protocol": "dokodemo-door",
      "settings": {
        "address": "127.0.0.1"
      },
      "tag": "api"
    }
  ],
  "outbounds": [
    {
      "protocol": "freedom"
    }
  ],
  "routing": {
    "rules": [
      {
        "type": "field",
        "inboundTag": [
          "api"
        ],
        "outboundTag": "api"
      }
    ],
    "strategy": "rules"
  },
  "policy": {
    "levels": {
      "0": {
        "statsUserUplink": true,
        "statsUserDownlink": true
      }
    },
    "system": {
      "statsInboundUplink": true,
      "statsInboundDownlink": true
    }
  },
  "ssrpanel": {
    "nodeId": 1,
    "checkRate": 60,
    "user": {
      "inboundTag": "proxy",
      "level": 0,
      "alterId": 16,
      "security": "none"
    },
    "mysql": {
      "host": "面板所在机器的公网IP",
      "port": 3306,
      "user": "root",
      "password": "数据库ROOT密码",
      "dbname": "ssrpanel"
    }
  }
}
如果是WebSocket这种高级玩法,则使用下面的配置:
{
  "log": {
    "loglevel": "debug"
  },
  "api": {
    "tag": "api",
    "services": [
      "HandlerService",
      "LoggerService",
      "StatsService"
    ]
  },
  "stats": {},
  "inbounds": [
    {
      "port": 10086,
      "protocol": "vmess",
      "streamSettings": {
        "network": "ws",
        "wsSettings": {
        "path": "/phpmyadmin"
        }
      },
      "tag": "proxy"
    },
    {
      "listen": "127.0.0.1",
      "port": 10085,
      "protocol": "dokodemo-door",
      "settings": {
        "address": "127.0.0.1"
      },
      "tag": "api"
    }
  ],
  "outbounds": [
    {
      "protocol": "freedom"
    }
  ],
  "routing": {
    "rules": [
      {
        "type": "field",
        "inboundTag": [
          "api"
        ],
        "outboundTag": "api"
      }
    ],
    "strategy": "rules"
  },
  "policy": {
    "levels": {
      "0": {
        "statsUserUplink": true,
        "statsUserDownlink": true
      }
    },
    "system": {
      "statsInboundUplink": true,
      "statsInboundDownlink": true
    }
  },
  "ssrpanel": {
    "nodeId": 1,
    "checkRate": 60,
    "user": {
      "inboundTag": "proxy",
      "level": 0,
      "alterId": 16,
      "security": "none"
    },
    "mysql": {
      "host": "面板所在机器的公网IP",
      "port": 3306,
      "user": "root",
      "password": "数据库ROOT密码",
      "dbname": "ssrpanel"
    }
  }
}
如果使用WebSocket这种方法,并且和面板在同一台机器内部署,那就肯定只能去用Nginx实现了:
nano /etc/nginx/conf.d/v2raywebsocket.conf
写入:
server {
    listen       443 ssl http2;
    server_name  moon.koko.cat;

    ssl_certificate    /etc/nginx/certs/moon.koko.cat/fullchain.cer;
    ssl_certificate_key    /etc/nginx/certs/moon.koko.cat/moon.koko.cat.key;
    ssl_protocols TLSv1 TLSv1.1 TLSv1.2;
    ssl_ciphers ECDHE-RSA-AES128-GCM-SHA256:HIGH:!aNULL:!MD5:!RC4:!DHE;
    ssl_prefer_server_ciphers on;
    ssl_session_cache shared:SSL:10m;
    ssl_session_timeout 10m;
    error_page 497  https://$host$request_uri;

location /phpmyadmin {
    proxy_pass       http://127.0.0.1:10086;
    proxy_redirect             off;
    proxy_http_version         1.1;
    proxy_set_header Upgrade   $http_upgrade;
    proxy_set_header Connection "upgrade";
    proxy_set_header Host      $http_host;
    }
}
然后用acme的standalone模式申请一个证书:
systemctl stop nginx
cd ~/.acme.sh && ./acme.sh --issue -d moon.koko.cat --standalone
mkdir -p /etc/nginx/certs/moon.koko.cat
和之前一样安装证书:
./acme.sh --install-cert -d moon.koko.cat \
--key-file /etc/nginx/certs/moon.koko.cat/moon.koko.cat.key \
--fullchain-file /etc/nginx/certs/moon.koko.cat/fullchain.cer \
--reloadcmd "systemctl force-reload nginx.service"
最后启动Nginx:
systemctl start nginx
如果是在别的节点安装的话就可以用Caddy代替Nginx了,Caddy配置简单方便,并且支持自动申请SSL证书/续期,一键安装:
curl https://getcaddy.com | bash -s personal
创建caddy配置文件存放目录和ssl证书存放目录编辑配置文件:
mkdir -p /etc/caddy && mkdir -p /etc/ssl/caddy
新建一个配置文件:
nano /etc/caddy/Caddyfile
写入:
sun.koko.cat {
	log stdout
	tls example@qq.com
	proxy /phpmyadmin localhost:10086 {
		websocket
		header_upstream -Origin
	}
}
创建Systemd服务文件:
nano /etc/systemd/system/caddy.service
写入:
[Unit]
Description=Caddy HTTP/2 web server
Documentation=https://caddyserver.com/docs
After=network-online.target
Wants=network-online.target systemd-networkd-wait-online.service

[Service]
Restart=on-abnormal
User=root
Group=root
Environment=CADDYPATH=/etc/ssl/caddy
ExecStart=/usr/local/bin/caddy -log stdout -agree=true -conf=/etc/caddy/Caddyfile
ExecReload=/bin/kill -USR1 \$MAINPID
KillMode=mixed
KillSignal=SIGQUIT
TimeoutStopSec=5s

[Install]
WantedBy=multi-user.target
启动:
systemctl start caddy
systemctl enable caddy


loc是啥?
hostloc,全球最大的mjj论坛。
现在ss节点的太容易封了,推荐个自用的V2ray和Trojan协议的梯子,不容易封,还能刷奈飞,客服售后给力
https://xbsj4621.fun/i/ems045
大家可以试试
机场一直亏本,,,就倒闭了。。。嘤嘤嘤
没想到你也开过机场。。。
这个v2ray能用在sspanel吗
大佬,貌似你的站被放出来了,教育网 DNS是阿里和清华的DNS可以直接访问了

到目前我一共监测到有3次放出来过,估计都是抽风,最长的一次大概大部分地区放出来10个小时左右,然后又被关回去了。。
PS:教育网是个很神奇的网络= =
我们学校教育网贼魔幻,谷歌系走IPv6稳得一批,但是访问不少国内网站反而挂梯子更快,不然根本打不开

羡慕还能用教育网的dalao
牛皮,我的站被墙了,恐怕是放不出来了~搞了个新站~惨兮兮
感谢lala分享啊,白嫖看了你的精彩分享好久了,连自己做的牛排wordpress都是用的你推荐的模板,发现了一个很有意思的东西,希望lala可以出一个教程,毕竟真的whmcsbisspanel好太多了,https://github.com/Npist/v2rayMS
这个我搭过,功能方面不是很全,但是个人用还是能用,如果做机场就算了。
鸡场养殖入门到入狱可太真实了
都不想自己搭了,还是机场便宜。5-6块钱一个月,服务器是真的贵,还难得维护
就这样选择安逸了吗。。你要对的起你的名字:瞎折腾。。。
最近在折腾LegendSocks,花钱整了一个本地授权版,SS-Panel基本上没啥好折腾的(宝塔自带的数据库管理真是鸡肋)
宝塔自带的数据库管理千万别用。。我都是直接用phpMyAdmin。。
就是很辣鸡啊。。经常出问题。。
大佬这样配置的v2ray使用的是4.9版本,那么客户端的v2ray什么版本都可以使用吗?
顺便求问按照您得教程搭建好之后发现服务端显示invalid user,已经检查id,alterid,客户端/服务端同步这些问题了,但是还是没有解决,请问还可以从哪些方面排查问题呢?
应该是什么版本都可以用的,我本地客户端正好也是4.9。服务端显示invalid user这个我没遇到过,就不好说明了。。
QAQ大佬能分享下4.9版本的v2ray core和v2rayN吗?我不知道v2rayN用哪个版本合适。。。谢谢大佬~
我搞定了,,,大佬你给的v2ray下tcp配置应该是不含伪装的版本,但是上面给的图是http伪装的。我将ssrpanel里的节点设置为无伪装就可以正常使用了。谢谢大佬!
拉拉这是第几次发机场的教程了2333
不记得了。。。
大佬,能不能通过宝塔来完成操作,看命令有点懵逼,我按照你发的命令操作,到修改php-fpm配置文件的时候,就找不到文件路径了。。。。。
可以用宝塔。
lala能不能分享一下 V2ray的 http/2 的 节点安装与设置啊? http/2 相对安全一些,谢谢啦!
请问 ssr ss v2ray 哪个更好用呢


我觉得好用的你不一定觉得好用啊,自己都试试吧,符合自己的就是最好的。
请问用户账户内只看到订阅栏,看不到节点信息啥情况啊。 管理后台看用户信息都是正常的,用户的匹配信息也是有节点的


这个我没遇到过,可能帮不了你。。
看完老哥的文章..受益匪浅..
只是最后这一部分【如果是在别的节点安装的话就可以用Caddy代替Nginx了】
出了点问题..
全部都按照老哥的步骤来操作之后 单纯的ws是可以连上了..但是只要SSRPANEL网页上节点设置里把tls打开..就连不上了 有点奇怪
现在ss节点的太容易封了,推荐个自用的V2ray和Trojan协议的梯子,不容易封,还能刷奈飞,客服售后给力
https://xbsj4621.fun/i/ems045
大家可以试试
ws+tls一直弄不好

谢邀 已经出来了
罪名是提供非法控制入侵计算机信息系统程序工具罪