qbittorrent-nox-static项目是一个bash脚本,这个脚本可以编译出完全静态的qbittorent-nox二进制文件,这就意味着可以在任意的Linux操作系统上使用qbittorent-nox。
同时项目作者会定期发布编译好的qbittorent-nox二进制文件,不需要我们自己去用脚本编译,要使用的话,基本操作就相当于是下载给个执行权限运行就可以了。
我喜欢用这种方式安装qbittorrent-nox的原因是更新简单,有新版本了下载新的二进制文件替换掉旧的就行,并且可以自由选择libtorrent的版本,作者每次发布新的qbittorrent-nox都会提供依赖于libtorrent1.2或libtorrent2.0的两个版本。有人说1.2好,有人说2.0好,反正切换来去自由= =
创建一个普通用户来运行qbittorent-nox:
useradd -m -d /opt/qbtuser -s /usr/sbin/nologin qbtuser
adduser qbtuser sudo
下载qbittorent-nox二进制文件、给执行权限:
curl -L https://github.com/userdocs/qbittorrent-nox-static/releases/latest/download/x86_64-qbittorrent-nox -o /usr/local/bin/qbittorrent-nox
chmod +x /usr/local/bin/qbittorrent-nox
手动运行一次,按个回车同意软件使用条款,之后按Ctrl+C退出:
sudo -u qbtuser qbittorrent-nox --webui-port=10000
注意事项:
1、由于我的服务器8080端口被占用了,这里我把端口修改成10000了,请注意这个修改是永久生效的,qbittorent会把这个端口信息写到配置文件里面,所以下次启动的时候就不需要指定–webui-port了。
2、较新版本的qbittorrent将Web UI的管理员密码改为随机生成了,并且是直到你在Web UI手动设置好管理员密码后才停止随机生成,也就意味着如果你不在Web UI里面设置管理员密码,那么qbittorrent每次启动的时候都会使用随机生成的管理员密码,所以这次启动生成的随机密码在你按Ctrl+C停止运行后就失效了,不需要去特意记住,后续用systemd放到后台运行的时候会再生成。
新建systemd配置文件:
nano /usr/lib/systemd/system/qbittorrent-nox@.service
写入如下配置:
[Unit]
Description=qBittorrent-nox service for user %I
Documentation=man:qbittorrent-nox(1)
Wants=network-online.target
After=local-fs.target network-online.target nss-lookup.target

[Service]
Type=simple
PrivateTmp=false
User=%i
ExecStart=/usr/local/bin/qbittorrent-nox
TimeoutStopSec=1800

[Install]
WantedBy=multi-user.target
启动:
systemctl start qbittorrent-nox@qbtuser
设置开机自启:
systemctl enable qbittorrent-nox@qbtuser
查看随机生成的管理员密码:
journalctl -u qbittorrent-nox@qbtuser
[可选]用NGINX反向代理qbittorrent Web UI,安装需要的软件包:
apt -y update
apt -y install nginx python3-certbot-nginx
新建NGINX站点配置文件:
nano /etc/nginx/sites-available/qbittorrent
写入如下内容:
server {
    listen 80;
    server_name qb.example.com;
    client_max_body_size 0;

    location / {
        proxy_pass http://127.0.0.1:10000/;
        proxy_http_version 1.1;
        http2_push_preload on;
        proxy_set_header   Host               $proxy_host;
        proxy_set_header   X-Forwarded-For    $proxy_add_x_forwarded_for;
        proxy_set_header   X-Forwarded-Host   $http_host;
        proxy_set_header   X-Forwarded-Proto  $scheme;
        proxy_set_header   X-Real-IP          $remote_addr;
    }
}
启用站点:
ln -s /etc/nginx/sites-available/qbittorrent /etc/nginx/sites-enabled/qbittorrent
签发TLS证书:
certbot --nginx --email example@example.com --agree-tos --no-eff-email
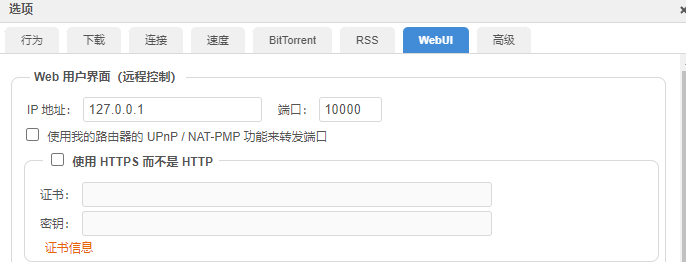
登录Web UI将监听地址修改为127.0.0.1:
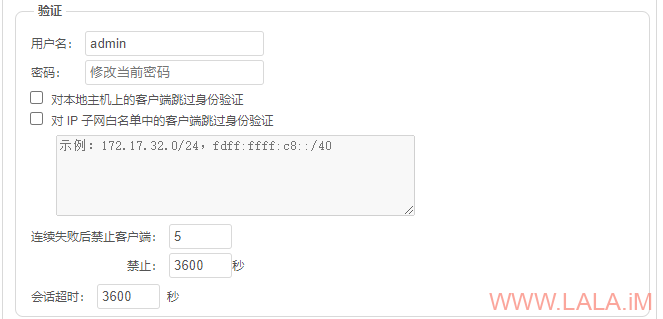
别忘了设置管理员密码:
重启生效:
systemctl restart qbittorrent-nox@qbtuser
[可选]安装VueTorrent主题:
cd /opt/qbtuser
sudo -u qbtuser curl -L https://github.com/VueTorrent/VueTorrent/releases/download/v2.15.0/vuetorrent.zip -o vuetorrent.zip
sudo -u qbtuser unzip vuetorrent.zip
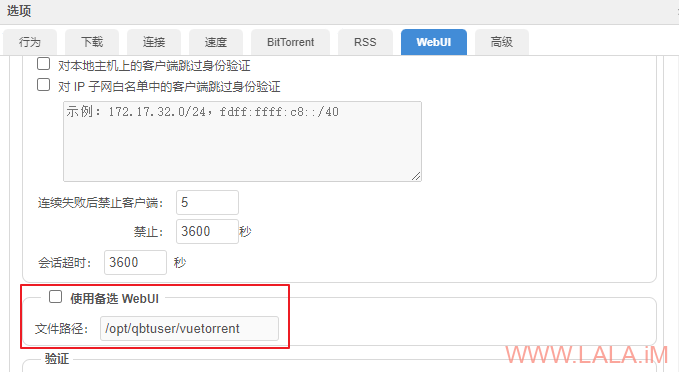
启用备选Web UI,路径填写:/opt/qbtuser/vuetorrent
qbittorrent-nox配置文件均在如下目录:
/opt/qbtuser/.config/qBittorrent
qbittorrent-nox默认下载目录:
/opt/qbtuser/Downloads
 荒岛
荒岛



![陈一发歌曲合集[45G]-荒岛](https://lala.im/wp-content/uploads/2019/02/37809906_871038629751743-220x150.jpg)



lala最近怎么这么高产
qbittorent有套皮肤叫 “洪流”挺不错的
已知qb的webui皮肤列表:https://github.com/qbittorrent/qBittorrent/wiki/List-of-known-alternate-WebUIs
这个评论框有点意思,是开源的嘛? 想整一个
想整一个 
主题自带的,表情是插件来着。。
我的环境是树莓派4B上安装的kali,再执行`qbittorrent-nox –webui-port=10000`时,报`/usr/local/bin/qbittorrent-nox: 2: Syntax error: word unexpected (expecting “)”)`.新建一个用户是必要步骤吗?我用kali用户不行?应该不是这原因把?