
在CentOS7上编译安装Deluge2.0就有点麻烦了,肯定是没Debian系那么轻松的。因为CentOS7没有Python3,这个得我们自己手动装,其次gcc编译器的版本过低不支持最新的libtorrent1.2,而这些还不是最难受的,最难受的是Boost库的版本也过低,所以你懂的。。
先装个Python3吧,CentOS7安装Python3还是挺方便的,EPEL源里面就自带了Python3.6,这版本比Debian9还新:
yum -y install epel-release
yum -y install python36 python36-pip python36-devel
然后安装高版本的gcc,为保证原系统环境不受破坏,直接用scl源里面的工具包就好了,这个工具特别方便,可以随意切换gcc的版本,终端一旦退出就还原设置:
yum -y install centos-release-scl
yum -y install devtoolset-7-gcc*
scl enable devtoolset-7 bash
下载boost源码解压:
yum -y install wget zlib-devel bzip2-devel
wget https://dl.bintray.com/boostorg/release/1.70.0/source/boost_1_70_0.tar.gz
tar -xzvf boost_1_70_0.tar.gz
cd boost_1_70_0
构建参数如下:
./bootstrap.sh --with-libraries=all --with-python=/usr/bin/python3 --with-python-root=/usr/lib64/python3.6 --with-python-version=3.6
编辑如下文件:
nano project-config.jam
默认你应该可以看到下面这一段配置:
{
    using python : 3.6 : /usr/lib64/python3.6 ;
}
改为:
{
    using python : 3.6 : /usr/lib64/python3.6 : /usr/include/python3.6m : /lib ;
}
编译并安装:
./b2 cxxflags="--std=c++11" -j8
./b2 install --prefix=/usr
ldconfig -v
接下来安装编译libtorrent所需的依赖/包:
yum -y install qt-devel qt5-qtbase-devel openssl-devel \
qt5-linguist GeoIP GeoIP-devel gettext intltool
编译libtorrent1.2:
wget https://github.com/arvidn/libtorrent/releases/download/libtorrent-1_2_1/libtorrent-rasterbar-1.2.1.tar.gz
tar -xzvf libtorrent-rasterbar-1.2.1.tar.gz
cd libtorrent-rasterbar-1.2.1
./configure --prefix=/usr --enable-encryption --enable-python-binding --with-libiconv --with-libgeoip=system CXXFLAGS=-std=c++11 PYTHON=/usr/bin/python3
make -j8
make install
ldconfig -v
ln -s /usr/lib/pkgconfig/libtorrent-rasterbar.pc /usr/lib64/pkgconfig/libtorrent-rasterbar.pc
ln -s /usr/lib/libtorrent-rasterbar.so.10 /usr/lib64/libtorrent-rasterbar.so.10
使用pip3安装Deluge所需的依赖/包:
pip3 install twisted pyopenssl simplejson pyxdg chardet geoip setproctitle pillow mako service_identity
编译安装Deluge2.0.3:
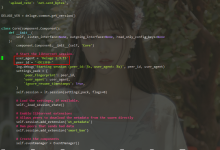
wget https://ftp.osuosl.org/pub/deluge/source/2.0/deluge-2.0.3.tar.xz
tar -xJf deluge-2.0.3.tar.xz
cd deluge-2.0.3
python3 setup.py build
python3 setup.py install
新建deluged的systemd服务:
nano /etc/systemd/system/deluged.service
写入:
[Unit]
Description=Deluge Bittorrent Client Daemon
Documentation=man:deluged
After=network-online.target
[Service]
Type=simple
User=root
Group=root
UMask=007
ExecStart=/usr/local/bin/deluged -d
Restart=on-failure
# Time to wait before forcefully stopped.
TimeoutStopSec=300
[Install]
WantedBy=multi-user.target
新建deluge-web的systemd服务:
nano /etc/systemd/system/deluge-web.service
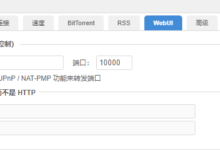
写入(注意现在Deluge的WEBUI也需要加上-d才是以daemon的方式运行):
[Unit]
Description=Deluge Bittorrent Client Web Interface
Documentation=man:deluge-web
After=network-online.target deluged.service
Wants=deluged.service
[Service]
Type=simple
User=root
Group=root
UMask=027
# This 5 second delay is necessary on some systems
# to ensure deluged has been fully started
ExecStartPre=/bin/sleep 5
ExecStart=/usr/local/bin/deluge-web -d
Restart=on-failure
[Install]
WantedBy=multi-user.target
管理命令:
systemctl start deluged
systemctl start deluge-web
systemctl enable deluged
systemctl enable deluge-web
未完待续,我其实早就不用这种方式去装挂PT的软件了,麻烦不说还不能一劳永逸。所以我早就全套使用Docker了。。这些只是我熟悉下流程,往后好写Dockerfile。。所以接下来是Docker方面的部署方法了。。


我都是直接用doubi的Cloud Torrent 太tm懒了
太tm懒了
这是给挂PT的人用的,如果是普通用户,我也会选择CloudTorrent或者Aria2
博主高产胜母猪啊。佩服
楼主有冇计划发布centos 8的教程?
用centos做seedbox的人实在太少,找不到教程啊
centos8我可能还要熟悉一哈,这个版本变动挺大的。