
前言
要学习Ceph首先得了解这个分布式存储系统的各个组件,每个组件的具体作用是什么,知道了这些之后,在后续的操作中才不至于摸不着头脑。这里简要介绍一下本文会用到的几个组件:
MON全称Ceph Monitor,顾名思义即监视器,主要作用是监控各个组件的工作状态。
OSD全称Object Storage Device,也就是负责响应客户端请求返回具体数据的进程。一般一个硬盘对应一个OSD Daemon进程。
RGW全称RADOS gateway,是Ceph对外提供的对象存储服务,接口与S3和Swift兼容。(高级用法,本文不介绍这个233)
RBD全称RADOS block device,是Ceph对外提供的块设备服务。
MDS全称Ceph Metadata Server,是CephFS服务依赖的元数据服务。
CephFS全称Ceph File System,是Ceph对外提供的文件系统服务。
Ceph Pool,是Ceph实际存储数据时的逻辑分区。
还有一些本文没涉及到的就不介绍了,初学者知道这些就足够了。
集群环境搭建
本人使用的环境是Ubuntu18.04宿主机安装KVM虚拟化,使用KVM虚拟出4台机器,一台用作mon(管理节点)三台osd(存储节点)同时mon也安装MDS服务。
4台虚拟机均使用CentOS-7-x86_64-Minimal原版iso,mon管理节点的ip为:243,其他三台osd节点ip为:244/245/246。
关于在Ubuntu18.04搭建KVM虚拟化环境可以看我之前的文章,这里不重复叙述了:
下载iso镜像:
cd /var/lib/libvirt/boot
wget http://isoredirect.centos.org/centos/7/isos/x86_64/CentOS-7-x86_64-Minimal-1810.iso
创建第一台管理节点MON:
virt-install \
--virt-type=kvm \
--name=centos7-mon \
--vcpus=4 \
--ram=4096 \
--network=bridge=br0,model=virtio \
--cdrom=/var/lib/libvirt/boot/CentOS-7-x86_64-Minimal-1810.iso \
--disk path=/var/lib/libvirt/images/centos7-mon-vm-disk1.qcow2,size=10,bus=virtio,cache=writeback,format=qcow2 \
--graphics=vnc
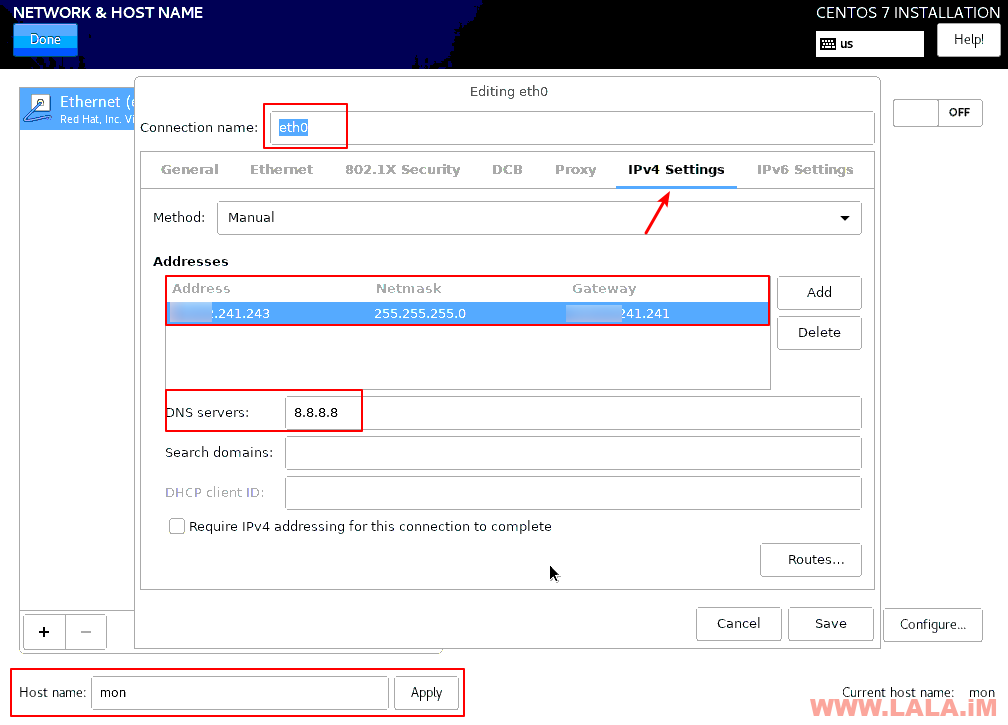
通过VNC进行图形化安装的时候,手动配置好这台机器的IP和hostname:
分区:

安装完成之后把第一台机器关机:
virsh shutdown centos7-mon
这里为节省时间,直接通过第一台虚拟机克隆三台OSD节点机器出来:
virt-clone -o centos7-mon -n centos7-osd1 --auto-clone
virt-clone -o centos7-mon -n centos7-osd2 --auto-clone
virt-clone -o centos7-mon -n centos7-osd3 --auto-clone
创建三块附加硬盘,直接全部分配不要用预分配,为节省时间这里只创建三个大小为20G的:
cd /var/lib/libvirt/images
qemu-img create -o preallocation=full -f qcow2 centos7-osd1-vm-disk2-20g.qcow2 20G
qemu-img create -o preallocation=full -f qcow2 centos7-osd2-vm-disk2-20g.qcow2 20G
qemu-img create -o preallocation=full -f qcow2 centos7-osd3-vm-disk2-20g.qcow2 20G
附加第二块硬盘到OSD1:
virsh attach-disk centos7-osd1 \
--source /var/lib/libvirt/images/centos7-osd1-vm-disk2-20g.qcow2 \
--cache writeback \
--targetbus virtio \
--target vdb \
--persistent
附加第二块硬盘到OSD2:
virsh attach-disk centos7-osd2 \
--source /var/lib/libvirt/images/centos7-osd2-vm-disk2-20g.qcow2 \
--cache writeback \
--targetbus virtio \
--target vdb \
--persistent
附加第二块硬盘到OSD3:
virsh attach-disk centos7-osd3 \
--source /var/lib/libvirt/images/centos7-osd3-vm-disk2-20g.qcow2 \
--cache writeback \
--targetbus virtio \
--target vdb \
--persistent
单个开启虚拟机(不要一次性全部都开机,因为我使用的是手动分配IP,克隆机器的IP和原机器IP一样,这样会导致IP冲突)
virsh start centos7-osd1
virsh start centos7-osd2
virsh start centos7-osd3
分别编辑三台虚拟机内的网卡配置文件:
nano /etc/sysconfig/network-scripts/ifcfg-eth0
分别将三台OSD的机器IP更改为:
IPADDR="xxx.xxx.241.244"
IPADDR="xxx.xxx.241.245"
IPADDR="xxx.xxx.241.246"
重启网络使其生效:
systemctl restart network
最后启动MON管理节点:
virsh start centos7-mon
最终确认4台虚拟机的运行状态:
root@ubuntu:~# virsh list --all
 Id    Name                           State
----------------------------------------------------
 4     centos7-osd2                   running
 5     centos7-osd3                   running
 6     centos7-osd1                   running
 7     centos7-mon                    running
分别在三台OSD虚拟机内确认当前硬盘状态,应该都是这样,即/dev/vdb没有任何分区:
[root@mon ~]# fdisk -l

Disk /dev/vda: 10.7 GB, 10737418240 bytes, 20971520 sectors
Units = sectors of 1 * 512 = 512 bytes
Sector size (logical/physical): 512 bytes / 512 bytes
I/O size (minimum/optimal): 512 bytes / 512 bytes
Disk label type: dos
Disk identifier: 0x000b796a

   Device Boot      Start         End      Blocks   Id  System
/dev/vda1   *        2048     1050623      524288   83  Linux
/dev/vda2         1050624    18874367     8911872   83  Linux
/dev/vda3        18874368    20971519     1048576   82  Linux swap / Solaris

Disk /dev/vdb: 21.5 GB, 21478375424 bytes, 41949952 sectors
Units = sectors of 1 * 512 = 512 bytes
Sector size (logical/physical): 512 bytes / 512 bytes
I/O size (minimum/optimal): 512 bytes / 512 bytes
而MON管理节点的硬盘状态则是单盘,后续我们在实际使用的时候就把这台MON管理节点同时当作客户端:
[root@mon ~]# fdisk -l

Disk /dev/vda: 10.7 GB, 10737418240 bytes, 20971520 sectors
Units = sectors of 1 * 512 = 512 bytes
Sector size (logical/physical): 512 bytes / 512 bytes
I/O size (minimum/optimal): 512 bytes / 512 bytes
Disk label type: dos
Disk identifier: 0x000b796a

   Device Boot      Start         End      Blocks   Id  System
/dev/vda1   *        2048     1050623      524288   83  Linux
/dev/vda2         1050624    18874367     8911872   83  Linux
/dev/vda3        18874368    20971519     1048576   82  Linux swap / Solaris
使用ceph-deploy部署集群
现在编辑MON虚拟机内的Hosts配置文件:
vi /etc/hosts
在里面添加所有OSD的Host:
127.0.0.1   localhost localhost.localdomain localhost4 localhost4.localdomain4
::1         localhost localhost.localdomain localhost6 localhost6.localdomain6
xxx.xxx.241.243 mon
xxx.xxx.241.244 osd1
xxx.xxx.241.245 osd2
xxx.xxx.241.246 osd3
修改所有OSD虚拟机的主机名与MON管理节点内Hosts指定的名字对应:
hostnamectl set-hostname osd1
hostnamectl set-hostname osd2
hostnamectl set-hostname osd3
重启所有OSD虚拟机:
reboot
重启完成之后,在MON管理节点内测试所有OSD是否能够正常通信:
ping -c 2 osd1
ping -c 2 osd2
ping -c 2 osd3
在每个虚拟机内关闭防火墙和SELinux:
systemctl stop firewalld
systemctl disable firewalld
sed -i 's/SELINUX=enforcing/SELINUX=disabled/g' /etc/selinux/config
setenforce 0
在每个虚拟机内更新系统并在MON管理节点安装EPEL源:
yum -y update
yum -y install epel-release
在每个虚拟机内安装NTP服务:
yum -y install ntp ntpdate ntp-doc
systemctl start ntpd
systemctl enable ntpd
在每个虚拟机内安装SSHSERVER/SUDO(使用原生CentOS7iso安装的系统这步应该可以省略,系统内应该已经自带了这些:)
yum -y install openssh-server sudo
systemctl start sshd
systemctl enable sshd
在每个虚拟机内创建一个新的ceph用户:
useradd -d /home/cephuser -m cephuser
passwd cephuser
在每个虚拟机内配置刚新建的用户能够无密码使用SUDO:
echo "cephuser ALL = (root) NOPASSWD:ALL" | tee /etc/sudoers.d/cephuser
chmod 0440 /etc/sudoers.d/cephuser
回到MON管理节点内生成cephuser用户的SSH密钥对:
su - cephuser
ssh-keygen # 全部回车
将MON管理节点的公钥拷贝到所有OSD节点:
ssh-copy-id cephuser@osd1
ssh-copy-id cephuser@osd2
ssh-copy-id cephuser@osd3
在MON内将所有OSD的Host和登录用户做一个指定:
vi ~/.ssh/config
配置如下:
Host mon
   Hostname mon
   User cephuser
Host osd1
   Hostname osd1
   User cephuser
Host osd2
   Hostname osd2
   User cephuser
Host osd3
   Hostname osd3
   User cephuser
修改一下配置文件的权限:
chmod 600 ~/.ssh/config
在MON管理节点安装ceph-deploy:
sudo yum -y install python-pip
sudo pip install ceph-deploy
开始使用ceph-deploy创建你的第一个集群:
mkdir imlala-cluster && cd imlala-cluster
创建一个新集群:
ceph-deploy new mon --public-network xxx.xxx.241.0/24
安装ceph软件包到各个节点:
ceph-deploy install mon osd1 osd2 osd3
初始化集群:
ceph-deploy mon create-initial
将配置文件拷贝到各个节点:
ceph-deploy admin mon osd1 osd2 osd3
修改管理节点中如下文件的权限,否则ceph集群无法正常工作:
sudo chmod +r /etc/ceph/ceph.client.admin.keyring
将管理器守护程序部署到MON:
ceph-deploy mgr create mon
现在创建三个OSD:
ceph-deploy osd create osd1 --data /dev/vdb
ceph-deploy osd create osd2 --data /dev/vdb
ceph-deploy osd create osd3 --data /dev/vdb
此时检查ceph集群状态:
ceph -s
应该可以看到HEALTH_OK,一个mon/mgr以及三个osd共60G的集群正常工作中:
[cephuser@mon imlala-cluster]$ ceph -s
  cluster:
    id:     d201a076-42d9-408b-8f8b-30215a0268e7
    health: HEALTH_OK

  services:
    mon: 1 daemons, quorum mon
    mgr: mon(active)
    osd: 3 osds: 3 up, 3 in

  data:
    pools:   0 pools, 0 pgs
    objects: 0  objects, 0 B
    usage:   3.0 GiB used, 57 GiB / 60 GiB avail
    pgs:
初步了解pool和ceph中的各种模块
接下来让我们一起创建一个测试pool:
按照官方的建议pg_num/pgp_num的值根据OSD的多少计算。少于5个设置为128,5-10个设置为512,10-50个设置为1024,超过50个则要手动计算,我们只有3个,所以这里设置为128:
ceph osd pool create imlala 128 128
关于pg的详细介绍和计算方法:http://docs.ceph.com/docs/master/rados/operations/placement-groups/
有创建就有删除,如果我们要删除刚才创建的pool呢?默认情况下ceph是不允许直接删除pool的,我们需要在管理节点启用一个标志来允许:
ceph tell mon.* injectargs --mon-allow-pool-delete=true
这时候我们就可以删除了:
ceph osd pool delete imlala imlala --yes-i-really-really-mean-it
建议是删除完成之后恢复之前的标志:
ceph tell mon.* injectargs --mon-allow-pool-delete=false
在MON管理节点查询当前可用的模块:
ceph mgr module ls
列出:
{
    "enabled_modules": [
        "balancer",
        "iostat",
        "restful",
        "status"
    ],
    "disabled_modules": [
        {
            "name": "dashboard",
            "can_run": true,
            "error_string": ""
        },
        {
            "name": "hello",
            "can_run": true,
            "error_string": ""
        },
        {
            "name": "influx",
            "can_run": false,
            "error_string": "influxdb python module not found"
        },
        {
            "name": "localpool",
            "can_run": true,
            "error_string": ""
        },
        {
            "name": "prometheus",
            "can_run": true,
            "error_string": ""
        },
        {
            "name": "selftest",
            "can_run": true,
            "error_string": ""
        },
        {
            "name": "smart",
            "can_run": true,
            "error_string": ""
        },
        {
            "name": "telegraf",
            "can_run": true,
            "error_string": ""
        },
        {
            "name": "telemetry",
            "can_run": true,
            "error_string": ""
        },
        {
            "name": "zabbix",
            "can_run": true,
            "error_string": ""
        }
    ]
}
这里我们可以尝试开启一个dashboard模块,这个模块用处很大(这也是带你熟悉mgr管理器的用法之一):
ceph mgr module enable dashboard
自签一个证书:
ceph dashboard create-self-signed-cert
设置WEB控制台账号密码:
ceph dashboard set-login-credentials imlala password
现在访问MON管理节点的公网IP+端口8443(Https协议)应该可以访问到控制台界面:
https://xxx.xxx.241.243:8443/
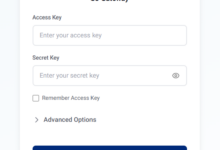
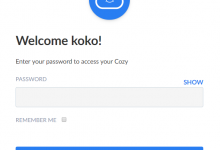
如果一切正常,你将可以看到登录界面,登录账号/密码是你刚才创建的:

RBD块设备的使用
使用ceph最常用的两种方式:RBD块设备挂载以及CephFS文件系统挂载。首先我们这里演示RBD块设备的配置。
首先还是创建pool:
ceph osd pool create imlalarbd 128 128
初始化pool以供rbd使用:
rbd pool init imlalarbd
创建rbd映像:
rbd create imlalaimage -p imlalarbd --image-feature layering --size 40960
如果要删除rbd映像:
rbd remove imlalaimage -p imlalarbd
映射rbd映像:
sudo rbd map imlalaimage -p imlalarbd
映射成功后会回显给你一个块设备名:
/dev/rbd0
那么接下来我们就可以格式化这个设备了,这里我建议是使用xfs:
sudo mkfs.xfs /dev/rbd0
创建挂载目录:
sudo mkdir /mnt/rbd0
挂载rbd设备开始使用:
sudo mount /dev/rbd0 /mnt/rbd0
查看挂载是否成功,一个40G的ceph块设备就能正常使用了:
[cephuser@mon imlala-cluster]$ df -h
Filesystem      Size  Used Avail Use% Mounted on
/dev/vda2       8.3G  1.7G  6.2G  22% /
devtmpfs        1.9G     0  1.9G   0% /dev
tmpfs           1.9G     0  1.9G   0% /dev/shm
tmpfs           1.9G   33M  1.9G   2% /run
tmpfs           1.9G     0  1.9G   0% /sys/fs/cgroup
/dev/vda1       488M  133M  320M  30% /boot
tmpfs           379M     0  379M   0% /run/user/0
/dev/rbd0        40G   33M   40G   1% /mnt/rbd0
关于pool的一点小扩展
这里我要特别提醒一下的是,别看到这个40G你就真以为我们可以用到40G的大小,实际上这个数字是没有什么用处的,真正的可用容量是pool的容量。
我们这个/dev/rbd0实际上对应的pool是imlalarbd,如果imlalarbd内的容量只有20G,那么这个/dev/rbd0的设备也就最多只能存储20G的数据。
同时我们使用的模式是复制模式,那么就相当于这60G的集群实际可用的容量只有20G,你可以理解为1份数据复制3份保存到各个OSD。
有没有什么办法调整一下这个呢?比如我们只想复制两份数据而不是三份,该如何做?准确点说在ceph中通过多个OSD复制保存数据的备份行为应该叫作:副本。
在pool创建之后我们就可以设置这个副本值,首先我们可以通过下面的命令查看一下当前的pool副本数量:
ceph osd pool get imlalarbd size
接着通过下面的命令修改副本数量:
ceph osd pool set imlalarbd size 2
CephFS/MDS的用法
接下来我来演示cephFS文件系统的使用方法。在文章开始的时候我就提到过cephFS是离不开MDS的,所以要使用cephFS就首先得部署一个MDS服务在集群内。
由于机器有限,这里MDS服务我还是直接部署在MON管理节点上,那么首先就创建一个MDS服务:
ceph-deploy mds create mon
接着我们需要创建两个pool,因为在cephFS中文件的数据会分为元数据和实际数据分开保存,那么首先创建一个用于元数据的pool:
ceph osd pool create cephfsmeta 64 64
再创建一个保存实际数据的pool:
ceph osd pool create cephfsdata 64 64
现在就可以创建cephFS文件系统了:
ceph fs new imlalacephfs cephfsmeta cephfsdata
创建完成之后现在我们就可以使用cephFS文件系统了,在你需要挂载的节点机器内新建一个挂载目录(例如我想挂载到OSD3,那么就在OSD3创建目录):
su - cephuser
sudo mkdir /mnt/cephfs
查看密钥:
sudo cat /etc/ceph/ceph.client.admin.keyring
在OSD3节点内挂载:
sudo mount -t ceph xxx.xxx.241.243:6789:/ /mnt/cephfs -o name=admin,secret=AQBpneEcL2VlimlalarhQsi2Dc7lalaimglIfHPIQ==
注:其中的ip是MON管理节点的IP,secret是上一步查看到的密钥。
查看挂载状态:
[cephuser@osd3 ~]$ df -hT
Filesystem            Type      Size  Used Avail Use% Mounted on
/dev/vda2             ext4      8.3G  1.6G  6.3G  21% /
devtmpfs              devtmpfs  1.9G     0  1.9G   0% /dev
tmpfs                 tmpfs     1.9G     0  1.9G   0% /dev/shm
tmpfs                 tmpfs     1.9G   57M  1.8G   3% /run
tmpfs                 tmpfs     1.9G     0  1.9G   0% /sys/fs/cgroup
/dev/vda1             ext4      488M  133M  320M  30% /boot
tmpfs                 tmpfs     1.9G   48K  1.9G   1% /var/lib/ceph/osd/ceph-2
tmpfs                 tmpfs     379M     0  379M   0% /run/user/0
xxx.xx.241.243:6789:/ ceph       15G     0   15G   0% /mnt/cephfs
现在我们可以配置fstab,让cephFS可以随系统启动自动挂载,首先我们要把密钥保存到一个新的key文件内:
sudo ceph-authtool -p /etc/ceph/ceph.client.admin.keyring > ceph.key
chmod 600 ceph.key
编辑fstab配置文件:
sudo vi /etc/fstab
添加:
xxx.xx.241.243:6789:/ /mnt/cephfs ceph name=admin,secretfile=/home/cephuser/ceph.key,noatime,_netdev 0 0
简单测试ceph冗余能力
让我们简单测试一下ceph的冗余能力(副本数默认为3),这里我假设OSD3的硬盘掉了(实际上是我把这台虚拟机关机了。)
首先在关机前我往OSD3的cephFS内通过sysbench写入2G的零散文件:
cd /mnt/cephfs
sysbench --test=fileio --file-total-size=2G prepare
文件写入完成:
[root@osd3 cephfs]# ls
test_file.0    test_file.112  test_file.127  test_file.27  test_file.41  test_file.56  test_file.70  test_file.85
test_file.1    test_file.113  test_file.13   test_file.28  test_file.42  test_file.57  test_file.71  test_file.86
test_file.10   test_file.114  test_file.14   test_file.29  test_file.43  test_file.58  test_file.72  test_file.87
test_file.100  test_file.115  test_file.15   test_file.3   test_file.44  test_file.59  test_file.73  test_file.88
test_file.101  test_file.116  test_file.16   test_file.30  test_file.45  test_file.6   test_file.74  test_file.89
test_file.102  test_file.117  test_file.17   test_file.31  test_file.46  test_file.60  test_file.75  test_file.9
test_file.103  test_file.118  test_file.18   test_file.32  test_file.47  test_file.61  test_file.76  test_file.90
test_file.104  test_file.119  test_file.19   test_file.33  test_file.48  test_file.62  test_file.77  test_file.91
test_file.105  test_file.12   test_file.2    test_file.34  test_file.49  test_file.63  test_file.78  test_file.92
test_file.106  test_file.120  test_file.20   test_file.35  test_file.5   test_file.64  test_file.79  test_file.93
test_file.107  test_file.121  test_file.21   test_file.36  test_file.50  test_file.65  test_file.8   test_file.94
test_file.108  test_file.122  test_file.22   test_file.37  test_file.51  test_file.66  test_file.80  test_file.95
test_file.109  test_file.123  test_file.23   test_file.38  test_file.52  test_file.67  test_file.81  test_file.96
test_file.11   test_file.124  test_file.24   test_file.39  test_file.53  test_file.68  test_file.82  test_file.97
test_file.110  test_file.125  test_file.25   test_file.4   test_file.54  test_file.69  test_file.83  test_file.98
test_file.111  test_file.126  test_file.26   test_file.40  test_file.55  test_file.7   test_file.84  test_file.99
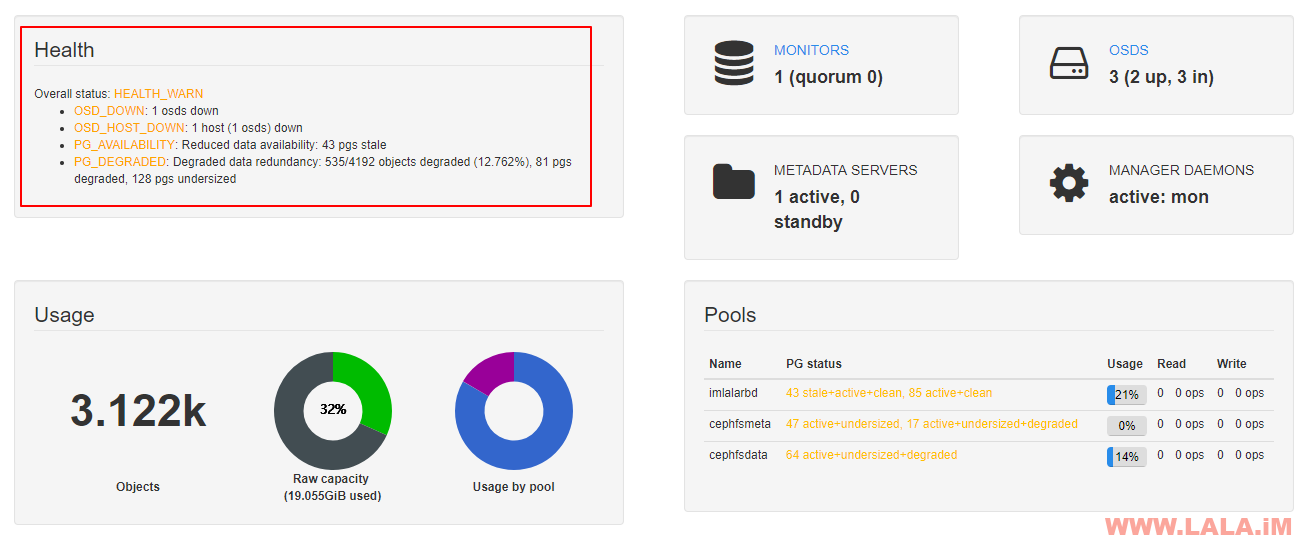
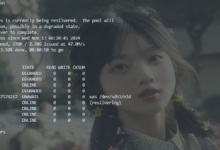
现在将OSD3节点关机,我们可以在WEB控制台看到ceph已经检查到有OSD已经是down状态:
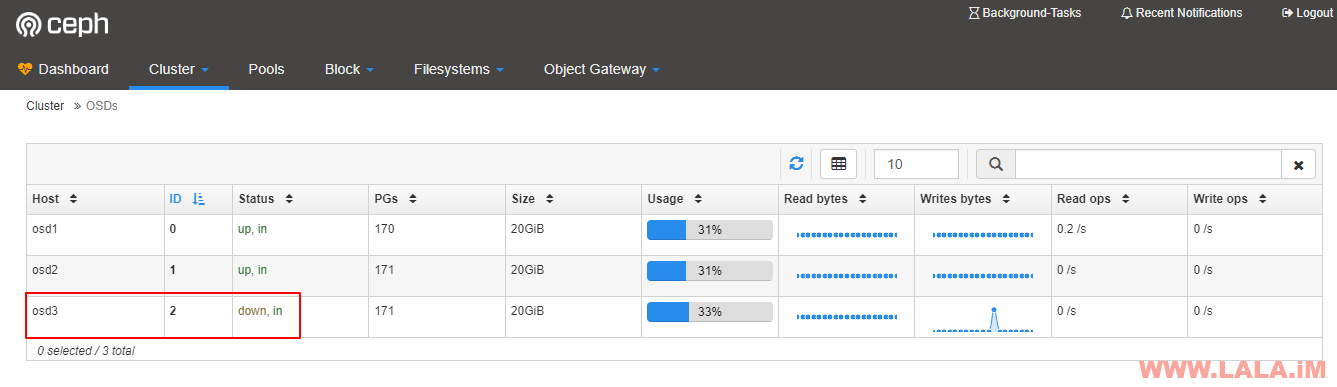
在更详细的页面内可以知道具体是哪个OSD down了:
此时我在OSD2重新挂载之前的cephFS,可以正常挂载:
[root@osd2 cephfs]# df -hT
Filesystem            Type      Size  Used Avail Use% Mounted on
/dev/vda2             ext4      8.3G  1.5G  6.4G  19% /
devtmpfs              devtmpfs  486M     0  486M   0% /dev
tmpfs                 tmpfs     496M     0  496M   0% /dev/shm
tmpfs                 tmpfs     496M  6.7M  489M   2% /run
tmpfs                 tmpfs     496M     0  496M   0% /sys/fs/cgroup
/dev/vda1             ext4      488M  133M  320M  30% /boot
tmpfs                 tmpfs     496M   24K  496M   1% /var/lib/ceph/osd/ceph-1
tmpfs                 tmpfs     100M     0  100M   0% /run/user/0
xxx.xx.241.243:6789:/ ceph       15G  2.0G   13G  14% /mnt/cephfs
在OSD2上你可以看到数据完好保存并没有丢失:
[root@osd2 cephfs]# ls
test_file.0    test_file.112  test_file.127  test_file.27  test_file.41  test_file.56  test_file.70  test_file.85
test_file.1    test_file.113  test_file.13   test_file.28  test_file.42  test_file.57  test_file.71  test_file.86
test_file.10   test_file.114  test_file.14   test_file.29  test_file.43  test_file.58  test_file.72  test_file.87
test_file.100  test_file.115  test_file.15   test_file.3   test_file.44  test_file.59  test_file.73  test_file.88
test_file.101  test_file.116  test_file.16   test_file.30  test_file.45  test_file.6   test_file.74  test_file.89
test_file.102  test_file.117  test_file.17   test_file.31  test_file.46  test_file.60  test_file.75  test_file.9
test_file.103  test_file.118  test_file.18   test_file.32  test_file.47  test_file.61  test_file.76  test_file.90
test_file.104  test_file.119  test_file.19   test_file.33  test_file.48  test_file.62  test_file.77  test_file.91
test_file.105  test_file.12   test_file.2    test_file.34  test_file.49  test_file.63  test_file.78  test_file.92
test_file.106  test_file.120  test_file.20   test_file.35  test_file.5   test_file.64  test_file.79  test_file.93
test_file.107  test_file.121  test_file.21   test_file.36  test_file.50  test_file.65  test_file.8   test_file.94
test_file.108  test_file.122  test_file.22   test_file.37  test_file.51  test_file.66  test_file.80  test_file.95
test_file.109  test_file.123  test_file.23   test_file.38  test_file.52  test_file.67  test_file.81  test_file.96
test_file.11   test_file.124  test_file.24   test_file.39  test_file.53  test_file.68  test_file.82  test_file.97
test_file.110  test_file.125  test_file.25   test_file.4   test_file.54  test_file.69  test_file.83  test_file.98
test_file.111  test_file.126  test_file.26   test_file.40  test_file.55  test_file.7   test_file.84  test_file.99
通过这个小演练你就可以明白ceph中副本的作用以及cephFS的作用。
这篇文章就写到这里了,关于ceph的基本使用方法就是这些,还有一些高级点的,比如快照功能等。但剩下的大多数就是排障相关,即生产环境中遇到的各种问题,这种环境不好模拟,爱莫能助,说白了就是靠经验的积累,碰到了一个什么错误就记录下解决方法。


问下大佬,使用cat命令写入文本到nginx网站配置文件,输入nginx -t自检命令报错。但是用vim编辑这个nginx网站配置文件,内容不改动,随意增加一个空行再:wq保存,再输入nginx -t自检就通过了。这是不是什么玄学问题啊?有人说是编码问题,问题是cat写入命令默认编码应该是默认的linux编码,应该没有问题啊。用file 命令检查网站配置文件的编码,是ASCII码,编码对的话,用cat命令写入文本应该nginx可以识别,但是就是识别不了,用vi vim nano编辑器随便增加空行再保存,nginx又可以识别了,请问大佬,这是什么情况啊?
玄学问题,你的猫可能病了。。
大佬也在研究ceph了 看到知乎上自建机房的大神,想入坑。
不是dalao,但如果是在家里搞个nas什么的,还是别用这个ceph,这东西是给企业用的。。个人用这个就是找罪受。。而且ceph的性能并不怎么样,不如直接组raid来的实在。
感觉博主这么搞下去就是openstack那一套了。。。高端啊
openstack太复杂了,个人玩不来,前两天我才试着部署了。。