
堪萨斯的辣鸡独服既然每个月只能重装一次,那这个月的先用了再说,找沙雕客服重装了个Ubuntu18.04,正好熟悉一下这个新版本的网络配置。
新版本用Netplan替代了之前的网络配置方法,Netplan使用yaml语法,我并没有觉得这个改变有什么好处,而且很可惜还有BUG让我碰到了,不过也没什么奇怪的,Debian系盲目追新就是给自己没事找事,不是这里有点小BUG就是那里有点问题,习惯就好。
这个还是很不错的,有一个kvm-ok的工具可以检测当前的系统和硬件是否支持KVM:
apt -y install cpu-checker
如下回显就是支持了:
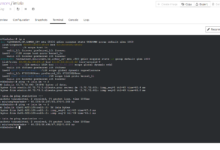
root@ubuntu:~# kvm-ok
INFO: /dev/kvm exists
KVM acceleration can be used
安装KVM相关依赖和包:
apt -y install qemu-kvm libvirt-bin virtinst bridge-utils
这个版本的Ubuntu默认已经是用networkd了,但是因为有bug,所以还是换成networkmanager(这也有bug,只是目前的patch只针对这个做了修复)具体问题参考:
https://superuser.com/questions/1435615/ubuntu-18-04-netplan-with-bridge
https://bugs.launchpad.net/netplan/+bug/1810043
所以这里先把networkmanager装上,附带装一个DHCP服务:
apt -y install patch network-manager isc-dhcp-server
该装的东西装完了,现在就来配置桥接,首先打补丁修bug:
wget https://bugs.launchpad.net/netplan/+bug/1810043/+attachment/5263137/+files/apply.py.patch
patch -d /usr/share/netplan/netplan/cli/commands/ < apply.py.patch
开IPv4转发:
echo "net.ipv4.ip_forward = 1" >> /etc/sysctl.conf && sysctl -p
cat /proc/sys/net/ipv4/ip_forward
查看默认的网卡配置文件:
cat /etc/netplan/01-netcfg.yaml
我的默认配置如下:
network:
  version: 2
  renderer: networkd
  ethernets:
    enp2s0:
      dhcp4: no
      dhcp6: no
      addresses: [xxx.xxx.241.242/29]
      gateway4: xxx.xxx.241.241
      nameservers:
          addresses: [192.187.107.16, 69.30.209.16]
修改网卡配置文件:
nano /etc/netplan/01-netcfg.yaml
改桥接:
network:
  version: 2
  renderer: NetworkManager
  ethernets:
    enp2s0:
      dhcp4: no
      dhcp6: no

  bridges:
    br0:
      interfaces: [enp2s0]
      dhcp4: no
      dhcp6: no
      addresses: [xxx.xxx.241.242/29]
      gateway4: xxx.xxx.241.241
      nameservers:
        addresses: [192.187.107.16, 69.30.209.16]
使新配置生效并重启系统:
netplan apply
reboot
重新登上来之后检查网桥状态:
btctl show
如下回显表示enp2s0已经和br0建立了网桥:
root@ubuntu:~# brctl show
bridge    name bridge id      STP enabled   interfaces
br0       8000.c8600012a252   yes           enp2s0
virbr0    8000.5254009c312f   yes           virbr0-nic
配置DHCP服务器:
nano /etc/dhcp/dhcpd.conf
写入如下配置:
subnet xxx.xxx.241.0 netmask 255.255.255.0 {
  range xxx.xxx.241.243 xxx.xxx.241.246;
  option domain-name-servers 8.8.8.8;
  option routers xxx.xxx.241.241;
  option subnet-mask 255.255.255.0;
  option broadcast-address xxx.xxx.241.247;
  default-lease-time 600;
  max-lease-time 7200;
}
启动DHCP服务:
systemctl start isc-dhcp-server
systemctl enable isc-dhcp-server
启动libvirt:
systemctl start libvirtd.service
systemctl enable libvirtd.service
把vnc监听在外网并设置一个公共的默认vnc密码:
sed -i 's/#vnc_listen = "0.0.0.0"/vnc_listen = "0.0.0.0"/g' /etc/libvirt/qemu.conf
sed -i 's/#vnc_password = "XYZ12345"/vnc_password = "imlala"/g' /etc/libvirt/qemu.conf
重启libvirt使其生效:
systemctl restart libvirtd.service
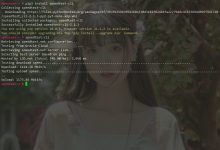
现在尝试开一台虚拟机:
cd /var/lib/libvirt/boot
wget http://isoredirect.centos.org/centos/7/isos/x86_64/CentOS-7-x86_64-Minimal-1810.iso
创建虚拟机:
virt-install \
--virt-type=kvm \
--name=centos7 \
--vcpus=4 \
--ram=4096 \
--network=bridge=br0,model=virtio \
--cdrom=/var/lib/libvirt/boot/CentOS-7-x86_64-Minimal-1810.iso \
--disk path=/var/lib/libvirt/images/centos7.qcow2,size=1000,bus=virtio,cache=writeback,format=qcow2 \
--graphics=vnc
KVM的配置至此全部完成。
下面是LXD的安装和配置,LXD其实还是基于LXC的,只是多了一些新功能。官方建议目前在Ubuntu上部署LXD是使用SNAP:
apt -y install snapd
snap install lxd
初始化:
lxd init
步骤(留空直接回车表示使用默认值):
Would you like to use LXD clustering? (yes/no) [default=no]:
Do you want to configure a new storage pool? (yes/no) [default=yes]:
Name of the new storage pool [default=default]: imlala
Name of the storage backend to use (btrfs, ceph, dir, lvm, zfs) [default=zfs]:
Create a new ZFS pool? (yes/no) [default=yes]:
Would you like to use an existing block device? (yes/no) [default=no]:
Size in GB of the new loop device (1GB minimum) [default=100GB]: 200GB
Would you like to connect to a MAAS server? (yes/no) [default=no]:
Would you like to create a new local network bridge? (yes/no) [default=yes]:
What should the new bridge be called? [default=lxdbr0]:
What IPv4 address should be used? (CIDR subnet notation, “auto” or “none”) [default=auto]:
What IPv6 address should be used? (CIDR subnet notation, “auto” or “none”) [default=auto]:
Would you like LXD to be available over the network? (yes/no) [default=no]: yes
Address to bind LXD to (not including port) [default=all]:
Port to bind LXD to [default=8443]:
Trust password for new clients:
Again:
Would you like stale cached images to be updated automatically? (yes/no) [default=yes]
Would you like a YAML "lxd init" preseed to be printed? (yes/no) [default=no]:
查看所有可用的镜像:
lxc image list images:
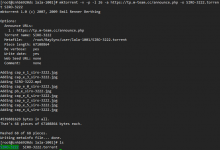
要启动一个容器:
lxc launch images:[发行版]/[版本号]/[架构] [实例名]
例如CentOS7:
lxc launch images:centos/7/amd64 imlala
创建完成之后使用下面的命令可查看运行状态:
lxc list
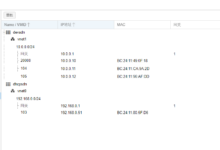
主要是看运行状态和网络情况:
+--------+---------+----------------------+-----------------------------------------------+------------+-----------+
|  NAME  |  STATE  |         IPV4         |                     IPV6                      |    TYPE    | SNAPSHOTS |
+--------+---------+----------------------+-----------------------------------------------+------------+-----------+
| imlala | RUNNING | 10.247.223.80 (eth0) | fd42:b6e6:985a:12d8:216:3eff:fed8:9697 (eth0) | PERSISTENT |           |
+--------+---------+----------------------+-----------------------------------------------+------------+-----------+
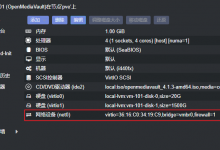
可以看到容器的网络默认情况下是NAT,即小鸡内是没有公网IP的。那我们有公网IP怎么把公网IP直接附加到容器内而不使用NAT呢?其实很简单,之前我们在配置KVM的时候已经建立了一个br0的网桥了,那么这里先把默认用于NAT的网卡lxdbr0给取消绑定:
lxc network detach-profile lxdbr0 default eth0
然后直接把br0给附加上去:
lxc network attach-profile br0 default eth0
重启容器:
lxc restart imlala
稍等片刻DHCP服务就会自动把公网IP分配到小鸡了:
+--------+---------+-----------------------+------+------------+-----------+
|  NAME  |  STATE  |         IPV4          | IPV6 |    TYPE    | SNAPSHOTS |
+--------+---------+-----------------------+------+------------+-----------+
| imlala | RUNNING | xxx.xx.241.244 (eth0) |      | PERSISTENT |           |
+--------+---------+-----------------------+------+------------+-----------+
进入到容器内:
lxc exec imlala bash
常用管理命令:
lxc start containername
lxc stop containername
lxc restart containername
lxc delete containername
本文力争不截一张图,无奈强迫症写到最后还是要搞一张妹子图上来。。


拉拉妹子图哪里找?