介绍
Netbird官方提供了快速部署的一键脚本,但这个脚本会直接占用80、443端口,如果你的服务器还需要运行其他WEB服务的话可以参考下我这篇纯手动部署的文章。
请注意Netbird的手动部署过程非常复杂繁琐,需要改动的配置很多,不是刚需的话个人还是建议用官方的一键脚本部署。
本文选择使用Nginx反代Netbird相关服务,IDP选择使用Authentik。
准备工作
1.一台Linux服务器,系统选择Debian12,内存至少2GB。
2.TCP端口80/443/9000/9443/8011/8012/10000没有被占用。
3.UDP端口3478/49152-65535没有被占用。
4.准备一个域名,配置2个A记录与2个AAAA记录(IPv6需要),本文示例:nb.example.com、sso.example.com
安装需要用到的软件包:
apt -y update
apt -y install wget curl nginx python3-certbot-nginx git jq
安装Docker:
curl -fsSL https://get.docker.com -o get-docker.sh
sh get-docker.sh
获取Netbird源码,切换到包含docker-compose文件的目录:
cd /opt
git clone --depth 1 -b v0.26.3 https://github.com/netbirdio/netbird.git
cd netbird/infrastructure_files/
复制一份配置文件:
cp setup.env.example setup.env
现在暂时把Netbird放在一边,我们需要部署一个IDP服务,Netbird的控制台没有身份验证功能,而是直接使用的外部身份验证服务。
部署Authentik IDP
可以自建的IDP服务非常多,我同时部署过Keycloak和Zitadel,但最终我选择用Authentik,没别的原因,就是这个Authentik的文档写的通俗易懂,部署最简单方便。
新建一个目录下载官方提供的compose文件:
mkdir -p /opt/authentik && cd /opt/authentik && wget https://goauthentik.io/docker-compose.yml
安装一个生成随机密码的小工具:
apt -y install pwgen
生成密码和密匙到.env文件:
echo "PG_PASS=$(pwgen -s 40 1)" >> .env
echo "AUTHENTIK_SECRET_KEY=$(pwgen -s 50 1)" >> .env
启动:
docker compose up -d
配置反向代理:
nano /etc/nginx/sites-available/authentik
写入如下配置:
upstream authentik {
    server 127.0.0.1:9443;
    keepalive 10;
}

map $http_upgrade $connection_upgrade_keepalive {
    default upgrade;
    ''      '';
}

server {
    listen 80;
    listen [::]:80;
    server_name sso.example.com;

    location / {
        proxy_pass https://authentik;
        proxy_http_version 1.1;
        proxy_set_header X-Forwarded-Proto $scheme;
        proxy_set_header X-Forwarded-For $proxy_add_x_forwarded_for;
        proxy_set_header Host $host;
        proxy_set_header Upgrade $http_upgrade;
        proxy_set_header Connection $connection_upgrade_keepalive;
    }
}
启用站点:
ln -s /etc/nginx/sites-available/authentik /etc/nginx/sites-enabled/authentik
签发TLS证书:
certbot --nginx --email example@lala.im --agree-tos --no-eff-email
[重要]再次编辑Authentik的Nginx站点配置文件:
nano /etc/nginx/sites-available/authentik
[重要]启用HTTP2:
...
    listen [::]:443 ssl http2 ipv6only=on; # managed by Certbot
    listen 443 ssl http2; # managed by Certbot
...
[重要]重载Nginx使其生效:
systemctl reload nginx
访问:https://sso.example.com/if/flow/initial-setup/,配置默认的管理员账号和密码。
配置Authentik IDP
先遵循官方的这个文档进行配置:https://docs.netbird.io/selfhosted/identity-providers#authentik,这里我就不重复这些步骤了。务必记下Client ID、Username、Password,后续配置Netbird需要用到。
[备注1]如果你完全按照官方的文档配置,那么Username就是:Netbird(注意大小写)
[备注2]Password是服务账户的密码,不是Authentik管理员账户的密码。
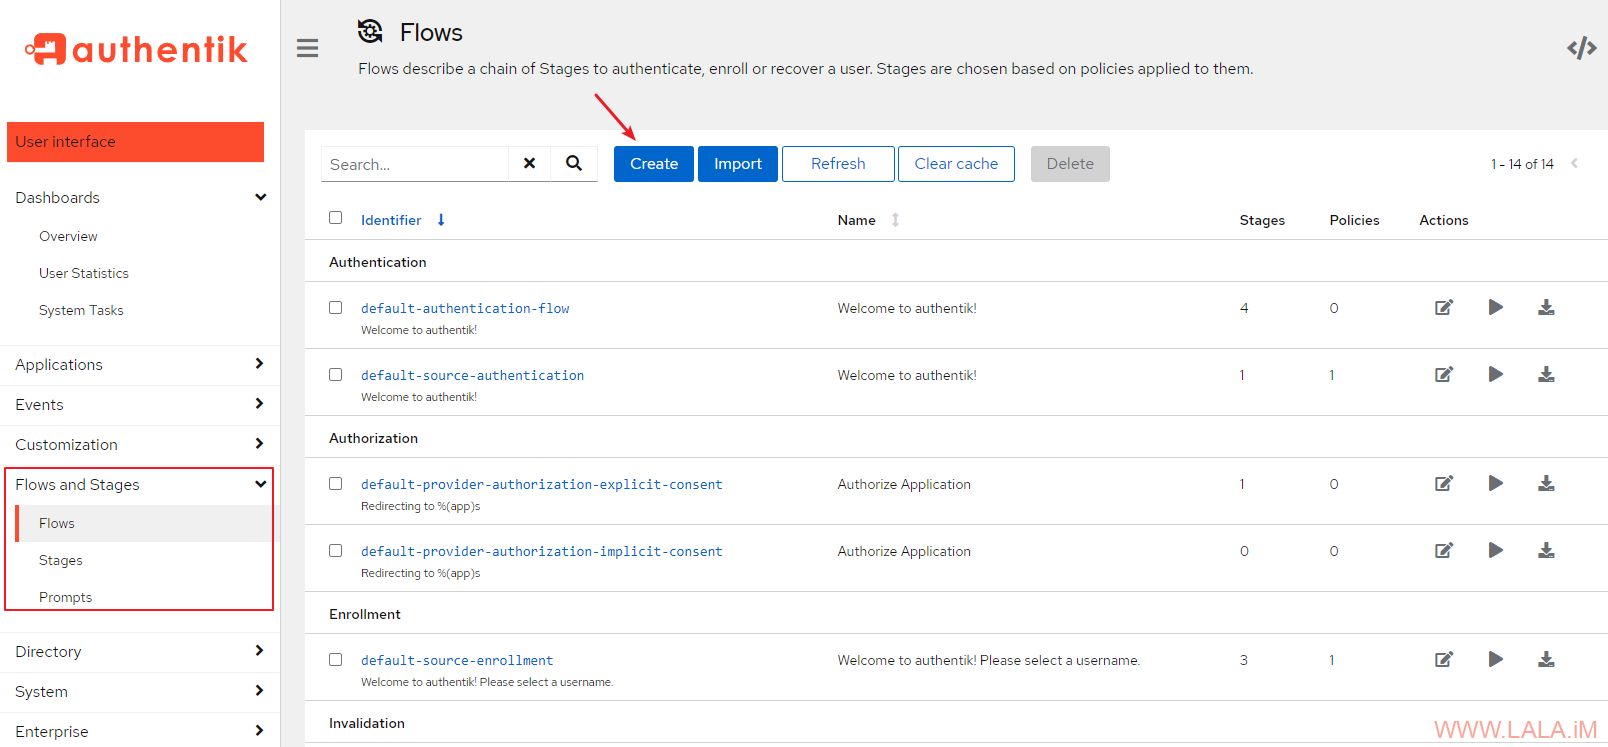
做完官方文档所说的配置后,我们还需要转到Admin interface > Flows and Stages > Flows > Create:
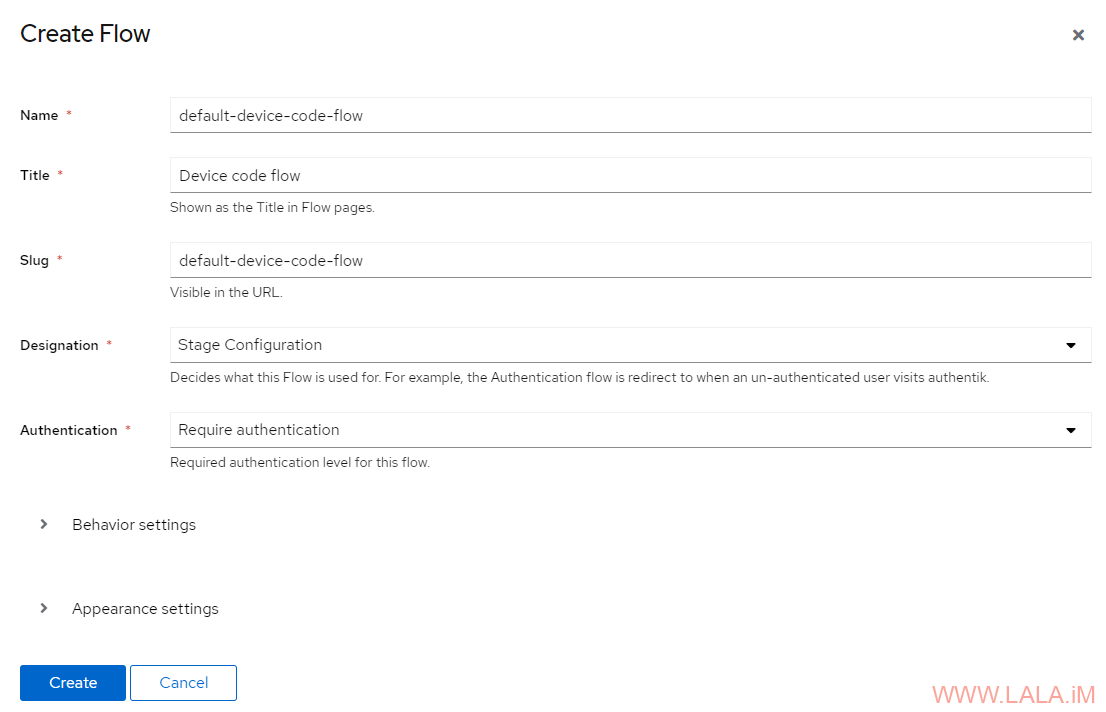
创建一个新的Flow:
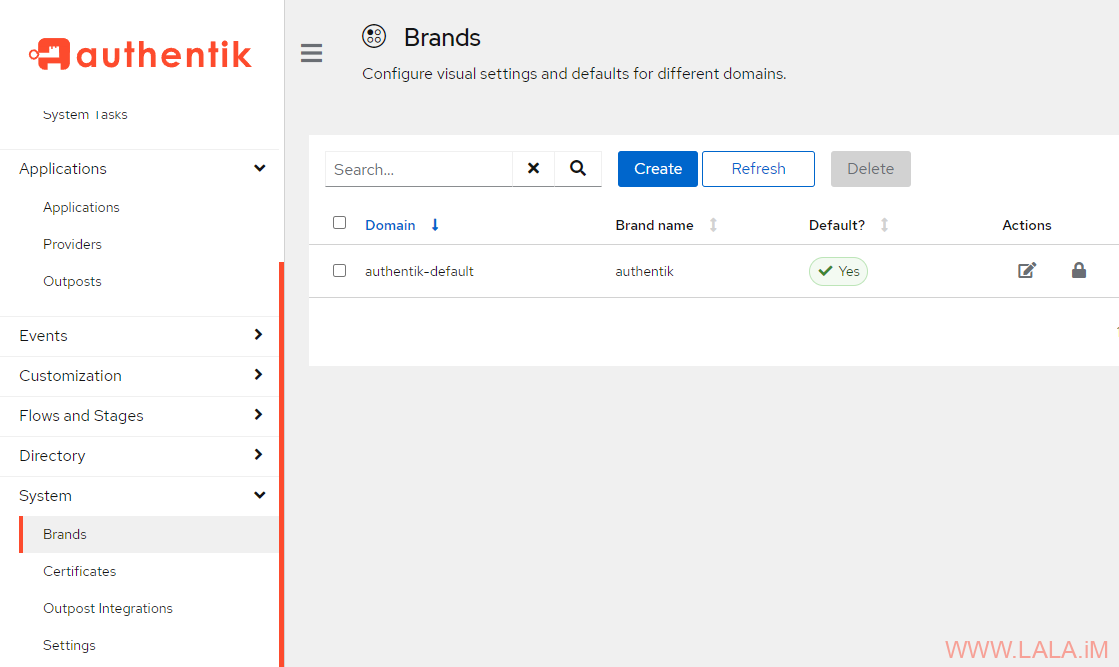
然后转到System > Brands,编辑authentik-default:
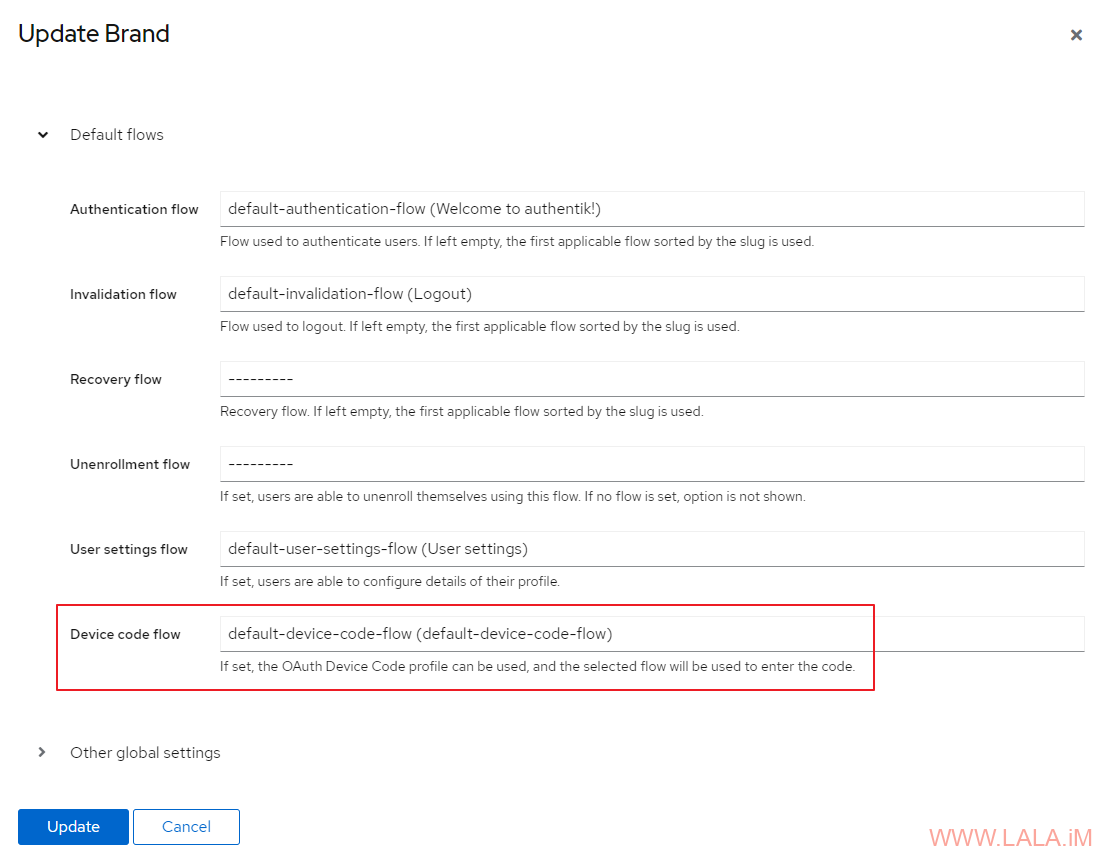
找到Default flows > Device code flow,选择刚才新建的Flow:
务必做好上述这些配置,否则后续Netbird客户端将无法通过URL的方式鉴权。
配置Netbird
现在来继续配置Netbird,我们需要将IDP和一些其他配置信息写入到setup.env,转到如下目录,编辑setup.env文件:
cd /opt/netbird/infrastructure_files/ && nano setup.env
需要修改的内容如下:
NETBIRD_DOMAIN="nb.example.com"
NETBIRD_AUTH_OIDC_CONFIGURATION_ENDPOINT="https://sso.example.com/application/o/netbird/.well-known/openid-configuration"
NETBIRD_AUTH_AUDIENCE="Authentik Client ID"
NETBIRD_AUTH_CLIENT_ID="Authentik Client ID"
NETBIRD_AUTH_SUPPORTED_SCOPES="openid profile email offline_access api"
NETBIRD_USE_AUTH0="false"
NETBIRD_AUTH_DEVICE_AUTH_PROVIDER="none"
NETBIRD_AUTH_DEVICE_AUTH_CLIENT_ID="Authentik Client ID"
NETBIRD_AUTH_DEVICE_AUTH_AUDIENCE="Authentik Client ID"
NETBIRD_AUTH_DEVICE_AUTH_SCOPE="openid"
NETBIRD_AUTH_DEVICE_AUTH_USE_ID_TOKEN=false
NETBIRD_MGMT_IDP="authentik"
NETBIRD_IDP_MGMT_CLIENT_ID="Authentik Client ID"
NETBIRD_IDP_MGMT_CLIENT_SECRET=""
NETBIRD_IDP_MGMT_EXTRA_USERNAME="Netbird"
NETBIRD_IDP_MGMT_EXTRA_PASSWORD="Service Account Password"
NETBIRD_DISABLE_LETSENCRYPT=true
[备注1]用你的域名替换掉nb.example.com、sso.example.com。
[备注2]用你之前配置Authentik时得到的客户端ID替换掉所有与Authentik Client ID相关的内容。
[备注3]用你之前配置Authentik时得到的服务账户密码替换掉Service Account Password。
需要增加的内容如下:
NETBIRD_MGMT_API_PORT=8012
NETBIRD_SIGNAL_PORT=10000
[备注1]这两个环境变量也可以都配置成443,但后续你就得把compose文件内相关容器的外部端口改为Nginx反代所需的端口,这样修改的话就不用改动management.json和dashboard容器的环境变量了,如果你不知道我说的是什么意思,那么就无视这段话,与我的配置保持一致即可。
执行官方提供的配置脚本来生成相应的配置文件:
./configure.sh
完成后转到artifacts目录:
cd artifacts/
里面应该有这4个文件:docker-compose.yml、management.json、openid-configuration.json、turnserver.conf
由于官方的这个脚本有点问题,我们还需要修改一些配置才能使其正常工作,首先编辑management.json:
nano management.json
默认情况下脚本会把信号服务的端口配置为10000:
...
    "Signal": {
        "Proto": "https",
        "URI": "nb.example.com:10000",
        "Username": "",
        "Password": ""
    },
...
需要将其改为443端口,因为我们后续会配置使用Nginx反向代理信号服务:
...
    "Signal": {
        "Proto": "https",
        "URI": "nb.example.com:443",
        "Username": "",
        "Password": ""
    },
...
还需要修改compose文件:
nano docker-compose.yml
官方的脚本没有帮我们处理dashboard容器的端口,由于我们后续会配置使用Nginx反向代理,所以将这里的443端口注释掉,容器外的80端口改为8011:
...
services:
  #UI dashboard
  dashboard:
    image: netbirdio/dashboard:latest
    restart: unless-stopped
    ports:
      - 8011:80
#      - 443:443
...
另外dashboard容器的环境变量也需要做修改,默认情况下会把Endpoints相关的环境变量配置为Domain:8012的形式:
services:
  #UI dashboard
  dashboard:
    image: netbirdio/dashboard:latest
    ...
    environment:
      # Endpoints
      - NETBIRD_MGMT_API_ENDPOINT=https://nb.example.com:8012
      - NETBIRD_MGMT_GRPC_API_ENDPOINT=https://nb.example.com:8012
    ...
需要将其修改为:
services:
  #UI dashboard
  dashboard:
    image: netbirdio/dashboard:latest
    ...
    environment:
      # Endpoints
      - NETBIRD_MGMT_API_ENDPOINT=https://nb.example.com
      - NETBIRD_MGMT_GRPC_API_ENDPOINT=https://nb.example.com
    ...
务必做好上述修改,否则Netbird的控制台无法正常加载,Netbird的客户端无法连接到信号服务。
[可选1]删除compose文件内的netbird-letsencrypt命名卷。
[可选2]启用signal容器的日志,方便后续维护和调试:
...
  signal:
    image: netbirdio/signal:latest
    restart: unless-stopped
...
    command: [ "--log-file", "console"]
启动Netbird:
docker compose up -d
配置Nginx反向代理Netbird
启动Netbird成功后,现在需要反代Netbird的8011、8012、10000端口,新建Nginx站点配置文件:
nano /etc/nginx/sites-available/netbird
写入如下配置:
upstream dashboard {
    server 127.0.0.1:8011;
    keepalive 10;
}
upstream signal {
    server 127.0.0.1:10000;
}
upstream management {
    server 127.0.0.1:8012;
}

server {
    listen 80;
    listen [::]:80;
    server_name nb.example.com;

    client_header_timeout 1d;
    client_body_timeout 1d;

    proxy_set_header        X-Real-IP $remote_addr;
    proxy_set_header        X-Forwarded-For $proxy_add_x_forwarded_for;
    proxy_set_header        X-Scheme $scheme;
    proxy_set_header        X-Forwarded-Proto https;
    proxy_set_header        X-Forwarded-Host $host;
    grpc_set_header         X-Forwarded-For $proxy_add_x_forwarded_for;

    # Proxy dashboard
    location / {
        proxy_pass http://dashboard;
    }
    # Proxy Signal
    location /signalexchange.SignalExchange/ {
        grpc_pass grpc://signal;
        #grpc_ssl_verify off;
        grpc_read_timeout 1d;
        grpc_send_timeout 1d;
        grpc_socket_keepalive on;
    }
    # Proxy Management http endpoint
    location /api {
        proxy_pass http://management;
    }
    # Proxy Management grpc endpoint
    location /management.ManagementService/ {
        grpc_pass grpc://management;
        #grpc_ssl_verify off;
        grpc_read_timeout 1d;
        grpc_send_timeout 1d;
        grpc_socket_keepalive on;
    }
}
启用站点:
ln -s /etc/nginx/sites-available/netbird /etc/nginx/sites-enabled/netbird
签发TLS证书:
certbot --nginx --email example@lala.im --agree-tos --no-eff-email
[重要]再次编辑Netbird的Nginx站点配置文件:
nano /etc/nginx/sites-available/netbird
[重要]启用HTTP2:
...
    listen [::]:443 ssl http2 ipv6only=on; # managed by Certbot
    listen 443 ssl http2; # managed by Certbot
...
[重要]重载Nginx使其生效:
systemctl reload nginx
至此Netbird服务端就全部部署完毕了。
安装Netbird客户端
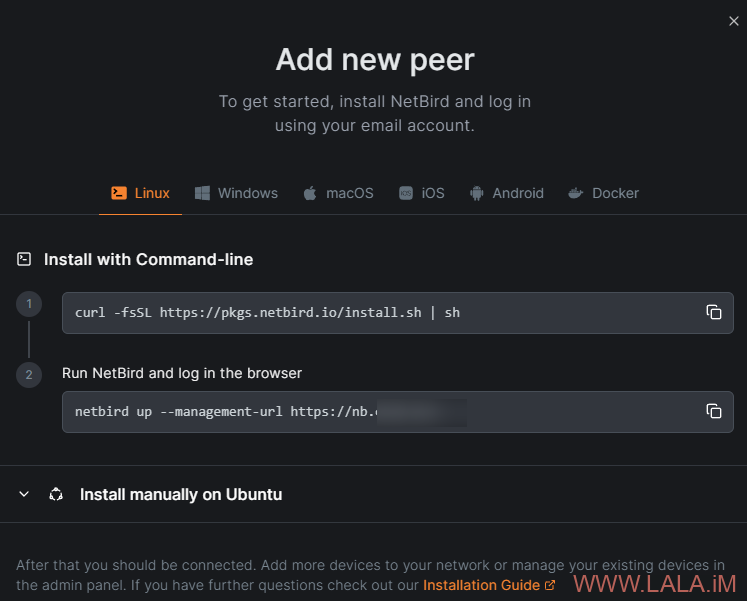
访问:nb.example.com,登录Netbird的控制台添加Peer,可以看到支持很多平台,根据提示安装客户端即可:
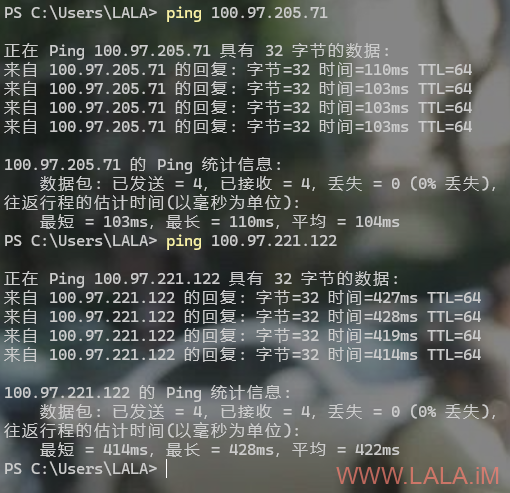
这里我搞了3台设备测试了下,无论是P2P还是中继都是可以连接上的:
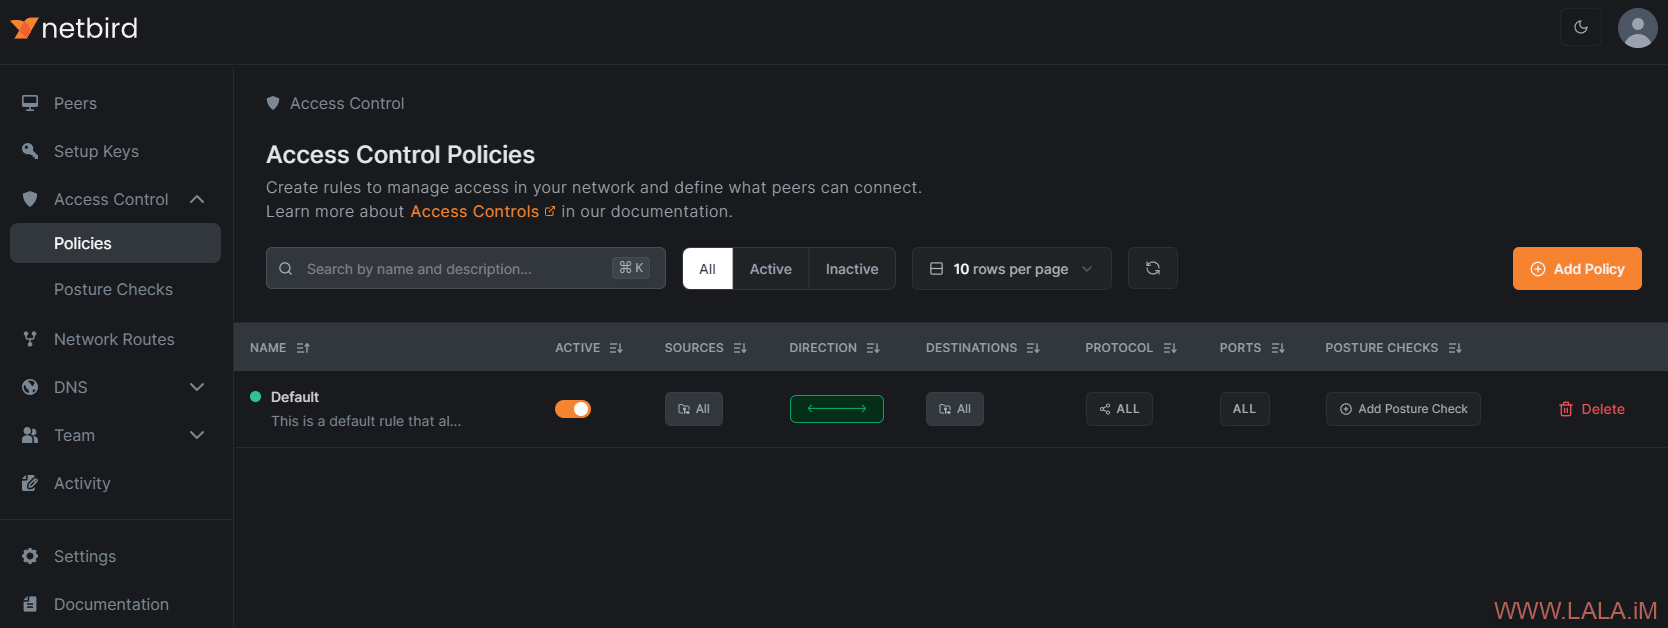
面板的功能不多但也够用,访问控制,路由什么的都有:
据说这个月还是下个月会上线ExitNode的功能。
参考:
https://docs.netbird.io/selfhosted/selfhosted-guide
https://docs.goauthentik.io/docs/installation/docker-compose
https://docs.goauthentik.io/docs/installation/reverse-proxy
https://github.com/netbirdio/netbird/issues/536
https://github.com/netbirdio/netbird/issues/1288
https://github.com/goauthentik/authentik/issues/5133
 荒岛
荒岛










大佬 ,我部署玩之后进入网页一直是报 Application error: a client-side exception has occurred (see the browser console for more information).
控制台报错: SyntaxError: “undefined” is not valid JSON
这是什么原因?
抱歉回复晚了,这个一般都是IDP没配置好或者是netbird里面和IDP相关的环境变量没配置对导致的。
有个问题,客户端url鉴权是直接和自建服务器沟通还是,通过自建服务器与idp沟通啊,因为我客户端屏蔽的所有国外ip,如果通过国内自建服务器中转就没问题
如果我没理解错的话,应该是通过自建服务器与idp沟通,更具体的你可以发个issue问下官方的人员。。
大佬,我部署完成之后打开netbird的主页提示
Oops, something went wrong
There was an error logging you in.
Error: Unauthenticated
在控制台中请求 URL:
http://192.168.1.4/.well-known/openid-configuration链接失败,但是我在浏览器直接访问接口是可以打开的,我用的是ZITADEL,我是部署在内网主机里的,方便交流一下吗?
zitadel我没有手动部署过,官方的那个一键安装脚本默认就是用的zitadel,要不你先试试官方的脚本看看会不会有一样的问题。。还不行的话就去发issue吧,他们比我更懂= =
必须要开放80 443端口吗?
家庭用户就没办法自建了吧?
全网能找到唯一的netbird+反向代理的,这个能用Nginx Proxy Manager 实现吗