
La Suite Meet由LiveKit提供技术支持,拥有媲美Zoom的卓越性能和高质量音视频体验。
特点:
- 针对大型会议的稳定性进行了优化(100+人)
- 支持多屏幕共享
- 非持久性、安全聊天
- 端到端加密(即将推出)
- 会议记录
- 会议记录及摘要(目前处于测试阶段)
- 电话系统集成
- 通过强大的身份验证和访问控制机制确保安全参与
- 可定制的前端样式
这个项目也是法国政府主导的,引用下面这段话:
On the 25th of January 2026, David Amiel, France’s Minister for Civil Service and State Reform, announced the full deployment of Visio—the French government’s dedicated Meet platform—to all public servants
这哥们打算让法国所有公务员都用这个开会= =这么牛b的程序(其实牛b的是LiveKit)必须部署逝一下。。。
本文根据官方的文档编写,主要记录并解决目前官方部署文档内的一些错误。
准备工作:
1.准备一个域名做好解析:meet.example.com(主程序),livekit.example.com(livekit服务)
2.部署VoidAuth OIDC身份验证服务,示例域名:voidauth.example.com
3.服务器的这些端口不能被其他程序占用:80、443、7880、7881、7882(UDP)、8086
在VoidAuth创建OIDC APP:
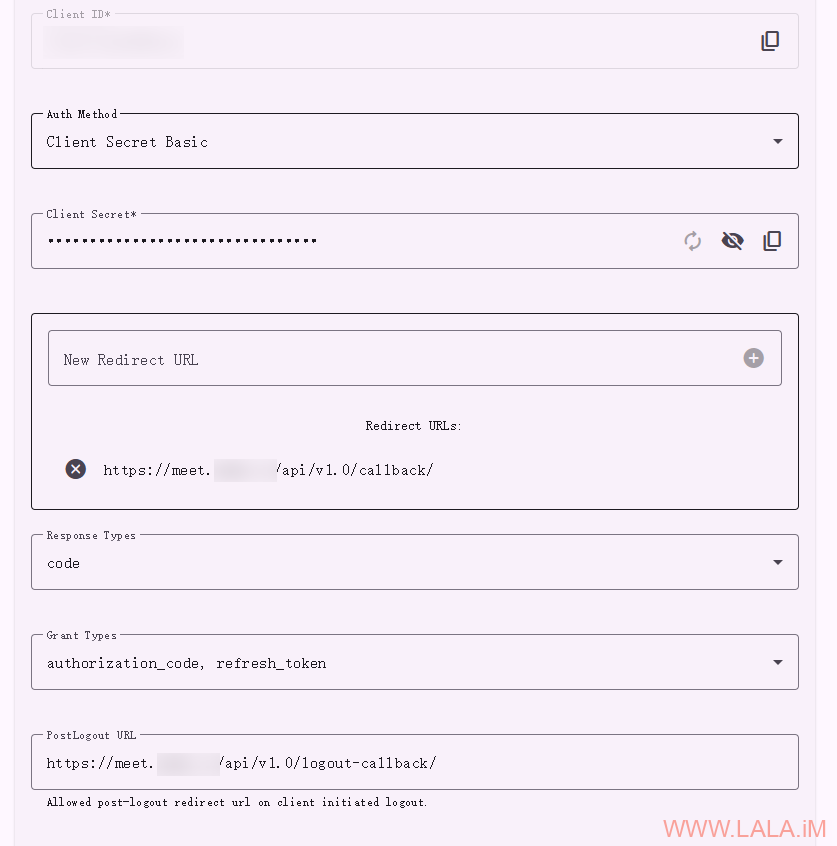
请将Redirect URLs配置为,注意URL最后的/,不要少了这个/:
https://meet.example.com/api/v1.0/callback/
请将PostLogout URL配置为,注意URL最后的/,不要少了这个/:
https://meet.example.com/api/v1.0/logout-callback/
做好上述准备工作后,现在就可以来部署Meet了,安装Docker:
apt -y update
apt -y install curl
curl -fsSL https://get.docker.com -o get-docker.sh
sh get-docker.sh
下载compose文件以及需要用到的环境变量配置文件、LiveKit配置文件、NGINX配置文件:
cd /opt
mkdir -p meet/env.d && cd meet
curl -o compose.yaml https://raw.githubusercontent.com/suitenumerique/meet/refs/heads/main/docs/examples/compose/compose.yaml
curl -o .env https://raw.githubusercontent.com/suitenumerique/meet/refs/heads/main/env.d/production.dist/hosts
curl -o env.d/common https://raw.githubusercontent.com/suitenumerique/meet/refs/heads/main/env.d/production.dist/common
curl -o env.d/postgresql https://raw.githubusercontent.com/suitenumerique/meet/refs/heads/main/env.d/production.dist/postgresql
curl -o livekit-server.yaml https://raw.githubusercontent.com/suitenumerique/meet/refs/heads/main/docs/examples/livekit/server.yaml
curl -o default.conf.template https://raw.githubusercontent.com/suitenumerique/meet/refs/heads/main/docker/files/production/default.conf.template
为了后续部署工作的顺利进行,这里先解决一些目前官方文档里面的错误,编辑compose文件:
nano compose.yaml
后端容器设置的env配置文件是错的,根本没有backend这个文件,取而代之的是.env文件,所以这里注释掉不存在的backend文件,添加.env文件:
...
  backend:
    image: lasuite/meet-backend:latest
    ...
    restart: always
    env_file:
    - env.d/common
#    - env.d/backend
    - .env
    - env.d/postgresql
    ...
前端容器又缺少.env文件,这里加上,同时将前端容器的8083端口暴露出来(不是官方文档说的8086端口)方便后续配置反向代理:
...
  frontend:
    image: lasuite/meet-frontend:latest
    ...
    env_file:
    - .env
    - env.d/common
    ...
    ports:
    - "127.0.0.1:8086:8083"
将LiveKit容器的7880端口暴露出来,这是Likvkit的“信号”端口,是Meet与Livekit通信的关键:
...
  livekit:
    image: livekit/livekit-server:latest
    command: --config /config.yaml
    ports:
    - 127.0.0.1:7880:7880
    - 7881:7881/tcp
    - 7882:7882/udp
    ...
编辑供前端容器内部使用的NGINX配置文件:
nano default.conf.template
将这两个错误的环境变量:BACKEND_HOST/FRONTEND_HOST修改为如下内容:
upstream meet_backend {
    server ${BACKEND_INTERNAL_HOST}:8000 fail_timeout=0;
}
upstream meet_frontend {
    server ${FRONTEND_INTERNAL_HOST}:8080 fail_timeout=0;
}
编辑.env文件:
nano .env
这里只列出需要修改的内容:
MEET_HOST=meet.example.com
#KEYCLOAK_HOST=id.domain.tld # 注释掉这个配置,我们不使用KEYCLOAK
LIVEKIT_HOST=livekit.example.com
#REALM_NAME=meet # 注释掉这个配置,我们不使用KEYCLOAK
编辑common文件:
nano env.d/common
这里只列出需要修改的内容:
# Django
DJANGO_SECRET_KEY= # 使用openssl rand -hex 32生成

# Mail
DJANGO_EMAIL_HOST=mail.example.com
DJANGO_EMAIL_HOST_USER=smtp
DJANGO_EMAIL_HOST_PASSWORD=smtppassword
DJANGO_EMAIL_PORT=587
DJANGO_EMAIL_FROM=smtp@example.com
DJANGO_EMAIL_USE_TLS=true

# OIDC
OIDC_OP_JWKS_ENDPOINT=https://voidauth.example.com/oidc/jwks
OIDC_OP_AUTHORIZATION_ENDPOINT=https://voidauth.example.com/oidc/auth
OIDC_OP_TOKEN_ENDPOINT=https://voidauth.example.com/oidc/token
OIDC_OP_USER_ENDPOINT=https://voidauth.example.com/oidc/me
OIDC_OP_LOGOUT_ENDPOINT=https://voidauth.example.com/oidc/session/end
OIDC_RP_CLIENT_ID=
OIDC_RP_CLIENT_SECRET=

# Livekit Token settings
LIVEKIT_API_SECRET= # 使用openssl rand -hex 32生成
编辑postgresql文件,设置PostgreSQL数据库密码:
nano env.d/postgresql
这里只列出需要修改的内容:
DB_PASSWORD=setyourdbpassword # 设置你的数据库密码。
编辑livekit-server.yaml:
nano livekit-server.yaml
将keys的值设置成和LIVEKIT_API_SECRET相同的内容:
port: 7880
redis:
  address: redis:6379
keys:
  meet: # 把这里的值设置成和LIVEKIT_API_SECRET相同的内容
# WebRTC configuration
rtc:
  # # when set, LiveKit will attempt to use a UDP mux so all UDP traffic goes through
  # # listed port(s). To maximize system performance, we recommend using a range of ports
  # # greater or equal to the number of vCPUs on the machine.
  # # port_range_start & end must not be set for this config to take effect
  udp_port: 7882
  # when set, LiveKit enable WebRTC ICE over TCP when UDP isn't available
  # this port *cannot* be behind load balancer or TLS, and must be exposed on the node
  # WebRTC transports are encrypted and do not require additional encryption
  # only 80/443 on public IP are allowed if less than 1024
  tcp_port: 7881
  # use_external_ip should be set to true for most cloud environments where
  # the host has a public IP address, but is not exposed to the process.
  # LiveKit will attempt to use STUN to discover the true IP, and advertise
  # that IP with its clients
  use_external_ip: true
启动全部容器:
docker compos up -d
运行数据库迁移并创建Django管理员用户:
docker compose run --rm backend python manage.py migrate
docker compose run --rm backend python manage.py createsuperuser --email imlala@lala.im --password adminpassword
稍后你可以使用这个URL访问Docs的Django后台:meet.example.com/admin。在这个后台你可以管理用户创建的房间。
请注意这里创建的用户只拥有Django管理员权限,最终实际可供用户使用的账号必须使用OIDC创建。
配置Ferron反向代理:
nano /etc/ferron.kdl
写入如下内容:
meet.example.com {
   proxy "http://127.0.0.1:8086/"
   proxy_request_header_replace "Host" "{header:Host}"
}

livekit.example.com {
   proxy "http://127.0.0.1:7880/"
   proxy_request_header_replace "Host" "{header:Host}"
}
如果你使用的是别的反向代理,则必须为LiveKit配置WebSocket和长连接支持。Ferron默认支持这些,所以不必写在配置文件内。
重载Ferron:
systemctl reload ferron
效果:
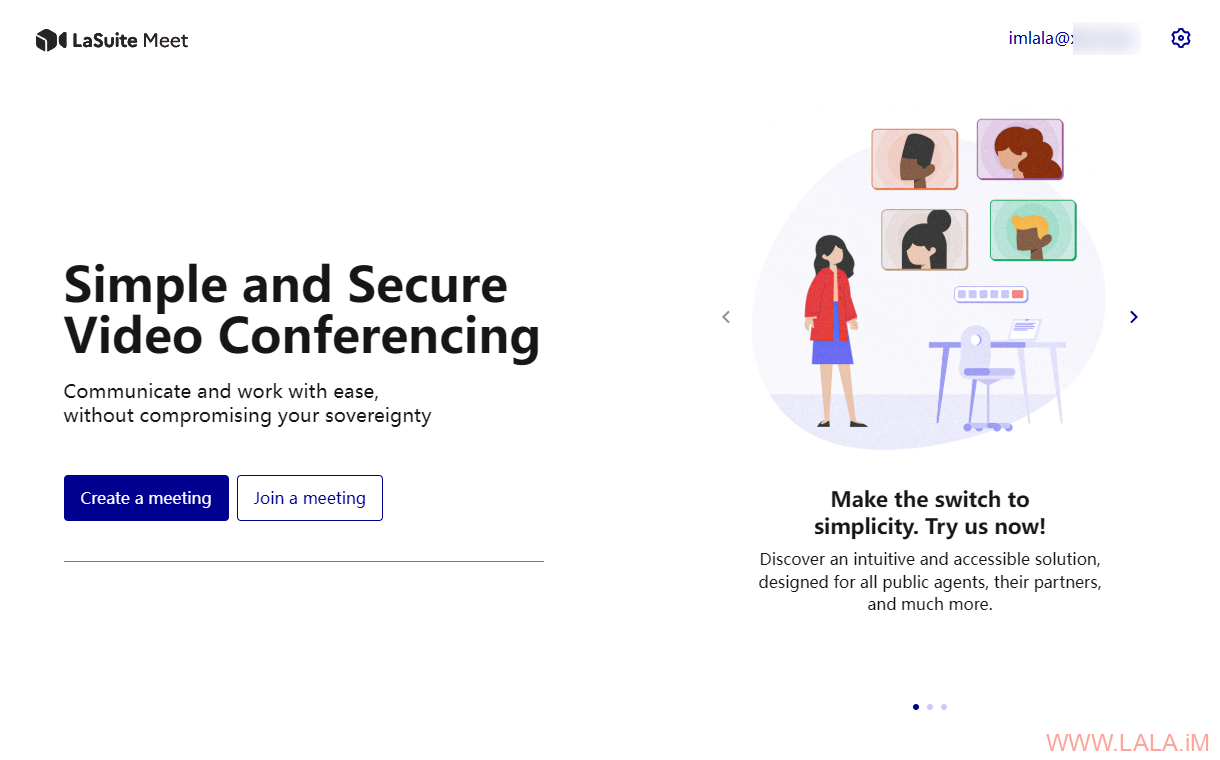
看着这个经典的蓝白配色UI,还有这几个按钮的造型,然后还是法国出品,瞬间就觉得好似一位故人:OVH!
简单测试,在电脑上启用OBS虚拟摄像头,在手机上加入房间,看看双方能不能正常视频通话:
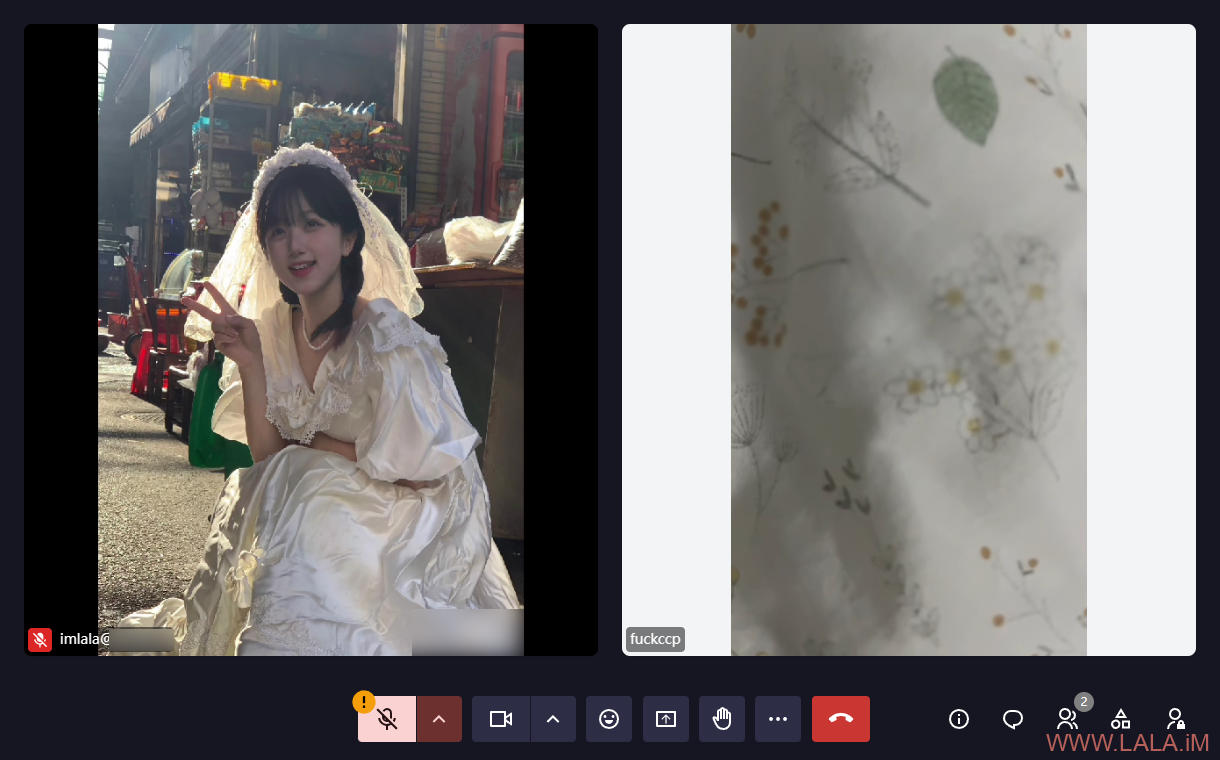
功能还是很全面的,共享浏览器屏幕、发表情、拍手、甚至还有虚拟背景和聊天功能。唯独在国内使用的话可能要注意连通性问题,国内的网络嘛,懂的都懂,如果你按照这篇文章部署后连不上,则可能还需要在LiveKit配置TURN服务。


做个一键启动包,把服务都集成了给大家用吧