
RocketChat是一个开源并且完全免费的WEB聊天系统,虽然核心部分是基于WEB,但是官方开发了众多跨平台客户端,可以说RocketChat现在在众多主流操作系统上使用是完全没有问题的。
RocketChat具备了非常强大的社交功能,拿Telegram来对比一下的话,可以说在功能方面和Telegram不相上下。所以与其说RocketChat是一个聊天系统不如说它是一个强大的团队协作平台。那RocketChat具体都包含了哪些功能呢?我在这里稍微列举一些,看看符不符合你的需求:
1、公共频道聊天,就类似QQ群或者Telegram群组。当然我们可以新建任意多的频道。
2、频道只读,功能类似于Telegram的频道系统,在Telegram中群组可以公开发言,但频道只能由创建者发言。
3、私人对话,功能就相当于QQ好友与好友之间聊天。
4、无记录对话,类似于“阅后即焚”。聊私密信息的神器~
5、@功能,可以在群组和频道中使用,类似于Telegram中@一个人的用户名,该用户可以得到消息提示。
6、语音聊天以及视频聊天的支持。
7、网址链接预览,类似于Telegram中发一个网站地址可以读取网站的标题和描述。
8、文件共享、上传、下载、分享等等。
9、用户搜索、群组搜索、消息搜索等等一系列强大的搜索功能。
10、自定义聊天表情,这个可以由管理员设置。
11、完善的用户权限设置功能,每个用户所对应的用户组都可以设置相应的使用权限。
12、完善的自定义功能,可以自定义CSS、上传站点LOGO、站标、设置描述、设置ToS、开关闭用户注册,等等。
13、各种额外属性的支持,比如OAUTH第三方登录、外部聊天窗口,等等等等。。。
是不是觉得RocketChat太棒了?那我们就赶紧动手搭建一个试试吧~
准备工作:
系统CentOS7X64、内存1G以上、硬盘尽量大一点。现在使用Xshell以root用户的身份登录到你的机器内。
进入正题:
先更新一下系统:
yum update
使用nvm来安装node.js:
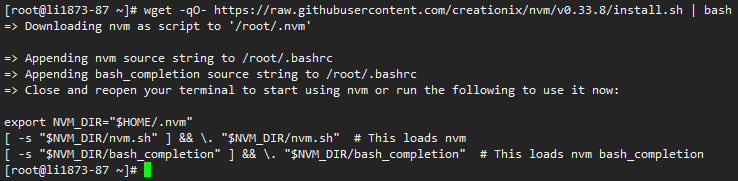
yum -y install wget
wget -qO- https://raw.githubusercontent.com/creationix/nvm/v0.33.8/install.sh | bash
安装完成后如图:
这里务必先断开Xshell连接,然后重新登录进来,必须要这样操作一次!否则nvm命令无法生效!
查看nvm支持安装的node.js版本:
nvm list-remote
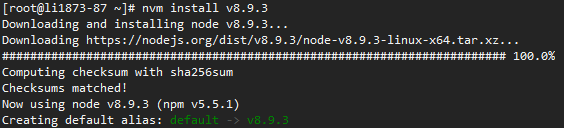
这里由于rocketchat官方推荐使用8.9.3版本的node.js,所以我们选择安装8.9.3:
nvm install v8.9.3
安装完成后如图:
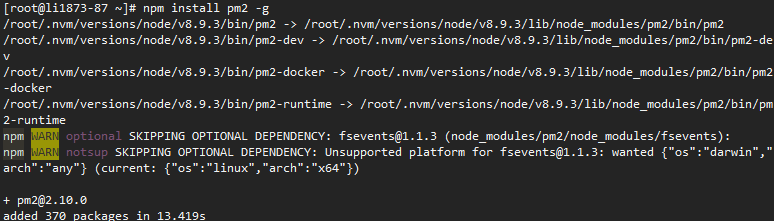
安装完node.js后,我们再安装一个pm2:
npm install pm2 -g
安装完成后如图:
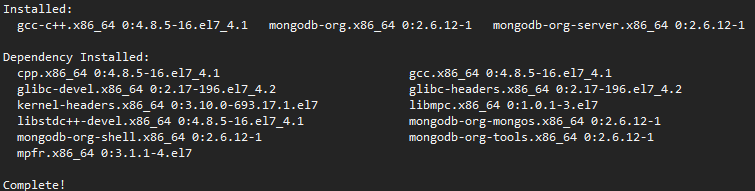
接着来安装mongodb,新建一个repo源:
vi /etc/yum.repos.d/mongodb.repo
写入如下内容:
[mongodb]
name=MongoDB Repository
baseurl=http://downloads-distro.mongodb.org/repo/redhat/os/x86_64/
gpgcheck=0
enabled=1
使用yum来安装mongodb以及一些后续我们会用到的依赖和组件:
yum -y install mongodb-org-server mongodb-org gcc-c++
安装完成后如图:
安装GraphicsMagick图像处理软件:
wget ftp://ftp.graphicsmagick.org/pub/GraphicsMagick/1.3/GraphicsMagick-1.3.28.tar.gz
tar -zxvf GraphicsMagick-1.3.28.tar.gz
cd GraphicsMagick-1.3.28
./configure
make && make install
查看是否安装成功:
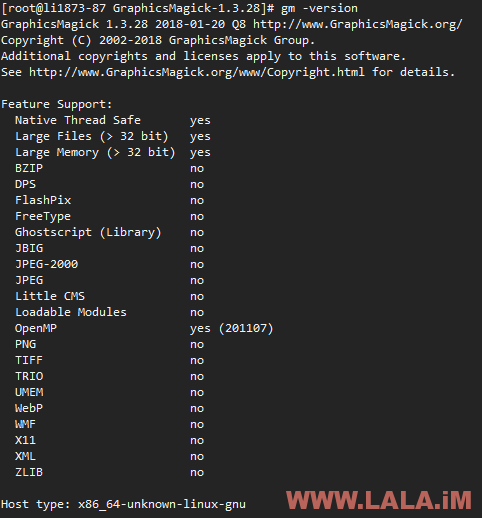
gm -version
回显如图信息,说明安装正常:
现在RocketChat需要的运行环境,我们就基本配置完成了,下面来安装RocketChat。
在root目录内下载RocketChat项目文件:
cd /root
curl -L https://releases.rocket.chat/latest/download -o rocket.chat.tgz
解压:
tar zxvf rocket.chat.tgz
复制解压出来的bundle目录重命名为Rocket.Chat:
mv bundle Rocket.Chat
进入到server目录内:
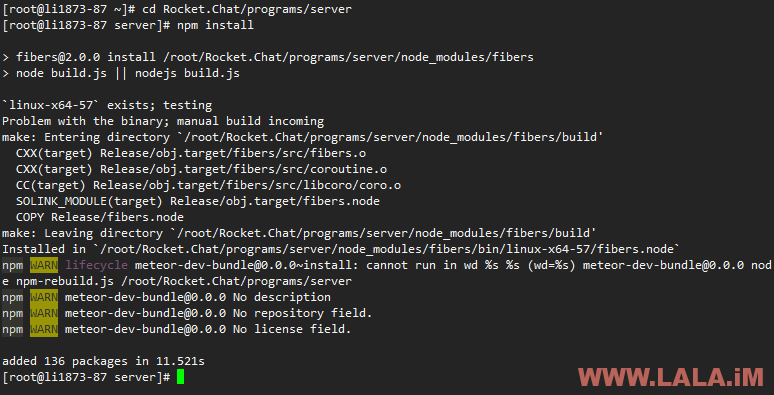
cd Rocket.Chat/programs/server
执行npm安装依赖包:
npm install
安装完成后如图所示:
回到Rocket.Chat根目录下:
cd ../..
配置mongodb环境变量:
export PORT=3000
export ROOT_URL=http://172.105.219.87:3000/
export MONGO_URL=mongodb://localhost:27017/rocketchat
注意ROOT_URL后面的地址要改成你自己的VPS公网IP。
设置mongodb开机启动以及现在就运行mongodb:
chkconfig mongod on
systemctl start mongod
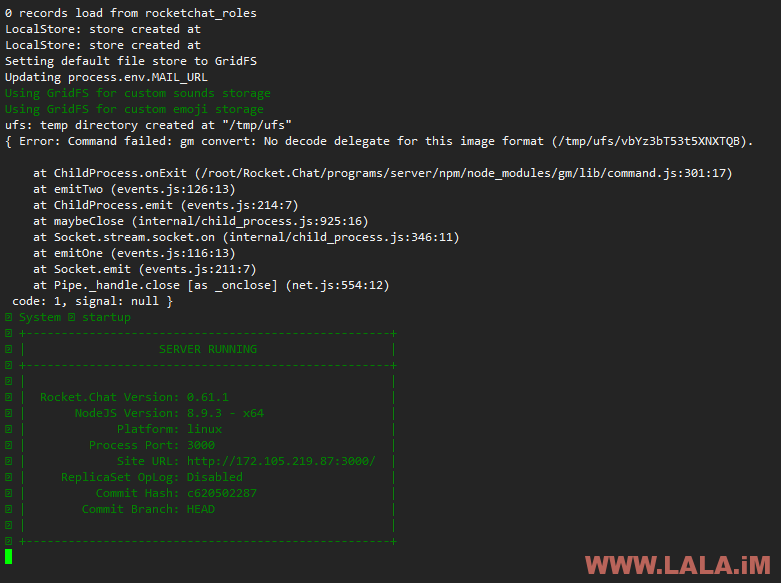
现在我们就可以尝试运行一下Rocket.Chat了:
node main.js
运行正常的话,会回显类似如下图的信息:
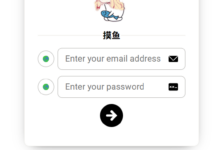
不出意外,现在就可以通过浏览器访问你的VPS公网IP+端口3000看到如下图界面了:
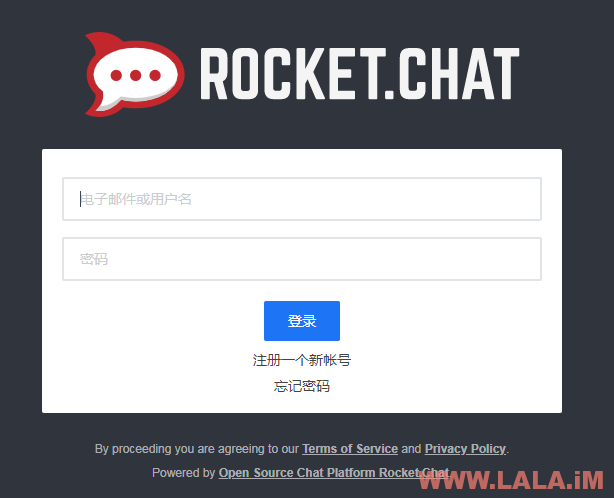
先注册一个账号,注意第一个注册的账号默认就是管理员权限:
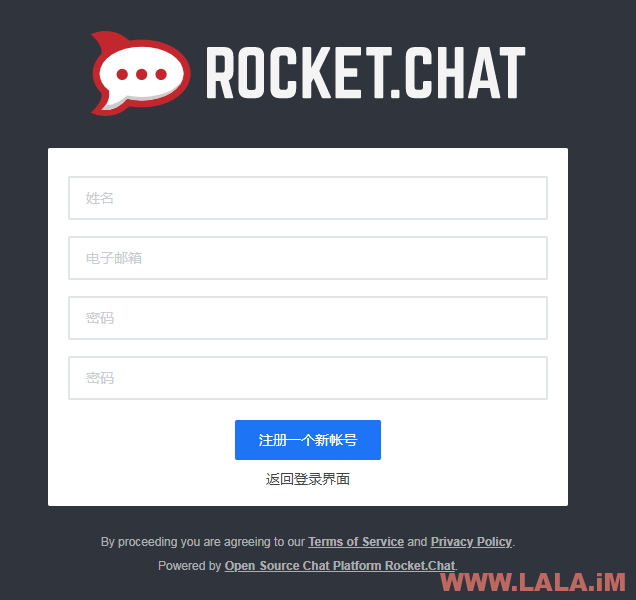
注册完成后,尝试登录一下,登录成功后如图所示:

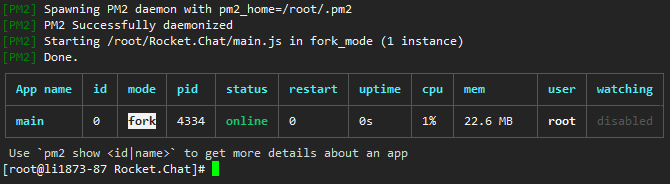
现在回到Xshell中,按键盘组合键Ctrl+C退出运行。我们将RocketChat用pm2放到后台运行:
pm2 start main.js
运行成功后如图所示:
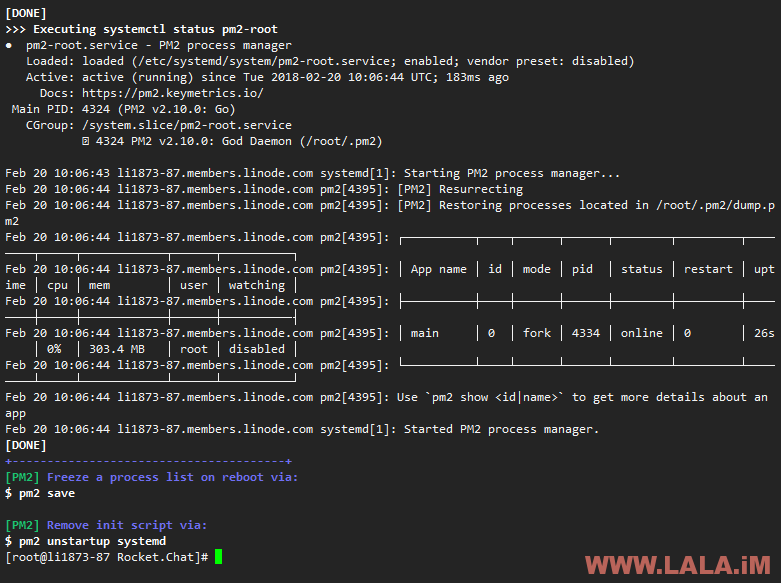
配置RocketChat的开机启动:
pm2 save
pm2 startup
成功后如图所示:
现在mongodb、rocketchat都开机启动了,还剩一个mongodb临时环境变量没开机启动,所以我们还要写一个小脚本让系统开机自动设置mongodb的环境变量:
vi /root/rocketchat.sh
写入如下内容:
#!/bin/bash
export PORT=3000
export ROOT_URL=http://172.105.219.87:3000/
export MONGO_URL=mongodb://localhost:27017/rocketchat
echo "MongoDB Started by LALA.IM"
注意将ROOT_URL后面的IP地址改成你自己的。
给脚本执行权限已经添加到rc.local内:
chmod +x /root/rocketchat.sh
chmod +x /etc/rc.d/rc.local && echo "sh /root/rocketchat.sh" >> /etc/rc.d/rc.local
至此,RocketChat就能够完美的运行在我们的服务器上了,但是作为一个node.js的项目,想正式上线运营肯定是需要一个nginx做反向代理的。并且,RocketChat作为一个团队协作平台,很多时候我们在里面聊天的内容都是非常私密的,为了避免数据遭到泄漏所以我们非常有必要配置上SSL。下面LALA就教大家使用Nginx来配置SSL完美反向代理RocketChat。
首先安装Nginx:
新建一个repo源:
vi /etc/yum.repos.d/nginx.repo
写入如下内容:
[nginx]
name=nginx repo
baseurl=http://nginx.org/packages/centos/7/$basearch/
gpgcheck=0
enabled=1
现在就可以使用yum安装nginx了:
yum -y install nginx
启动nginx已经配置开机启动:
systemctl start nginx
systemctl enable nginx
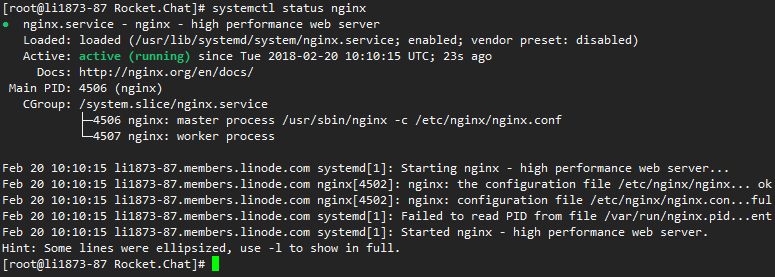
查看运行状态,确保是Active:
systemctl status nginx
如图:
进入到nginx的conf.d目录内:
cd /etc/nginx/conf.d
新建一个rocketchat站点conf:
vi rocketchat.conf
写入如下内容:
server {
    listen       80;
    listen       443 ssl http2;
    server_name  172.105.219.87;
    if ($server_port !~ 443){
        rewrite ^(/.*)$ https://$host$1 permanent;
    }

    ssl_certificate    /etc/nginx/cert/rocketchat.pem;
    ssl_certificate_key    /etc/nginx/cert/rocketchat.private.key;
    ssl_protocols TLSv1 TLSv1.1 TLSv1.2;
    ssl_ciphers ECDHE-RSA-AES128-GCM-SHA256:HIGH:!aNULL:!MD5:!RC4:!DHE;
    ssl_prefer_server_ciphers on;
    ssl_session_cache shared:SSL:10m;
    ssl_session_timeout 10m;
    error_page 497  https://$host$request_uri;

location / {
    proxy_pass       http://172.105.219.87:3000;
    proxy_redirect             off;
    proxy_http_version         1.1;
    proxy_set_header Upgrade   $http_upgrade;
    proxy_set_header Connection "upgrade";
    proxy_set_header Host      $host;
    proxy_set_header X-Real-IP $remote_addr;
    }
}
注:
一、server_name修改成你自己的网站域名,多个域名用空格隔开。
二、ssl_certificate是SSL证书的路径,这个你们要自己去申请一个。
三、ssl_certificate_key是证书的私钥,同样需要你们自己申请。
四、proxy_pass后面的地址务必改成你们自己的。
五、SSL证书的路径可以根据你们自己的需求来更改,不一定非要和我的conf内一致。
最后重启nginx即可:
systemctl restart nginx
至此,RocketChat的配置就大功告成了!开始和你的朋友们在一个由自己管理的聊天系统内玩耍吧~
如果你的系统无法正常运行,请检查防火墙是否关闭,关闭命令:
systemctl stop firewalld.service
systemctl disable firewalld.service
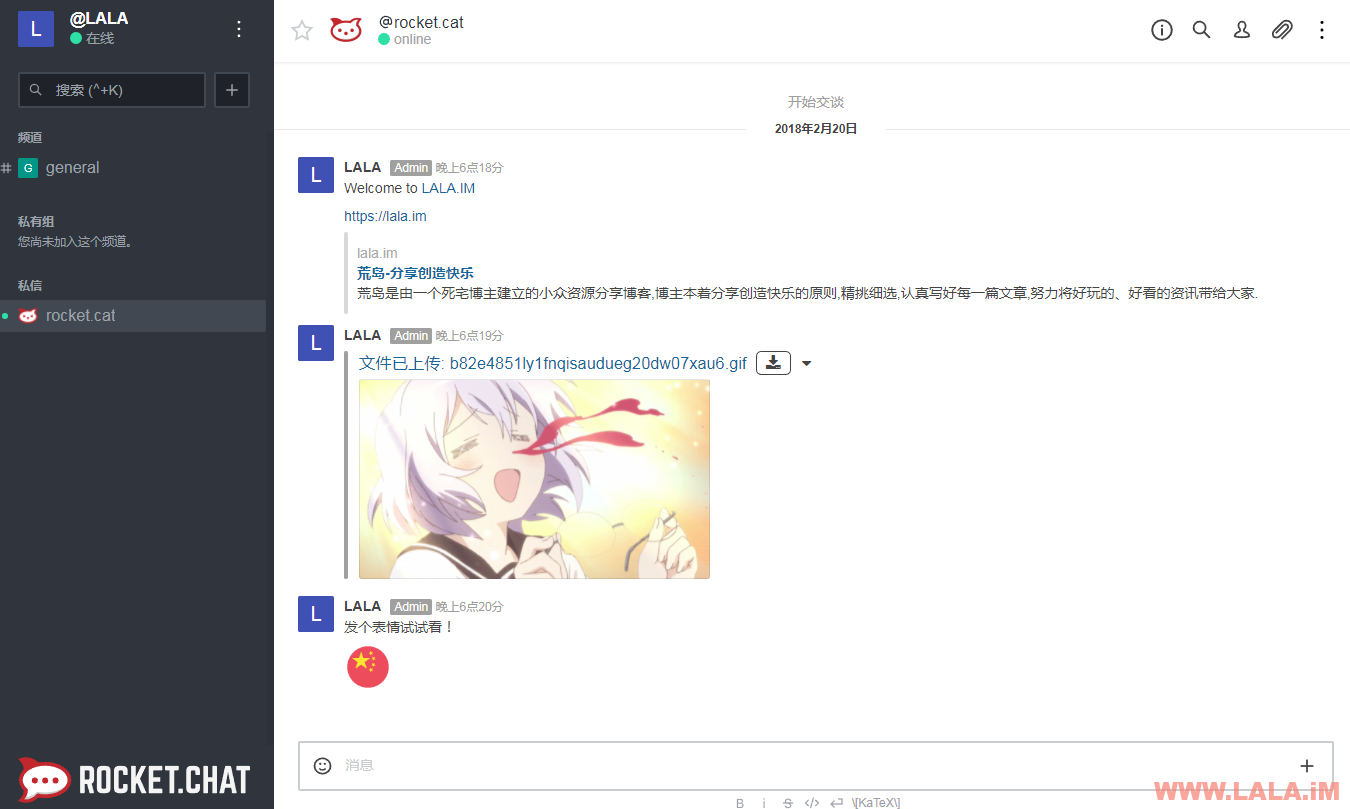
以下是LALA搭建完成后的测试截图:
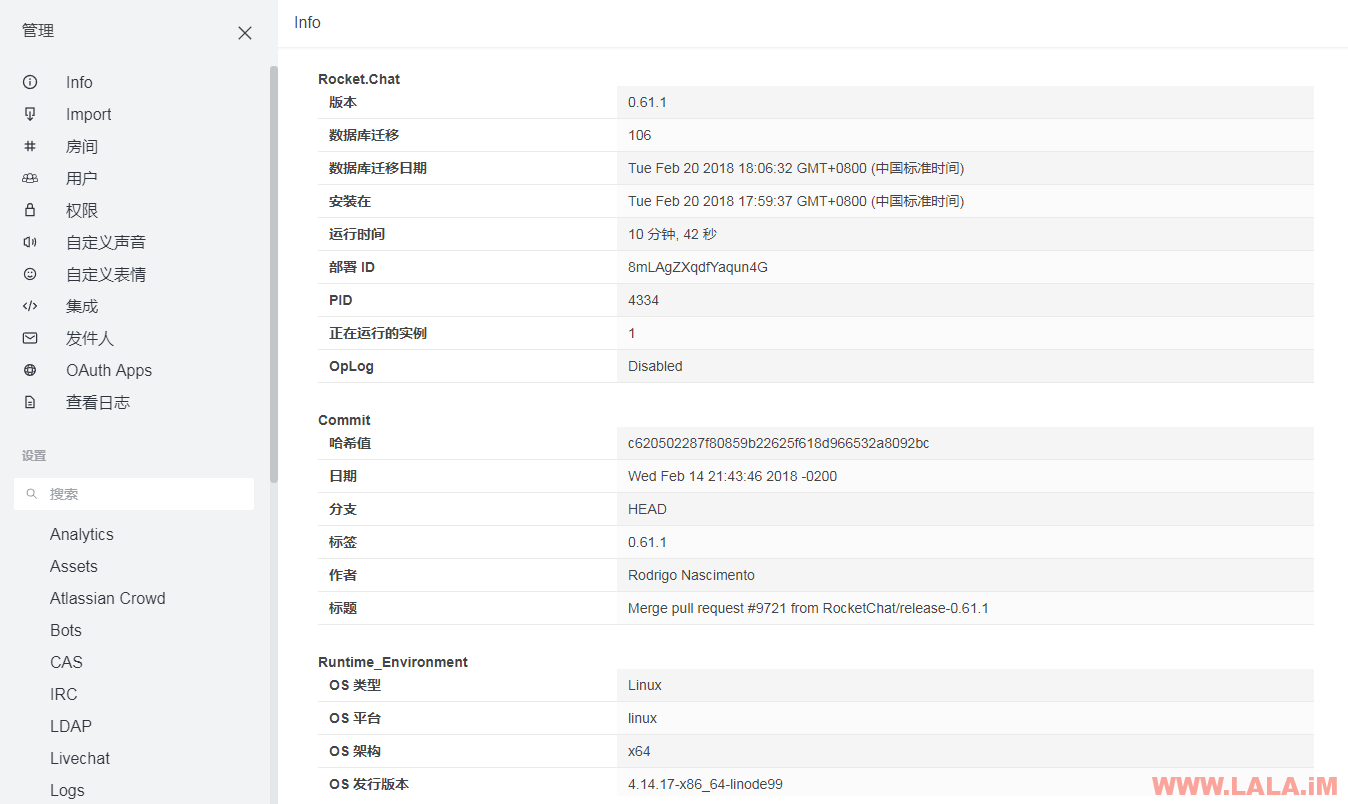
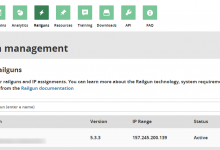
后台管理:
写在最后:
RocketChat是一个非常棒的聊天系统,如果你放心不下第三方的聊天工具,而又想逃避国内各种聊天软件的网络审查,比如QQ、微信之类,可以尝试使用RocketChat!
附上该项目的项目地址:https://github.com/RocketChat/Rocket.Chat
各类客户端软件下载地址:https://rocket.chat/download


大佬,可以和宝塔共存吗?
应该是可以的,貌似还可以直接用宝塔的Nginx反向代理,但是Nginx配置文件似乎得修改一下,不然WebSocket会有问题。另外记得放行3000端口。
答案是不能和BT共存 应该要做修改 安装这个过后 BT面包是无法启动的
你是不是先装的宝塔,然后装rocketchat的时候又yum update了一遍系统。。。
你搭建的,也分享出来。一起玩玩
这个你还是自己搭建个试试吧,我都把机器删了,懒得再装了。。。
应该可以的,没有必须要求一定要CentOS7。
问一下你的gcc版本,我提示缺少链接库,查了是gcc版本太低,库太低的原因 ?
你的系统是CentOS7吗?7默认的4.8.5没问题。
dalao,帮我看下这是咋回事呗
gyp ERR! build error
gyp ERR! stack Error: `make` failed with exit code: 2
gyp ERR! stack at ChildProcess.onExit (/root/.nvm/versions/node/v9.9.0/lib/node_modules/npm/node_modules/node-gyp/lib/build.js:258:23)
gyp ERR! stack at ChildProcess.emit (events.js:180:13)
gyp ERR! stack at Process.ChildProcess._handle.onexit (internal/child_process.js:209:12)
gyp ERR! System Linux 4.15.12-1.el6.elrepo.x86_64
gyp ERR! command “/root/.nvm/versions/node/v9.9.0/bin/node” “/root/.nvm/versions/node/v9.9.0/lib/node_modules/npm/node_modules/node-gyp/bin/node-gyp.js” “rebuild” “–release”
gyp ERR! cwd /root/Rocket.Chat/programs/server/node_modules/fibers
gyp ERR! node -v v9.9.0
gyp ERR! node-gyp -v v3.6.2
gyp ERR! not ok
node-gyp exited with code: 1
Please make sure you are using a supported platform and node version. If you
would like to compile fibers on this machine please make sure you have setup your
build environment–
Windows + OS X instructions here: https://github.com/nodejs/node-gyp
Ubuntu users please run: `sudo apt-get install g++ build-essential`
Alpine users please run: `sudo apk add python make g++`
sh: nodejs: command not found
npm ERR! file sh
npm ERR! code ELIFECYCLE
npm ERR! errno ENOENT
npm ERR! syscall spawn
npm ERR! fibers@2.0.0 install: `node build.js || nodejs build.js`
npm ERR! spawn ENOENT
npm ERR!
npm ERR! Failed at the fibers@2.0.0 install script.
npm ERR! This is probably not a problem with npm. There is likely additional logging output above.
你装的nodejs版本好像太新了,换成8.9.3试试看。
另外执行下这个:sudo apt-get install g++ build-essential
百度了一下用了yum install gcc gcc-c++;yum groupinstall “Development Tools”
还是报错
试试:yum -y install openssl-devel
。。那就别折腾了,我打算装一个公开出来给你们玩。
你好,很喜欢看你写的教程,我是个小白。我想知道。如果是多拨网络,自己用centos搭建ssr。要怎么做呢?或者有多个IP要怎么添加进去才能一起使用呢?只有一条默认路由IP才能使用的吗
博主能教下怎么弄么,完全按你的步骤来,到后面也出来绿色框了,但是无法访问,绿色框上方有个错误,能教下吗。。 可以有偿的,搞不出来我就非常想搞出来,强迫症
抱歉,这几天都没空看博客,看你之后的评论应该是都解决了?
我也是vultr,也是后天启动了,前端无法连接,换了不同的ip都不可以连接
用的centos7 64 Vultr的
执行npm安装依赖包:
npm install
这一步npm install前面加sudo
大佬,能联系一下我吗,真的很需要你
你的QQ是?邮箱这个?
大佬,有没有试过在路由器上跑起来
npm装不上。。。。
试试这个?https://lala.im/5388.html
更新到最新版的程序要用什么命令?
不行装到一半一堆错误
有一件脚本麻 qwq
有snap,相当于就是个一键脚本了:https://lala.im/5388.html
node main.js
Meteor requires Node v14.0.0 or later.
他给我返回了这个…怎么办