我看到网上有很多挂PT的人都在吹rTorrent怎么怎么好,我最终还是没经受住诱惑,决定自己安装配置一个试试看。
在开始之前,还是先介绍一下这个玩意儿,rTorrent其实只是一个命令行的BT下载工具,我们要想用它来挂PT的话是肯定少不了要额外装一个ruTorrent的,那ruTorrent又是个什么玩意呢?简而言之你可以理解成它是一个第三方的rTorrent的WEBUI,也就是一个图形化界面。
其实接下来你们可能看着步骤好多的样子,感觉很麻烦,实际上rTorrent+ruTorrent的安装和配置都没什么大坑,基本上只要你系统的依赖都安装好,最后应该都能完美工作的~
进入到ROOT目录,安装基本组件和依赖:
cd ~
yum -y install epel-release openssl-devel screen
安装开发工具包:
yum -y groupinstall "Development Tools"
rTorrent依赖libtorrent,所以我们先编译安装libtorrent:
wget http://rtorrent.net/downloads/libtorrent-0.13.6.tar.gz
tar -xzvf libtorrent-0.13.6.tar.gz
cd libtorrent-0.13.6
./configure
make
make install
现在我们就可以来安装rTorrent了,这里需要注意的是rTorrent高版本后面要想和ruTorrent结合的话是依赖RPC的,所以别忘记安装xmlrpc-c-devel这个依赖:
cd ~
yum -y install ncurses-devel xmlrpc-c-devel
防止待会编译的时候出错,设置一下系统的环境变量:
echo "/usr/local/lib/" >> /etc/ld.so.conf
ldconfig
export PKG_CONFIG_PATH=/usr/local/lib/pkgconfig
接着就是下载、编译、安装了:
wget http://rtorrent.net/downloads/rtorrent-0.9.6.tar.gz
tar -xzvf rtorrent-0.9.6.tar.gz
cd rtorrent-0.9.6
./configure --with-xmlrpc-c
make
make install
创建一个rTorrent的配置文件:
cd ~
vi .rtorrent.rc
你们可以直接复制我的:
# This is the rtorrent configuration file installed by LALA script - https://lala.im
# This file is installed to ~/.rtorrent.rc
# Enable/modify the options as needed, uncomment the options you wish to enable.
# This configuration will work well with most systems, but optimal settings are dependant on specific server setup


directory ="/opt/rtorrent/download/"
session ="/opt/rtorrent/.session"
schedule = watch_directory,5,5,load_start="/opt/rtorrent/.watch/*.torrent"

### BitTorrent
# Global upload and download rate in KiB, `0` for unlimited
throttle.global_down.max_rate.set = 0
throttle.global_up.max_rate.set = 0

# Maximum number of simultaneous downloads and uploads slots
throttle.max_downloads.global.set = 150
throttle.max_uploads.global.set = 150

# Maximum and minimum number of peers to connect to per torrent while downloading
throttle.min_peers.normal.set = 30
throttle.max_peers.normal.set = 150

# Same as above but for seeding completed torrents (seeds per torrent)
throttle.min_peers.seed.set = -1
throttle.max_peers.seed.set = -1

### Networking
network.port_range.set = 51001-51250
network.port_random.set = yes
dht.mode.set = disable
protocol.pex.set = no
trackers.use_udp.set = yes

# network.scgi.open_port = localhost:5000
network.scgi.open_port = 127.0.0.1:5000
network.http.ssl_verify_peer.set = 0
protocol.encryption.set = allow_incoming,enable_retry,prefer_plaintext

network.max_open_files.set = 4096
network.max_open_sockets.set = 1536
network.http.max_open.set = 48
network.send_buffer.size.set = 4M
network.receive_buffer.size.set = 4M

### Memory Settings
pieces.hash.on_completion.set = no
pieces.preload.type.set = 1
pieces.memory.max.set = 200M


#EOF
创建rTorrent所需的目录,注意如果你修改过上面配置文件内的目录路径,这里的路径也要和你修改的所对应:
mkdir /opt/rtorrent
mkdir /opt/rtorrent/download
mkdir /opt/rtorrent/.session
mkdir /opt/rtorrent/.watch
现在使用screen创建一个会话:
screen -S rtorrent
在这个会话内执行如下命令启动rTorrent:
rtorrent
键盘组合键Ctrl+A+D切回到当前终端。这样我们就把rTorrent放到后台运行了,如果要回到这个会话中可以执行:
screen -r rtorrent
到这里rTorrent的安装就大功告成了,现在我们就可以来安装配置ruTorrent了,由于ruTorrent需要PHP的支持,所以我们先来安装Nginx和PHP。
新建一个repo:
vi /etc/yum.repos.d/nginx.repo
写入:
[nginx]
name=nginx repo
baseurl=http://nginx.org/packages/centos/7/$basearch/
gpgcheck=0
enabled=1
然后我们就可以直接用yum来安装nginx了:
yum -y install nginx
启动nginx:
systemctl start nginx
接着来安装PHP7.2,添加webtatic源:
rpm -Uvh https://mirror.webtatic.com/yum/el7/webtatic-release.rpm
安装PHP7.2和相关组件:
yum -y install php72w-fpm php72w-cli php72w-common php72w-gd php72w-mysqlnd php72w-odbc php72w-pdo php72w-pgsql php72w-xmlrpc php72w-xml php72w-mbstring php72w-opcache
启动PHP-FPM:
systemctl start php-fpm
现在来下载、解压ruTorrent:
cd /usr/share/nginx
wget https://github.com/Novik/ruTorrent/archive/v3.8.tar.gz
tar -xzvf v3.8.tar.gz
mv ruTorrent-3.8 rutorrent
这里这条命令很重要,一定不要漏掉,当我们把PHP安装好了后,我们系统内用来运行PHP脚本的用户就是apache,这里我们要把rutorrent的站点目录所有者改为apache:
chown -R apache:apache /usr/share/nginx/rutorrent
另外由于ruTorrent这个WEBUI没有访问密码的功能,所以我们要先配置Nginx自带的密码访问功能,打开如下网站:
http://tool.oschina.net/htpasswd
输入一个账号密码,然后点击生成,复制你生成的密匙对,回到终端内,在Nginx目录下新建一个htpasswd文件:
vi /etc/nginx/htpasswd
在这个文件内粘贴你刚复制的密匙对,然后保存即可。
接着我们在nginx目录下新建一个rewrite目录,用来存放各种配置规则:
mkdir /etc/nginx/conf.d/rewrite
在rewrite目录下新建一个rutorrent.conf配置文件,这个文件专门用来配置RPC反向代理:
vi /etc/nginx/conf.d/rewrite/rutorrent.conf
写入:
location /RPC2 {
  include scgi_params;
  scgi_pass 127.0.0.1:5000;
}
保存,接着我们再在conf.d目录下新建一个rtorrent.conf的主配置文件:
vi /etc/nginx/conf.d/rtorrent.conf
写入:
server {
    listen       12315;
    server_name  你的服务器公网IP;

    #charset koi8-r;
    #access_log  /var/log/nginx/host.access.log  main;

    location / {
        auth_basic "Your mother is biubiubiu";
        auth_basic_user_file htpasswd;
        root   /usr/share/nginx/rutorrent;
        index  index.html index.htm index.php;
        include /etc/nginx/conf.d/rewrite/rutorrent.conf;
    }

    location ~ \.php$ {
        auth_basic "Your mother is biubiubiu";
        auth_basic_user_file htpasswd;
        root           /usr/share/nginx/rutorrent;
        fastcgi_pass   127.0.0.1:9000;
        fastcgi_index  index.php;
        fastcgi_param  SCRIPT_FILENAME  /usr/share/nginx/rutorrent$fastcgi_script_name;
        include        fastcgi_params;
    }

}
重启Nginx:
systemctl restart nginx
最后关闭防火墙:
systemctl stop firewalld.service
现在不出意外的话,使用浏览器打开你的服务器公网IP+端口12315就能访问到ruTorrent的WEBUI界面了。
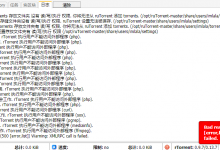
如果你不是一个追求完美的人,或者说你不需要rTorrent一些额外的功能,那么到这里你就已经安装完成了,可以拿去挂PT了。但做事就要做好,我们可以看到ruTorrent的日志信息那里会出现一些找不到组件的信息。
现在我们就来安装这些额外的组件。
安装mediainfo,很简单一条yum命令就能解决:
yum -y install mediainfo
安装ffmpeg:
rpm --import http://li.nux.ro/download/nux/RPM-GPG-KEY-nux.ro
rpm -Uvh http://li.nux.ro/download/nux/dextop/el7/x86_64/nux-dextop-release-0-1.el7.nux.noarch.rpm
yum -y install ffmpeg
ffmpeg -version
安装unrar:
cd ~
wget https://www.rarlab.com/rar/rarlinux-x64-5.6.b2.tar.gz
tar -xzvf rarlinux-x64-5.6.b2.tar.gz
cd rar
make
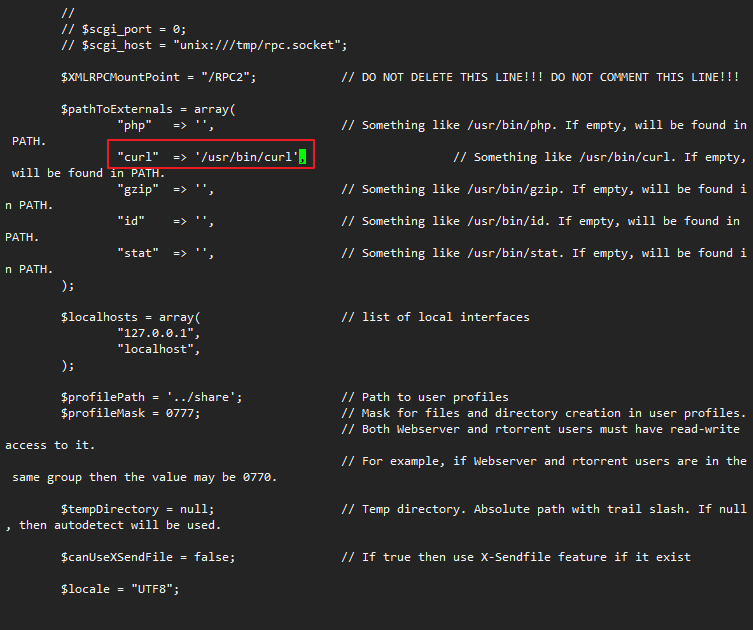
OK还剩一个curl的提示,请注意这是ruTorrent的一个BUG,实际上curl我们机器内是肯定安装好了的,解决的话很简单,编辑:
vi /usr/share/nginx/rutorrent/conf/config.php
直接在配置文件指定curl的绝对路径:
/usr/bin/curl
如图所示:
至此,rTorrent+ruTorrent的安装和配置就全部完成了。
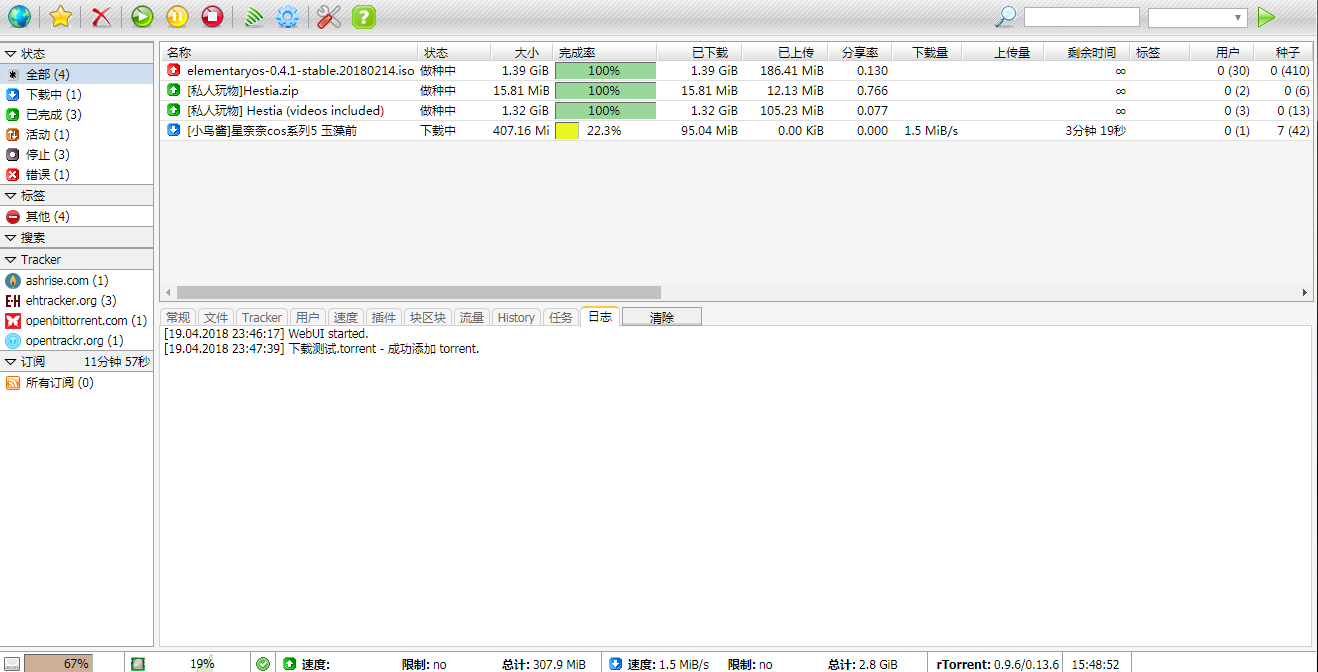
现在来测试使用一下我搭建的是否正常,首先访问的时候会提示让我们输入账号密码:

随便弄了几个种子试试下载:
写在最后:
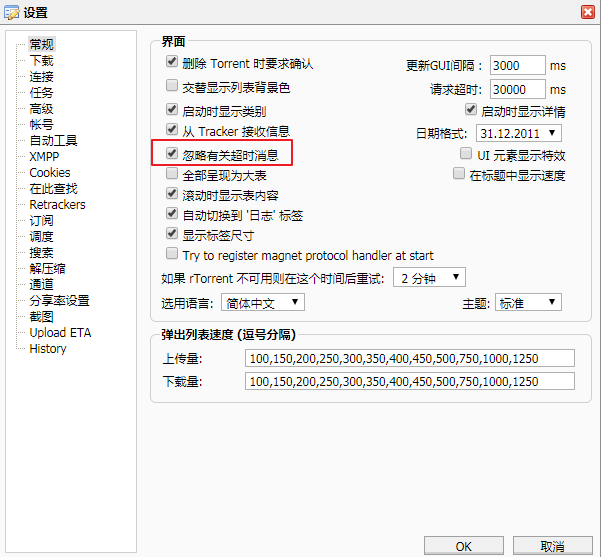
1、如果在日志那里经常提示rTorrent连接超时,可以不用管它,如果想解决这个问题,就在设置界面勾上如图红框所指的选项:
2、目前我还没有正式把这套“装备”拿来挂PT,所以挂PT的效果到底如何,现在还不得而知,当然我是肯定希望rTorrent+ruTorrent能够比Transmission更好,不然我不是白折腾了么。。。不过就目前而言,在功能方面反正是已经完爆了Transmission~
 荒岛
荒岛








请问能提供种子吗?
都搞好了,坐等
systemctl restart nginx
Job for nginx.service failed because the control process exited with error code. See “systemctl status nginx.service” and “journalctl -xe” for details
systemctl status nginx.service
● nginx.service – nginx – high performance web server
Loaded: loaded (/usr/lib/systemd/system/nginx.service; disabled; vendor preset: disabled)
Active: failed (Result: exit-code) since Wed 2018-06-13 08:13:45 EDT; 36s ago
Docs: http://nginx.org/en/docs/
Process: 2153 ExecStart=/usr/sbin/nginx -c /etc/nginx/nginx.conf (code=exited, status=1/FAILURE)
Jun 13 08:13:45 YUN83314033 systemd[1]: Starting nginx – high performance web server…
Jun 13 08:13:45 YUN83314033 nginx[2153]: nginx: [emerg] bind() to 0.0.0.0:12315 failed (13: Permission denied)
Jun 13 08:13:45 YUN83314033 systemd[1]: nginx.service: control process exited, code=exited status=1
Jun 13 08:13:45 YUN83314033 systemd[1]: Failed to start nginx – high performance web server.
Jun 13 08:13:45 YUN83314033 systemd[1]: Unit nginx.service entered failed state.
Jun 13 08:13:45 YUN83314033 systemd[1]: nginx.service failed.
这个看不懂。。不懂错在哪
系统的SElinux关了没?
还有运行php的是apche?不是装的ngnix吗
因为php是yum源安装的,默认php就是用apache这个用户名在跑,并不是apache这个软件。
your mother is biubiubiu 是什么鬼
难怪你这篇不用宝塔的nginx搭建了…用不了…一查好像宝塔把nginx权限卡死了…mmmp…重装系统去了..
宝塔应该可以跑这个ruTorrent才对,虽然我没试。。。
反正我没成功..不知道为啥。。
刚又重装用你这个方法边学边编译弄了2个小时….到了最后重启nginx的时候报错…心态爆炸了,继续去试一下qb,不行就deluge算了,主要是deluge没找到批量添加的插件,有时候下剧一排种子,每次一个个上传好麻烦
那我还是建议你直接用qb或者deluge,我最推荐deluge。
我今天一天就光配置服务器了…qb也凉了…独服,kvm,openvz都试了…我开始去源站把lib组件从v1.16更到v1.18装完后端口打不开…然后又照着你的配置抄了了一遍也不行,懵比了彻底…不弄了…就deluge…transmission当备用…
deluge确实好用,刷pt可以单种限速,但是没统计和批量上传多个种子又有些不方便…你看到过类似插件吗.?..web端的…
你可以把Deluge配置成瘦客户端,参考这里:https://lala.im/3433.html
配置好了后就可以用本地的Deluge客户端来管理服务器上面的Deluge,本地的Deluge客户端功能比WEB版本多的多。
我发现是我iterm2命令板有问题…每次运行yum update实际上未完成更新…改用termianl解决了一些errors…神奇
thin deluge 我试过,最在意的stream via vlc实现不了,所以准备当刷上传的工具。
继续在研究rt+rut…在git上找到一个centos7的一键脚本(link: https://github.com/etiennerached/rutorrent-auto-installer-centos)能在纯净centos7下使用,不过如果装面板就改变了nginx参数,然而我不会code,只能读懂文件夹位置不懂改,所以打算装个面板上传h5ai就不绑域名了,直接找rut的stream插件和h5ai从ip在线观看…plex都考虑弃了,那破通道还不如我服务器直接在线。
“装面板就改变了nginx参数”额,应该说装宝塔建站环境
你之前说qb编译出来端口访问不了,我昨天编译了一个试了下确实是这样,原因是之前文章里面编译的是开发版,就是还没正式发布的版本,估计是开发者弄了什么东西出BUG了。
你要想用qb的话,编译这个版本:https://github.com/qbittorrent/qBittorrent/archive/release-4.1.1.tar.gz
或者在这里找已经发布的版本:https://github.com/qbittorrent/qBittorrent/releases
额,最新的qb版本号不就是4.1.1吗?直接get clone不是4.1.1这个版本?
不是,git clone下来的是开发版本,也就是还没发布的版本,连Alpha都算不上。。。我实测编译这个版本会出现WEB界面访问不了,在releases那里下载4.1.1重新编译就好了。
转了一大圈,还是暂时用回了deluge…rutorrent的默认占用了80和443,想用h5ai在线但又不懂code改参数,只觉得应该可以用vhost能改一下…心塞得一批..
试了quickbox,感觉太臃肿了,感觉7o小独服都有些麻烦,其实git上有个一键脚本inexistence作者是Aniverse,他那个脚本还不错. 在git上搜rutorrent,h5ai无意搜到的,但是openvz的大盘鸡不能用,所以又放弃了,手里几个服务器想弄一套统一的标准化操作:D
再试下qb,不行就deluge+transimission算了…
BTW, Thin deluge on Mac没有远程连接设置, 手边没有windows机器…懒癌不想每次进虚拟机操作…
quickbox这个真心不推荐使用,臃肿是一方面,其次兼容性也不行。inexistence这个我知道,但是我没有用过,具体情况不得而知。
至于Mac的Deluge客户端没有远程连接设置,这个就有点蛋疼了,我在想,要是迅雷能支持PT那该多好啊,哈哈哈~
编译QB4.1.1失败…qbittorrent-nox command not found….wtf. ..懵比
..懵比
为什么会失败,我在CentOS7上屡试不爽,唯一可能让我失败的就是内存不够。。。
不少人吹捧quickbox的Dashboard,实在没感觉出哪里好,不加https的话浏览器报警,加了https以国内的情况来说加载速度又奇慢…你所说的兼容性是指他只兼容ubuntu16,18吗 我看过的你博文好像你只用Centos

inexistence 其实兼容也有些问题,毕竟它是多个脚本拼合到一起的,不过就我目前测试体验而言,我觉得其实比quickbox好
迅雷啊…现在我只是放着当备用了,cpu占用高还假死..现在基本上想下载的都没速度,哪怕是钻石会员,除了一些热度相对高的资源,然而热度高的资源通过服务器bt不就好了…
所以我现在是把bt,aira2都试一下,最后才用迅雷…
对了,音乐站不错啊,是模板吗,交出来
开源收费的程序:phpSound。
网上有破解版,可以找找看。
大佬,能做个宝塔面板下的教程吗