
最近这两天一直在折腾debian的preseed,只能说这玩意真的是个深坑,东拼西凑的文档看了无数遍。。。
我的需求是要做到真正的完全无人值守安装,安装过程中不能有任何交互行为。
搜了下Google,知道了大致思路是把preseed.cfg直接内嵌到initrd里面,然后重新封装iso,但是网上没有详细的文档,这里做个记录,留给可能需要的人。
首先安装需要用到的工具:
apt -y update
apt -y install p7zip-full genisoimage
下载debian的最小网络安装镜像,然后解压出来里面所有的内容:
cd /opt
wget https://cdimage.debian.org/debian-cd/current/amd64/iso-cd/debian-10.4.0-amd64-netinst.iso
7z x debian-10.4.0-amd64-netinst.iso -oimlala
首先编辑isolinux.cfg
nano imlala/isolinux/isolinux.cfg
把超时改为1,这步的目的是让系统开机的时候自动进入安装的步骤,而不需要人为的按一次回车:
timeout 1
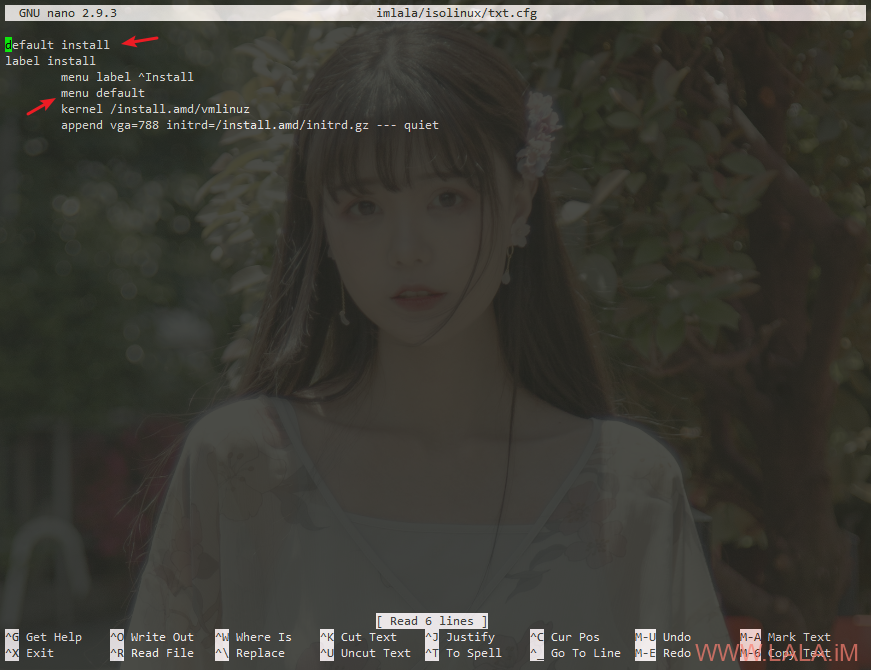
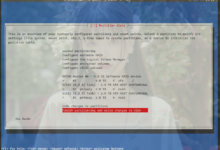
由于Debian10的菜单启动顺序是图形化安装在第一位,但图形化安装是不支持preseed的,所以这里要把启动顺序改一下。编辑txt.cfg:
nano imlala/isolinux/txt.cfg
把这个菜单设置为debian默认的,添加如下配置:
default install
        menu default
如图所示:
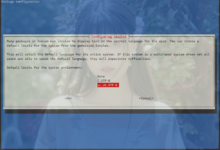
然后编辑gtk.cfg:
nano imlala/isolinux/gtk.cfg
取消图形化的默认安装菜单,删除如下的配置:
default installgui
        menu default
接下来新建preseed.cfg文件:
nano preseed.cfg
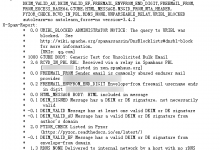
写入如下配置,这个配置我删删改改最终使用Debian10.4的iso在VMWare/VirtualBox测试通过,是可以做到完全无人值守的,另外我写了点注释方便理解:
# 配置语言
d-i debian-installer/locale string en_US

# 配置键盘
d-i keyboard-configuration/xkb-keymap select us

# 使用自动的方式配置网络(DHCP)
d-i netcfg/choose_interface select auto

# 配置hostname和domain
d-i netcfg/get_hostname string unassigned-hostname
d-i netcfg/get_domain string unassigned-domain
d-i netcfg/hostname string imlala

# 配置软件源
d-i mirror/country string manual
d-i mirror/http/hostname string mirrors.163.com
d-i mirror/http/directory string /debian
d-i mirror/http/proxy string

# 开启root登录并设置root密码,关闭普通用户创建
d-i passwd/root-login boolean true
d-i passwd/make-user boolean false
d-i passwd/root-password password 123456
d-i passwd/root-password-again password 123456

# 设置时区为东八区
d-i clock-setup/utc boolean true
d-i time/zone string Asia/Shanghai
d-i clock-setup/ntp boolean false

# 硬盘分区,注意/dev/sda这里的设备名,要改为你自己的设备名,一般虚拟机如VMware/VirtualBox都是这个设备名
d-i partman-auto/disk string /dev/sda
d-i partman-auto/method string regular
d-i partman-auto/choose_recipe select atomic

# 如果硬盘内之前有lvm或是raid的分区,全部删除
d-i partman-md/device_remove_md boolean true
d-i partman-lvm/device_remove_lvm boolean true

# 下面的这些配置可以做到没有交互式的完成硬盘分区
d-i partman-partitioning/confirm_write_new_label boolean true
d-i partman/choose_partition select finish
d-i partman/confirm boolean true
d-i partman/confirm_nooverwrite boolean true

# 禁止在安装的时候弹出CD/DVD扫描提示
d-i apt-setup/non-free boolean true
d-i apt-setup/contrib boolean true
d-i apt-setup/cdrom/set-first boolean false
d-i apt-setup/cdrom/set-next boolean false
d-i apt-setup/cdrom/set-failed boolean false

# 软件包选择
tasksel tasksel/first multiselect standard

# 安装额外的软件包,不更新系统
d-i pkgsel/include string openssh-server
d-i pkgsel/upgrade select none

# 禁止在安装的时候弹出popularity
popularity-contest popularity-contest/participate boolean false

# grub安装
d-i grub-installer/only_debian boolean true
d-i grub-installer/with_other_os boolean true
d-i grub-installer/bootdev string default

# 安装完成之后不要弹出安装完成的界面,直接重启
d-i finish-install/reboot_in_progress note
接下来把install.amd目录给写权限,我这是使用的64位iso,如果是32位这里的目录应该是i386:
chmod +w -R imlala/install.amd
解压initrd.gz:
gunzip imlala/install.amd/initrd.gz
把preseed.cfg的配置内嵌到initrd:
echo preseed.cfg | cpio -H newc -o -A -F imlala/install.amd/initrd
完成之后重新压缩initrd.gz并还原install.amd目录之前的权限:
gzip imlala/install.amd/initrd
chmod -w -R imlala/install.amd
最后一步,重新封装iso:
genisoimage -r -J -b isolinux/isolinux.bin -c isolinux/boot.cat -no-emul-boot -boot-load-size 4 -boot-info-table -o preseedv5-debian-10.4.0-amd64-netinst.iso imlala
在VirtualBox上的测试:
参考文献:
https://www.debian.org/releases/stable/example-preseed.txt
https://www.debian.org/mirror/list
https://wiki.debian.org/DebianInstaller/Preseed/EditIso
https://unix.stackexchange.com/questions/409212/preseed-directive-to-skip-another-cd-dvd-scanning


用 moeclub 的 DD 脚本不是也很方便嘛?当然,如果纯折腾这个功能,当我没说。
无人值守安装不应该配合PXE吗
你要一整套完整的环境那当然需要。。
老板,研究一下怎么在VPS里DD一个openwrt吧