
以往我们重装系统的时候都是用Grub2来引导,实际上配置Grub2是比较复杂的,你得找对应的磁盘和分区或者找到分区的UUID,继而才能成功引导新系统。
前段时间我发现用kexec的话配置起来更简单,只需要运行一条命令即可,这里做个记录。另外还解决了一些之前重装Debian时遇到的问题,比如机器网关IP不在同一子网,Grub2引导安装失败等。
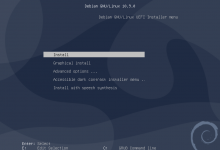
我测试了原系统是Debian12/11都能使用此方法来重装,另外我还单独测试了甲骨文ARM也是可以的。这里我就重装一个Debian12进行演示。首先安装kexec-tools:
apt -y update
apt -y install kexec-tools
然后下载initrd和linux文件:
wget https://deb.debian.org/debian/dists/bookworm/main/installer-amd64/current/images/netboot/debian-installer/amd64/initrd.gz
wget https://deb.debian.org/debian/dists/bookworm/main/installer-amd64/current/images/netboot/debian-installer/amd64/linux
如果是arm64:
wget https://deb.debian.org/debian/dists/bookworm/main/installer-arm64/current/images/netboot/debian-installer/arm64/initrd.gz
wget https://deb.debian.org/debian/dists/bookworm/main/installer-arm64/current/images/netboot/debian-installer/arm64/linux
解压initrd.gz:
gunzip initrd.gz
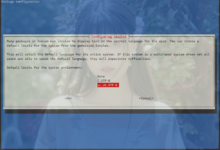
新建preseed配置文件,将你需要的配置写入到这个文件内:
nano preseed.cfg
下面我列出几个有特殊含义的preseed配置示例。
仅做简单配置,其余的安装步骤使用网络控制台(SSH)来操作,且原系统网关IP不在同一子网:
d-i debian-installer/locale string en_US
d-i keyboard-configuration/xkb-keymap select us

d-i netcfg/choose_interface select auto
d-i netcfg/disable_autoconfig boolean true
d-i netcfg/dhcp_failed note
d-i netcfg/dhcp_options select Configure network manually
d-i netcfg/get_ipaddress string x.x.x.x // IP地址
d-i netcfg/get_netmask string x.x.x.x // 子网掩码
d-i netcfg/get_gateway string none
d-i netcfg/get_nameservers string 8.8.8.8
d-i netcfg/confirm_static boolean true
d-i netcfg/get_hostname string unassigned-hostname
d-i netcfg/get_domain string unassigned-domain
d-i netcfg/hostname string imlala

d-i anna/choose_modules string network-console
d-i network-console/password password imlala // 控制台密码,控制台登录用户名是installer
d-i network-console/password-again password imlala // 控制台密码,控制台登录用户名是installer

d-i mirror/country string manual
d-i mirror/http/hostname string deb.debian.org
d-i mirror/http/directory string /debian
d-i mirror/http/proxy string

// 将x.x.x.x修改为你的机器网关IP,同时注意修改网卡接口名:ens3
d-i preseed/early_command string ip link set ens3 up && \
  echo "(ip route add default via x.x.x.x dev ens3 onlink || true) && echo 'nameserver 8.8.8.8' > /etc/resolv.conf" > /bin/ethdetect && \
  echo "(test -x /bin/ethdetect && /bin/ethdetect) || true" >> /usr/share/debconf/confmodule

// 将x.x.x.x修改为你的机器网关IP,同时注意修改网卡接口名:ens3
d-i preseed/late_command string sed -i 's/#PermitRootLogin.*/PermitRootLogin yes/g' /target/etc/ssh/sshd_config; \
  echo "post-up /sbin/ip route add default via x.x.x.x dev ens3 onlink" >> /target/etc/network/interfaces
直接使用预制文件配置所有内容,且原系统网关IP不在同一子网,同时原系统磁盘第一顺位不是主磁盘:
d-i debian-installer/locale string en_US

d-i keyboard-configuration/xkb-keymap select us

d-i netcfg/choose_interface select auto
d-i netcfg/disable_autoconfig boolean true
d-i netcfg/dhcp_failed note
d-i netcfg/dhcp_options select Configure network manually
d-i netcfg/get_ipaddress string x.x.x.x // IP地址
d-i netcfg/get_netmask string x.x.x.x // 子网掩码
d-i netcfg/get_gateway string none
d-i netcfg/get_nameservers string 8.8.8.8
d-i netcfg/confirm_static boolean true

d-i netcfg/get_hostname string unassigned-hostname
d-i netcfg/get_domain string unassigned-domain
d-i netcfg/hostname string imlala

d-i mirror/country string manual
d-i mirror/http/hostname string deb.debian.org
d-i mirror/http/directory string /debian
d-i mirror/http/proxy string

d-i passwd/root-login boolean true
d-i passwd/make-user boolean false
d-i passwd/root-password password imlala // 设置新系统的root密码
d-i passwd/root-password-again password imlala // 设置新系统的root密码

d-i clock-setup/utc boolean true
d-i time/zone string Asia/Shanghai
d-i clock-setup/ntp boolean false

d-i partman-auto/disk string /dev/vda // 系统磁盘设备名
d-i partman-auto/method string regular
d-i partman-auto/choose_recipe select atomic

d-i partman-md/device_remove_md boolean true
d-i partman-lvm/device_remove_lvm boolean true

d-i partman-partitioning/confirm_write_new_label boolean true
d-i partman/choose_partition select finish
d-i partman/confirm boolean true
d-i partman/confirm_nooverwrite boolean true

d-i apt-setup/non-free boolean true
d-i apt-setup/contrib boolean true
d-i apt-setup/cdrom/set-first boolean false
d-i apt-setup/cdrom/set-next boolean false
d-i apt-setup/cdrom/set-failed boolean false

tasksel tasksel/first multiselect standard

d-i pkgsel/include string openssh-server
d-i pkgsel/upgrade select none

popularity-contest popularity-contest/participate boolean false

d-i grub-installer/only_debian boolean true
d-i grub-installer/with_other_os boolean true
d-i grub-installer/bootdev string /dev/vda // 如果原系统磁盘第一顺位不是主磁盘,则在这里指定主磁盘设备名

d-i finish-install/reboot_in_progress note

// 将x.x.x.x修改为你的机器网关IP,同时注意修改网卡接口名:ens3
d-i preseed/early_command string ip link set ens3 up && \
  echo "(ip route add default via x.x.x.x dev ens3 onlink || true) && echo 'nameserver 8.8.8.8' > /etc/resolv.conf" > /bin/ethdetect && \
  echo "(test -x /bin/ethdetect && /bin/ethdetect) || true" >> /usr/share/debconf/confmodule

// 将x.x.x.x修改为你的机器网关IP,同时注意修改网卡接口名:ens3
d-i preseed/late_command string sed -i 's/#PermitRootLogin.*/PermitRootLogin yes/g' /target/etc/ssh/sshd_config; \
  echo "post-up /sbin/ip route add default via x.x.x.x dev ens3 onlink" >> /target/etc/network/interfaces
其他的常规配置这里我就不列举了,可以参考下面这几篇文章里的配置:
https://lala.im/8248.html、https://lala.im/7905.html、https://lala.im/8496.html、https://lala.im/8276.html
把preseed文件内嵌到initrd:
echo preseed.cfg | cpio -H newc -o -A -F initrd
重新压缩initrd:
gzip initrd
使用kexec加载linux和initrd.gz:
kexec -l linux --initrd=initrd.gz
执行如下命令开始重装:
kexec -e
ip不在同一子网的问题,解决办法参考:
https://lab.civicrm.org/infra/ops/blob/master/ansible/roles/kvm-server/templates/etc/preseeds/host/preseed.cfg
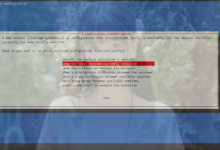
系统磁盘第一顺位不是主磁盘是什么意思?现在有很多VPS商家用的虚拟机管理面板是VirtFusion,这个面板提供的系统模板都是如此:
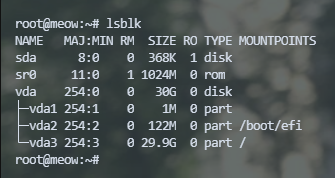
可以看到系统内有一个/dev/sda和一个/dev/vda,实际上/dev/sda是不可用的,如果你在预制文件内使用此配置:
d-i grub-installer/bootdev string default
则debian-installer程序在安装grub2引导的时候会尝试将grub2安装到/dev/sda,从而导致安装失败,系统无法引导。
对于此类系统,你需要指定实际可用的磁盘:
d-i grub-installer/bootdev string /dev/vda


谢谢lala按照教程成功安装了Windows 91 ltsc