
前两天买了一台腾讯云轻量,系统是控制台安装的Ubuntu18.04,后来发现有几个YDService的进程,怀疑是监控。。
说实话就目前而言腾讯云轻量的这个控制台和阿里的比起来要简陋不少,连VNC这种基础的功能都木有,不过据说在开发中?
可用的系统镜像也少的可怜,只有CentOS和Ubuntu,我也不是特别喜欢用Ubuntu,就想着折腾一下,来个全自动重装成Debian10?
理论上本文介绍的这个方法,只要你的preseed配置没问题,在任何KVM+系统是使用GRUB2引导的小鸡上都是适用的。后面我会详细说明一下preseed配置需要注意的地方。
其实这也算是这篇文章的一个小扩展:
更新源信息安装基本工具:
apt -y update
apt -y install wget
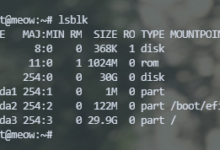
看看你的机器硬盘设备名:
df -h
可以看到是/dev/vda,记住这个,后续配置preseed的时候需要用到:
root@imlala:~# df -h
Filesystem      Size  Used Avail Use% Mounted on
udev            480M     0  480M   0% /dev
tmpfs            99M  1.6M   98M   2% /run
/dev/vda1        24G  1.1G   22G   5% /
tmpfs           494M     0  494M   0% /dev/shm
tmpfs           5.0M     0  5.0M   0% /run/lock
tmpfs           494M     0  494M   0% /sys/fs/cgroup
tmpfs            99M     0   99M   0% /run/user/0
下载debian网络安装所需的initrd和内核:
mkdir /boot/debian && cd /boot/debian
wget http://ftp.nl.debian.org/debian/dists/buster/main/installer-amd64/current/images/netboot/debian-installer/amd64/initrd.gz
wget http://ftp.nl.debian.org/debian/dists/buster/main/installer-amd64/current/images/netboot/debian-installer/amd64/linux
解压initrd:
gunzip initrd.gz
新建preseed配置文件:
nano preseed.cfg
这里给出我的一个配置模板:
# 配置语言
d-i debian-installer/locale string en_US

# 配置键盘
d-i keyboard-configuration/xkb-keymap select us

# 使用自动的方式配置网络(DHCP)
d-i netcfg/choose_interface select auto

# 配置hostname和domain
d-i netcfg/get_hostname string unassigned-hostname
d-i netcfg/get_domain string unassigned-domain
d-i netcfg/hostname string imlala

# 配置软件源
d-i mirror/country string manual
d-i mirror/http/hostname string ftp.tw.debian.org
d-i mirror/http/directory string /debian
d-i mirror/http/proxy string

# 开启root登录并设置root密码,关闭普通用户创建
d-i passwd/root-login boolean true
d-i passwd/make-user boolean false
d-i passwd/root-password password 123456
d-i passwd/root-password-again password 123456

# 设置时区为东八区
d-i clock-setup/utc boolean true
d-i time/zone string Asia/Shanghai
d-i clock-setup/ntp boolean false

# 硬盘分区,注意这里的设备名,要改为你自己的设备名,一般虚拟机如VMware/VirtualBox都是/dev/sda,VPS是/dev/vda
d-i partman-auto/disk string /dev/vda
d-i partman-auto/method string regular
d-i partman-auto/choose_recipe select atomic

# 如果硬盘内之前有lvm或是raid的分区,全部删除
d-i partman-md/device_remove_md boolean true
d-i partman-lvm/device_remove_lvm boolean true

# 下面的这些配置可以做到没有交互式的完成硬盘分区
d-i partman-partitioning/confirm_write_new_label boolean true
d-i partman/choose_partition select finish
d-i partman/confirm boolean true
d-i partman/confirm_nooverwrite boolean true

# 禁止在安装的时候弹出CD/DVD扫描提示
d-i apt-setup/non-free boolean true
d-i apt-setup/contrib boolean true
d-i apt-setup/cdrom/set-first boolean false
d-i apt-setup/cdrom/set-next boolean false
d-i apt-setup/cdrom/set-failed boolean false

# 软件包选择
tasksel tasksel/first multiselect standard

# 安装额外的软件包,不更新系统
d-i pkgsel/include string openssh-server
d-i pkgsel/upgrade select none

# 禁止在安装的时候弹出popularity
popularity-contest popularity-contest/participate boolean false

# grub安装
d-i grub-installer/only_debian boolean true
d-i grub-installer/with_other_os boolean true
d-i grub-installer/bootdev string default

# 安装完成之后不要弹出安装完成的界面,直接重启
d-i finish-install/reboot_in_progress note

# 允许SSH服务使用root登录
d-i preseed/late_command string in-target sed -i 's/#PermitRootLogin.*/PermitRootLogin yes/g' /etc/ssh/sshd_config
注意事项:
1.选一个好的软件源,有助于提升安装速度:
d-i mirror/http/hostname string ftp.tw.debian.org
在这里查找更多软件源:https://www.debian.org/mirror/list
2.我配置上的ROOT密码是123456,这是一个弱密码,请修改好你的ROOT密码:
d-i passwd/root-password password 123456
d-i passwd/root-password-again password 123456
3.硬盘设备名要改为你之前用df -h查看到的设备名,否则在安装过程中无法自动分区:
d-i partman-auto/disk string /dev/vda
4.腾讯云的机器支持DHCP,所以你可以直接照搬我上面的配置来配置网络,如果不支持DHCP,就需要自己手动配置了:
d-i netcfg/disable_autoconfig boolean true
d-i netcfg/get_ipaddress string 192.168.1.42 # IP地址
d-i netcfg/get_netmask string 255.255.255.0 # 子网掩码
d-i netcfg/get_gateway string 192.168.1.1 # 网关
d-i netcfg/get_nameservers string 8.8.8.8 # DNS服务器地址
d-i netcfg/confirm_static boolean true
写好preseed配置后,把preseed的配置内嵌到initrd:
echo preseed.cfg | cpio -H newc -o -A -F initrd
然后重新压缩initrd:
gzip initrd
接着添加一个grub菜单:
nano /etc/grub.d/40_custom
写入如下配置:
menuentry 'Debian 10 install' {
set root='hd0,msdos1'
linux /boot/debian/linux
initrd /boot/debian/initrd.gz
}
更新grub配置:
update-grub
查看你的grub菜单启动顺序(记住永远不要改动这个文件,所有有关grub的配置不应该在这个文件内修改:)
cat /boot/grub/grub.cfg
怎么看这个启动顺序?可以看我之前的这篇文章,这里就不多说了:
对于腾讯云控制台安装的Ubuntu18.04,后续你又没有安装新内核的话,那么你之前添加的菜单启动位置是在2:
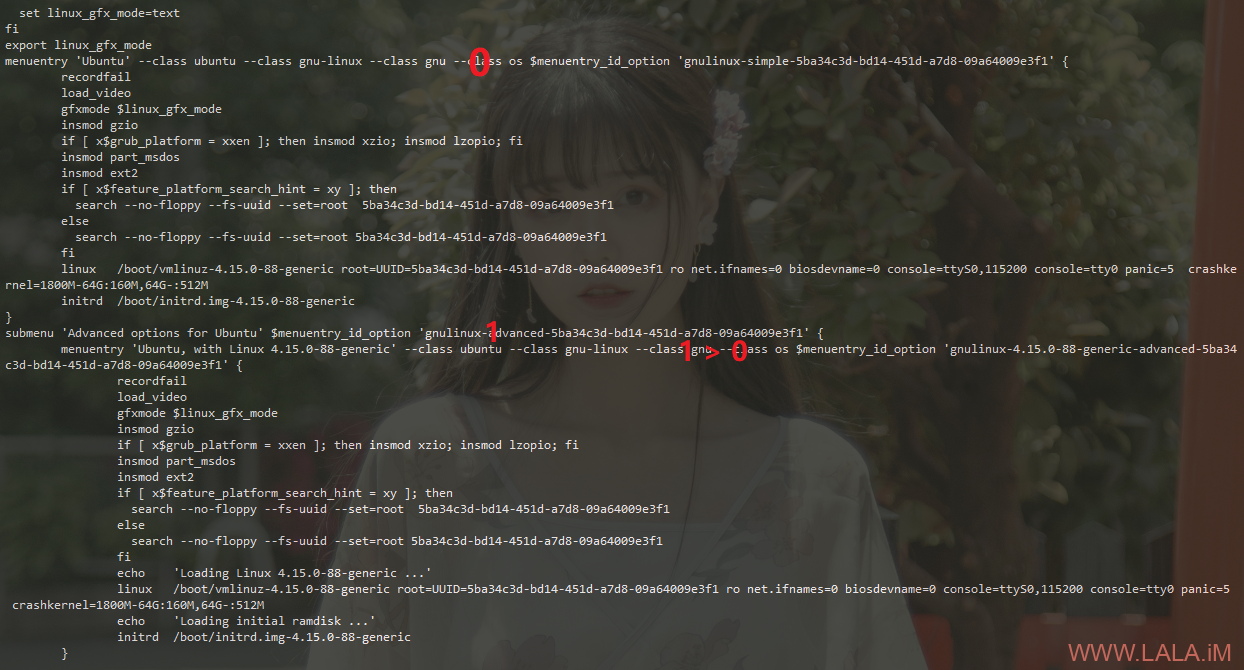
所以编辑grub的配置:
nano /etc/default/grub
修改默认启动顺序为2:
GRUB_DEFAULT=2
对于Ubuntu18.04而言,如果这个配置文件内有这一行配置:
GRUB_TIMEOUT_STYLE=hidden
那么修改为,没有的话就不用管:
GRUB_TIMEOUT_STYLE=menu
修改超时时间(可选:)
GRUB_TIMEOUT=5
再更新一次grub就大功告成啦:
update-grub
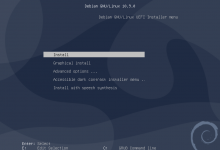
重启机器就开始安装了:
reboot
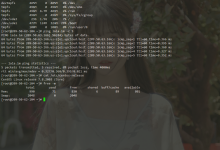
大概十分钟的样子系统就能装好了,重新登录上来,看看机器是否正常:


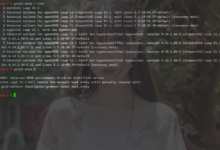


lala买的是硅谷?延迟怎样?
买的香港,我这里延迟25ms。
武汉延迟都才25?
学习了大佬