Sync-in介绍(摘自项目页面)
Sync-in旨在让个人和组织完全掌控自己的文件和文档,让您可以托管自己的工作区,以便与您的团队、社区或个人用户一起组织、访问和协作处理内容。它运行在您自己的基础设施上,让您掌控自己的数据,同时实现安全的文件共享、协作工作空间和细粒度的访问控制。
我初次看到这个项目的时候,说实话第一感觉就是这个前端未必有点太“复古”了吧,不知道该怎么表达好,就是感觉不够现代化。实际部署后使用下来感觉操作也不太顺手,很多操作很别扭,熟悉了好长时间才有所好转。。简单总结就是UI/UX这块有点拉跨。。
但我为什么还是要推荐一下这个项目,因为这个项目的完成度真的很高,有点惊艳到我了,别看它只有1.4k star,该有的功能全部都有,见与开源软件比较、与闭源软件比较。
它甚至还有全平台的同步客户端,如果你不在意UI/UX这块的问题,(其实看久了也还好= =)完全可以用它平替掉Nextcloud之类的产品。我这段时间使用下来,这个程序给我的总体感觉就是:看似古董,但稳的一匹。
这篇文章记录下Sync-in的部署步骤(含Collabora Online、OnlyOffice集成)
安装Docker:
apt -y update
apt -y install curl git
curl -fsSL https://get.docker.com -o get-docker.sh
sh get-docker.sh
安装NGINX、CertBot:
apt update
apt install nginx python3-certbot-nginx
下载解压部署需要用到的各种配置文件:
cd /opt
curl -L -o sync-in-docker.tar.gz \
https://github.com/Sync-in/server/releases/latest/download/sync-in-docker.tar.gz && \
tar zxvf sync-in-docker.tar.gz
进入目录:
cd sync-in-docker编辑environment.yaml:
nano environment.yaml我的配置如下:
server:
  trustProxy: 1
mysql:
  url: mysql://root:mysqlpassword@mariadb:3306/sync_in # 修改mysqlpassword为强密码
auth:
  encryptionKey: changeEncryptionKeyWithStrongKey # openssl rand -hex 16 生成
  token:
    access:
      secret: changeAccessWithStrongSecret # openssl rand -hex 16 生成
    refresh:
      secret: changeRefreshWithStrongSecret # openssl rand -hex 16 生成
applications:
  files:
    dataPath: /app/data
    collabora:
      enabled: true # 不需要文档协作可以关闭
    onlyoffice:
      enabled: true # 不需要文档协作可以关闭
      secret: changeOnlyofficeWithStrongSecret # openssl rand -hex 16 生成
编辑docker-compose.yaml:
nano docker-compose.yaml我的配置如下:
include:
#  - ./config/nginx/docker-compose.nginx.yaml
  - ./config/onlyoffice/docker-compose.onlyoffice.yaml
  - ./config/collabora/docker-compose.collabora.yaml
#  - ./config/sync-in-desktop-releases/docker-compose.sync-in-desktop-releases.yaml

name: sync-in
services:
  sync_in:
    image: syncin/server:2
    container_name: sync-in
    restart: always
    environment:
      - INIT_ADMIN=true
      - INIT_ADMIN_PASSWORD=adminpass # 设置管理员密码
      - INIT_ADMIN_LOGIN=imlala # 设置管理员账号
      - PUID=${PUID:-8888}
      - PGID=${PGID:-8888}
    ports:
      - "127.0.0.1:8080:8080"
    volumes:
      - ./environment.yaml:/app/environment/environment.yaml
      - ./data:/app/data
      - desktop_releases:/app/static/releases:ro
    depends_on:
      - mariadb
    logging:
      driver: json-file
      options:
        max-size: "25m"
        max-file: "5"
    networks:
      - sync_in_network

  mariadb:
    image: mariadb:11
    container_name: mariadb
    restart: always
    command: --innodb_ft_cache_size=16000000 --max-allowed-packet=1G
    environment:
      MYSQL_ROOT_PASSWORD: mysqlpassword # 设置数据库root密码,确保与environment.yaml内的值一致
      MYSQL_DATABASE: sync_in
    volumes:
      - ./mariadb_data:/var/lib/mysql
    networks:
      - sync_in_network

networks:
  sync_in_network:
    driver: bridge

volumes:
  desktop_releases:
这个配置和官方的出入有些大,具体说一下为什么这么配置。
1.我不使用Docker运行NGINX,因为这会占用我主机的80/443端口,所以注释掉docker-compose.nginx.yaml。这个修改会同时影响到collabora和onlyoffice容器的部署,所以后面还需要对collabora以及onlyoffice容器的配置进行修改,主要就是加个端口映射把端口暴露出来。后续我将使用主机的NGINX统一反代sync-in、collabora、onlyoffice。
2.sync-in和mariadb容器用来存重要数据的卷都改为bind mount,这是官方文档推荐用于生产环境的做法。这个desktop_releases的命名卷我就不改了,不重要哈,可有可无。
3.取消docker-compose.onlyoffice.yaml、docker-compose.collabora.yaml注释,如果你不需要文档编辑可以保持默认的注释状态。
编辑docker-compose.collabora.yaml:
nano config/collabora/docker-compose.collabora.yaml修改–o:ssl.termination=true,添加端口映射把9980端口暴露出来:
services:
  collabora:
    image: collabora/code
    container_name: collabora
    restart: always
    environment:
      extra_params: >-
        --o:ssl.enable=false
        --o:ssl.termination=true
        --o:logging.disable_server_audit=true
        --o:admin_console.enable=false
    cap_drop:
      - ALL
    cap_add:
      - SYS_CHROOT
      - SYS_ADMIN
      - FOWNER
      - CHOWN
    logging:
      driver: json-file
      options:
        max-size: "25m"
        max-file: "5"
    networks:
      - sync_in_network
    ports:
      - "127.0.0.1:9980:9980"
编辑docker-compose.onlyoffice.yaml:
nano config/onlyoffice/docker-compose.onlyoffice.yaml修改JWT_SECRET为你在environment.yaml内配置的值,添加端口映射把80端口暴露出来:
services:
  onlyoffice:
    image: onlyoffice/documentserver:9.3
    container_name: onlyoffice
    restart: always
    environment:
      - JWT_SECRET=changeOnlyofficeWithStrongSecret
      - JWT_IN_BODY=true
      - USE_UNAUTHORIZED_STORAGE=true
    logging:
      driver: json-file
      options:
        max-size: "25m"
        max-file: "5"
    networks:
      - sync_in_network
    ports:
      - "127.0.0.1:9981:80"
启动:
docker compose up -d新建NGINX站点配置文件,统一反代sync-in、collabora、onlyoffice:
nano /etc/nginx/sites-available/sync-in写入如下内容:
map $http_upgrade $connection_upgrade {
    default upgrade;
    ''      close;
}

upstream sync_in_server {
    server 127.0.0.1:8080;
    keepalive 32;
}

upstream collabora {
    server 127.0.0.1:9980;
    keepalive 32;
}

upstream onlyoffice {
    server 127.0.0.1:9981;
    keepalive 32;
}

server {
    listen 80;
    listen [::]:80;
    server_name sync-in.example.com;

    # General settings
    charset UTF-8;
    server_tokens off;
    access_log off;
    include mime.types;

    # Optimized file sending
    sendfile on;
    tcp_nodelay on;
    tcp_nopush on;

    # Buffering for requests proxied to Node
    proxy_http_version 1.1;
    chunked_transfer_encoding on;
    proxy_set_header Host $host;
    proxy_set_header X-Real-IP  $remote_addr;
    proxy_set_header X-Forwarded-For $proxy_add_x_forwarded_for;
    proxy_set_header X-Forwarded-Host $host;
    proxy_set_header X-Forwarded-Proto $scheme;
    proxy_set_header Upgrade $http_upgrade;
    proxy_set_header Connection $connection_upgrade;
    proxy_cache_bypass $http_upgrade;
    proxy_redirect off;

    # Proxy buffering settings
    proxy_buffering off; # nginx -> node
    proxy_buffers 8 512k;
    proxy_buffer_size 512k; # node highWaterMark

    # Generous timeouts for long transfers or ws
    proxy_read_timeout 3600s;
    proxy_send_timeout 3600s;
    keepalive_timeout  180  90s;

    # Clients settings
    proxy_request_buffering off; # client -> nginx
    large_client_header_buffers 4 16k;
    client_max_body_size 0;
    client_body_buffer_size 25M;

    location / {
        proxy_pass http://sync_in_server;
    }

    location ~* .(ico|jpg|png|gif|jpeg|swf|woff|svg)$ {
        # nginx always use the most accurate rule in its internal routing policies
        proxy_pass http://sync_in_server;
        gzip_static on;
        gzip_comp_level 5;
        expires 1d;
        add_header Cache-Control public;
    }

    # Static Files
    location ^~ /browser/ {
        proxy_pass http://collabora;
        proxy_set_header Host $http_host;
    }

    # WOPI Discovery URL and Capabilities
    location ^~ /hosting/ {
        proxy_pass http://collabora;
        proxy_set_header Host $http_host;
    }

    # Main WebSocket + Docs Management
    location ^~ /cool/ {
        proxy_pass http://collabora;
        proxy_set_header Host $http_host;
        proxy_set_header Upgrade $http_upgrade;
        proxy_set_header Connection $connection_upgrade;
    }

    location ^~ /onlyoffice/ {
        proxy_pass http://onlyoffice/;
        proxy_set_header X-Real-IP  $remote_addr;
        proxy_set_header X-Forwarded-For $proxy_add_x_forwarded_for;
        proxy_set_header X-Forwarded-Host $host/onlyoffice;
        proxy_set_header X-Forwarded-Proto $scheme;
        proxy_set_header Host $host;
        proxy_set_header Upgrade $http_upgrade;
        proxy_set_header Connection $connection_upgrade;
        proxy_no_cache 1;
        proxy_cache_bypass 1;
    }
}
这里有个细节值得注意,反代onlyoffice的时候,proxy_pass http://onlyoffice/;末尾要加一个/。如果你不需要文档编辑,可以从文件中移除以下内容:
upstream collabora {
    server 127.0.0.1:9980;
    keepalive 32;
}

upstream onlyoffice {
    server 127.0.0.1:9981;
    keepalive 32;
}

server {
    ...
    # Static Files
    location ^~ /browser/ {
        proxy_pass http://collabora;
        proxy_set_header Host $http_host;
    }

    # WOPI Discovery URL and Capabilities
    location ^~ /hosting/ {
        proxy_pass http://collabora;
        proxy_set_header Host $http_host;
    }

    # Main WebSocket + Docs Management
    location ^~ /cool/ {
        proxy_pass http://collabora;
        proxy_set_header Host $http_host;
        proxy_set_header Upgrade $http_upgrade;
        proxy_set_header Connection $connection_upgrade;
    }

    location ^~ /onlyoffice/ {
        proxy_pass http://onlyoffice/;
        proxy_set_header X-Real-IP  $remote_addr;
        proxy_set_header X-Forwarded-For $proxy_add_x_forwarded_for;
        proxy_set_header X-Forwarded-Host $host/onlyoffice;
        proxy_set_header X-Forwarded-Proto $scheme;
        proxy_set_header Host $host;
        proxy_set_header Upgrade $http_upgrade;
        proxy_set_header Connection $connection_upgrade;
        proxy_no_cache 1;
        proxy_cache_bypass 1;
    }
}
启用站点:
ln -s /etc/nginx/sites-available/sync-in /etc/nginx/sites-enabled/sync-in签发证书:
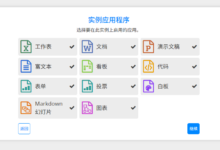
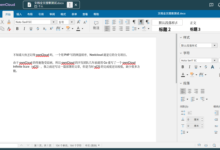
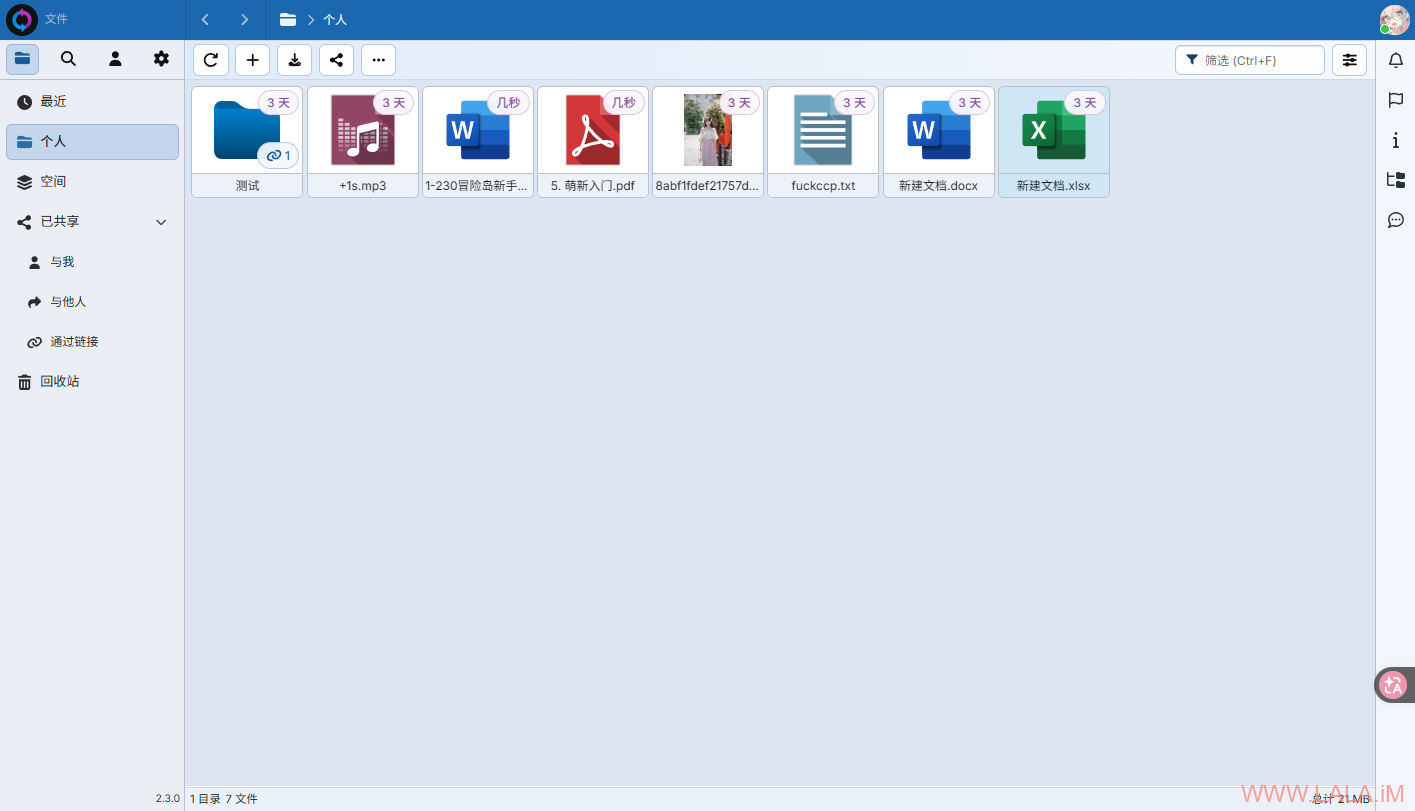
certbot --nginx我上传了多种不同格式的文件,文档、PDF、图片等等,全部都可以正常预览、打开、下载、分享:


最后补充点内容,其实collabora和onlyoffice只选择部署一个就行了,我个人更推荐onlyoffice,无论是UI/UX还是响应速度,onlyoffice都是吊打collabora的。当你两个同时部署的时候,会弹出选择框,让你选择用哪个打开: