
Pangolin介绍(摘自官方项目页面)
Pangolin is a self-hosted tunneled reverse proxy server with identity and access control, designed to securely expose private resources on distributed networks. Acting as a central hub, it connects isolated networks — even those behind restrictive firewalls — through encrypted tunnels, enabling easy access to remote services without opening ports.
如果你用过CloudFlare的Zero Trust Tunnel,那就可以简单理解为Pangolin是一个开源替代品。主要作用就是内网穿透,只不过加上了很多实用的功能,例如:身份验证、访问控制、自动HTTPS等。Pangolin的核心还是WireGuard,对,又是WireGuard=。=
虽然Pangolin用了WireGuard,但是一定不要将Pangolin和一众基于WireGuard的VPN混为一谈,Pangolin的目标不是组网,而是暴露内网的服务,并且通过反向代理来提供更多的周边功能。
下面记录下Pangolin部署的步骤。开始前需要做一些准备工作。
1、一个域名做好通配符解析。例如:*.example.com
2、一台小VPS,内存1GB就足够了。系统选择Debian12。如果你肉身在中国,最好选择亚太地区(境外)的VPS,这样可以省去很多不必要的麻烦,例如:域名备案、Docker代理配置等。
3、系统的TCP 80/TCP 443/UDP 51820端口不能被占用。
安装Docker:
apt -y update
apt -y install git curl
curl -fsSL https://get.docker.com -o get-docker.sh
sh get-docker.sh
创建目录和compose文件:
mkdir -p /opt/pangolin && cd /opt/pangolin && nano docker-compose.yml
写入如下内容:
services:
  pangolin:
    image: fosrl/pangolin:1.3.2
    container_name: pangolin
    restart: unless-stopped
    volumes:
      - ./config:/app/config
    healthcheck:
      test: ["CMD", "curl", "-f", "http://localhost:3001/api/v1/"]
      interval: "3s"
      timeout: "3s"
      retries: 15

  gerbil:
    image: fosrl/gerbil:1.0.0
    container_name: gerbil
    restart: unless-stopped
    depends_on:
      pangolin:
        condition: service_healthy
    command:
      - --reachableAt=http://gerbil:3003
      - --generateAndSaveKeyTo=/var/config/key
      - --remoteConfig=http://pangolin:3001/api/v1/gerbil/get-config
      - --reportBandwidthTo=http://pangolin:3001/api/v1/gerbil/receive-bandwidth
    volumes:
      - ./config/:/var/config
    cap_add:
      - NET_ADMIN
      - SYS_MODULE
    ports:
      - 51820:51820/udp
      - 443:443 # Port for traefik because of the network_mode
      - 80:80 # Port for traefik because of the network_mode

  traefik:
    image: traefik:v3.3.3
    container_name: traefik
    restart: unless-stopped
    network_mode: service:gerbil # Ports appear on the gerbil service
    depends_on:
      pangolin:
        condition: service_healthy
    command:
      - --configFile=/etc/traefik/traefik_config.yml
    volumes:
      - ./config/traefik:/etc/traefik:ro # Volume to store the Traefik configuration
      - ./config/letsencrypt:/letsencrypt # Volume to store the Let's Encrypt certificates

networks:
  default:
    driver: bridge
    name: pangolin
创建config目录并在目录内新建一个用于Pangolin的配置文件:
mkdir config && cd config && nano config.yml
写入如下配置,需要修改的位置写了注释:
app:
  dashboard_url: "https://pangolin.example.com" # 在这里配置你的域名,请使用子域名。
  log_level: "info"
  save_logs: true

domains:
  imlala-test:
    base_domain: "example.com" # 在这里配置你的域名,请使用根域名。
    cert_resolver: "letsencrypt"
    prefer_wildcard_cert: false

server:
  external_port: 3000
  internal_port: 3001
  next_port: 3002
  internal_hostname: "pangolin"
  session_cookie_name: "p_session_token"
  resource_access_token_param: "p_token"
  resource_access_token_headers:
    id: "P-Access-Token-Id"
    token: "P-Access-Token"
  resource_session_request_param: "p_session_request"
  secret: "RAQrAI4YVwvTJzDGu5icA530SRA+98WEFW0HgGyq0tI=" # 使用命令openssl rand -base64 32生成

traefik:
  cert_resolver: "letsencrypt"
  http_entrypoint: "web"
  https_entrypoint: "websecure"

gerbil:
  start_port: 51820
  base_endpoint: "gerbil.example.com" # 在这里配置你的域名,请使用子域名。
  use_subdomain: false
  block_size: 24
  site_block_size: 30
  subnet_group: 100.89.137.0/20

rate_limits:
  global:
    window_minutes: 1
    max_requests: 100

email:
  smtp_host: "mail.example.com"
  smtp_port: 587
  smtp_user: "smtp"
  smtp_pass: "password"
  no_reply: "smtp@example.com"

users:
  server_admin:
    email: "imlala@example.com" # 管理员账号
    password: "password" # 管理员密码

flags:
  require_email_verification: true
  disable_signup_without_invite: true
  disable_user_create_org: true
  allow_raw_resources: true
  allow_base_domain_resources: true
注意事项:
1、如果没有配置SMTP,可以将require_email_verification改为false。
2、disable_signup_without_invite我改成了true,这意味着关闭了用户注册的功能,仅限私人使用。
继续在config目录内创建一个名为traefik的目录并进入该目录:
mkdir traefik && cd traefik
新建traefik_config.yml配置文件:
nano traefik_config.yml
写入如下配置,需要修改的位置写了注释:
api:
  insecure: true
  dashboard: true

providers:
  http:
    endpoint: "http://pangolin:3001/api/v1/traefik-config"
    pollInterval: "5s"
  file:
    filename: "/etc/traefik/dynamic_config.yml"

experimental:
  plugins:
    badger:
      moduleName: "github.com/fosrl/badger"
      version: "v1.1.0"

log:
  level: "INFO"
  format: "common"

certificatesResolvers:
  letsencrypt:
    acme:
      httpChallenge:
        entryPoint: web
      email: imlala@example.com # 在这里配置你的邮箱地址
      storage: "/letsencrypt/acme.json"
      caServer: "https://acme-v02.api.letsencrypt.org/directory"

entryPoints:
  web:
    address: ":80"
  websecure:
    address: ":443"
    transport:
      respondingTimeouts:
        readTimeout: "30m"
    http:
      tls:
        certResolver: "letsencrypt"

serversTransport:
  insecureSkipVerify: true
新建dynamic_config.yml配置文件:
nano dynamic_config.yml
写入如下配置,需要修改的位置写了注释:
http:
  middlewares:
    redirect-to-https:
      redirectScheme:
        scheme: https

  routers:
    # HTTP to HTTPS redirect router
    main-app-router-redirect:
      rule: "Host(`pangolin.example.com`)" # 在这里配置你的域名,必须与config.yml内的dashboard_url保持一致
      service: next-service
      entryPoints:
        - web
      middlewares:
        - redirect-to-https

    # Next.js router (handles everything except API and WebSocket paths)
    next-router:
      rule: "Host(`pangolin.example.com`) && !PathPrefix(`/api/v1`)" # 在这里配置你的域名,必须与config.yml内的dashboard_url保持一致
      service: next-service
      entryPoints:
        - websecure
      tls:
        certResolver: letsencrypt

    # API router (handles /api/v1 paths)
    api-router:
      rule: "Host(`pangolin.example.com`) && PathPrefix(`/api/v1`)" # 在这里配置你的域名,必须与config.yml内的dashboard_url保持一致
      service: api-service
      entryPoints:
        - websecure
      tls:
        certResolver: letsencrypt

    # WebSocket router
    ws-router:
      rule: "Host(`pangolin.example.com`)" # 在这里配置你的域名,必须与config.yml内的dashboard_url保持一致
      service: api-service
      entryPoints:
        - websecure
      tls:
        certResolver: letsencrypt

  services:
    next-service:
      loadBalancer:
        servers:
          - url: "http://pangolin:3002" # Next.js server

    api-service:
      loadBalancer:
        servers:
          - url: "http://pangolin:3000" # API/WebSocket server
启动:
docker compose up -d
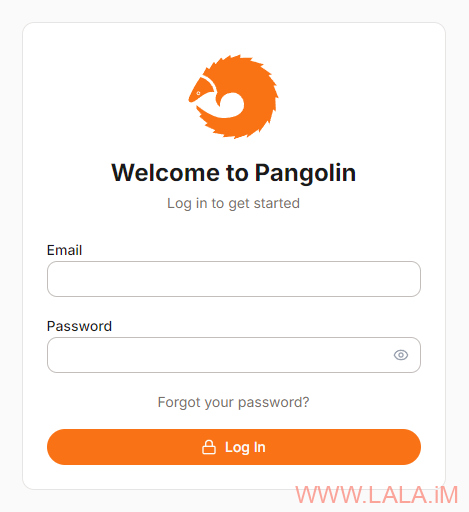
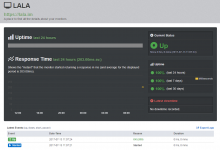
如果一切正常你将可以访问Pangolin的登录界面:
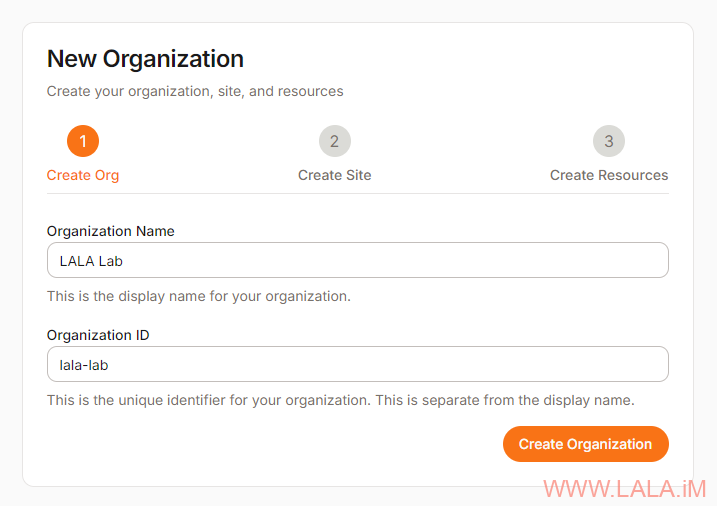
登录进去后需要创建一个组织,组织是一种收集站点、用户和资源的方式:
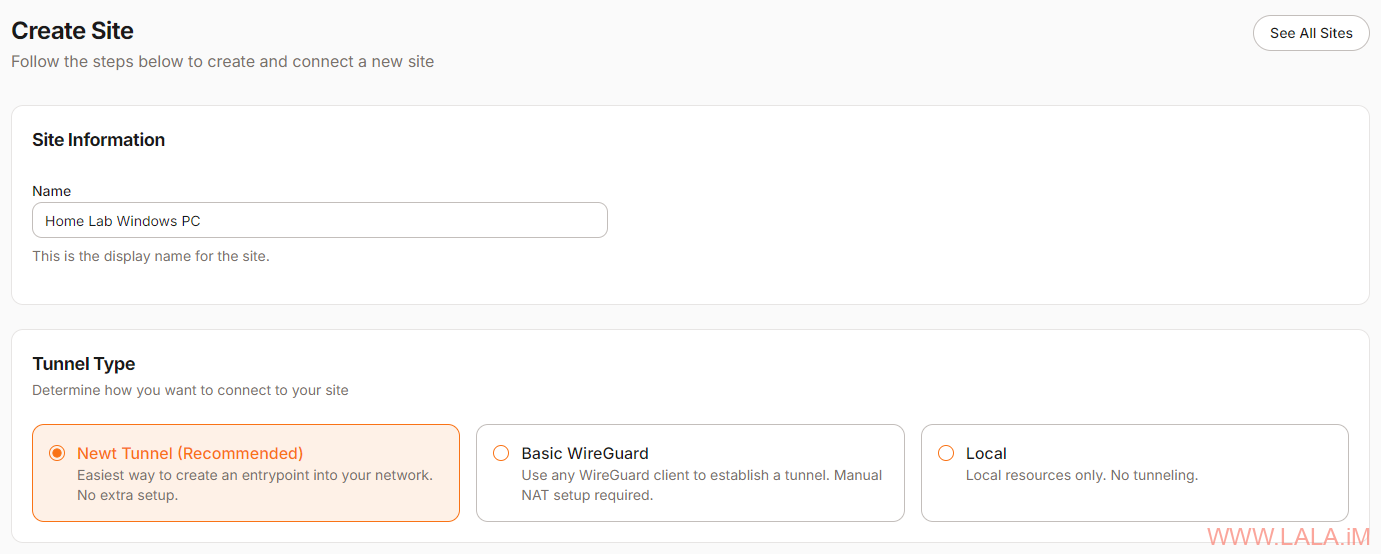
接下来需要创建站点,站点实际上是指你希望通过隧道进行代理的远程位置。例如:你家里的电脑、小主机、NAS等。
这里我用家里的Windows电脑演示一下,名字就随便起个,比如Home Lab Windows之类的,需要注意的是Tunnel类型,这里我选择的是Newt(Pangolin推荐的)
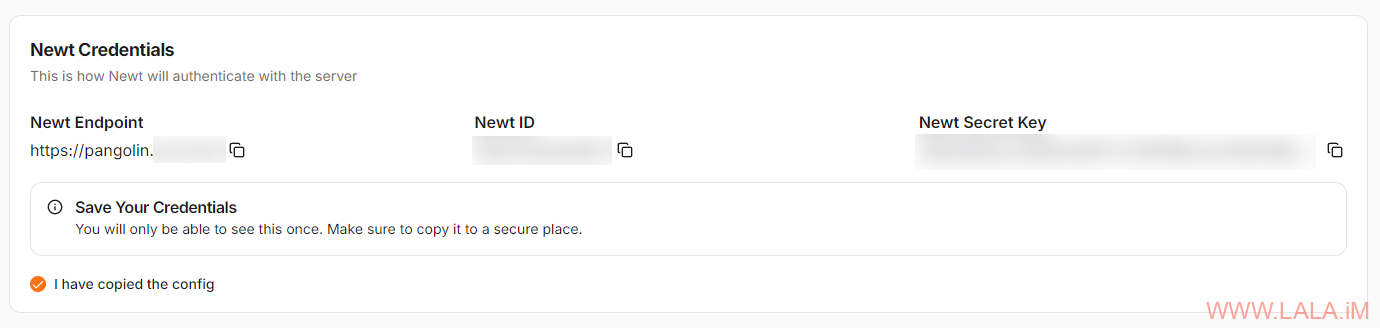
它会回显一个ID和Secret,这个只显示一次,务必保存好,当你每次使用Newt连接的时候都需要用到:
现在需要在Windows安装Newt,Pangolin提供Newt的二进制文件,下载一下就行:
https://github.com/fosrl/newt/releases/download/1.1.3/newt_windows_amd64.exe
运行Newt:
./newt \
--id your_id \
--secret your_secret \
--endpoint https://pangolin.example.com
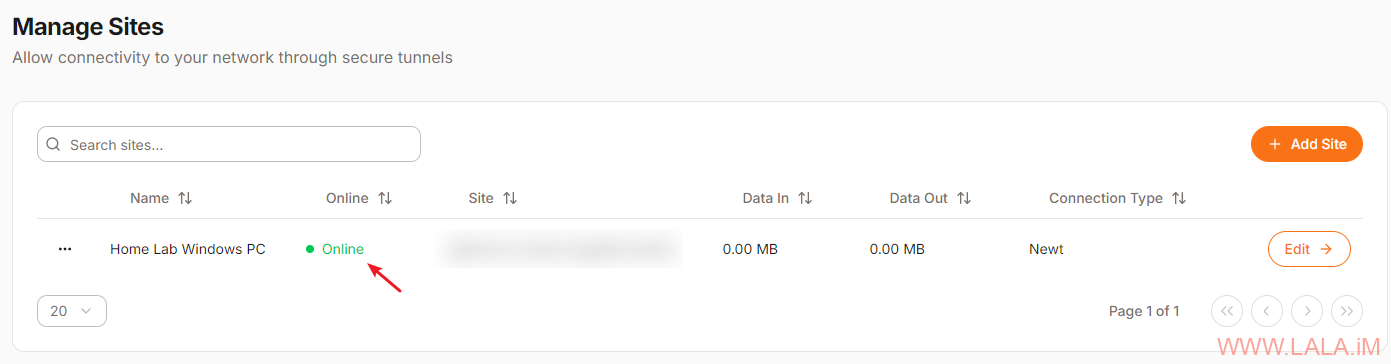
如果能够成功建立连接,那么在Pangolin的控制台应该就能看到这台设备目前是“在线”状态:
接下来需要在Pangolin的控制台创建“资源”,“资源”就相当于你想要暴露出去的任意服务,一个服务可以是一个资源,也可以是多个服务共用一个资源。这里我拿qBittorrent演示。
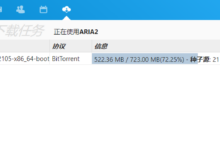
假设现在我想把这台Windows电脑上的qBittorrent Web UI暴露出去:
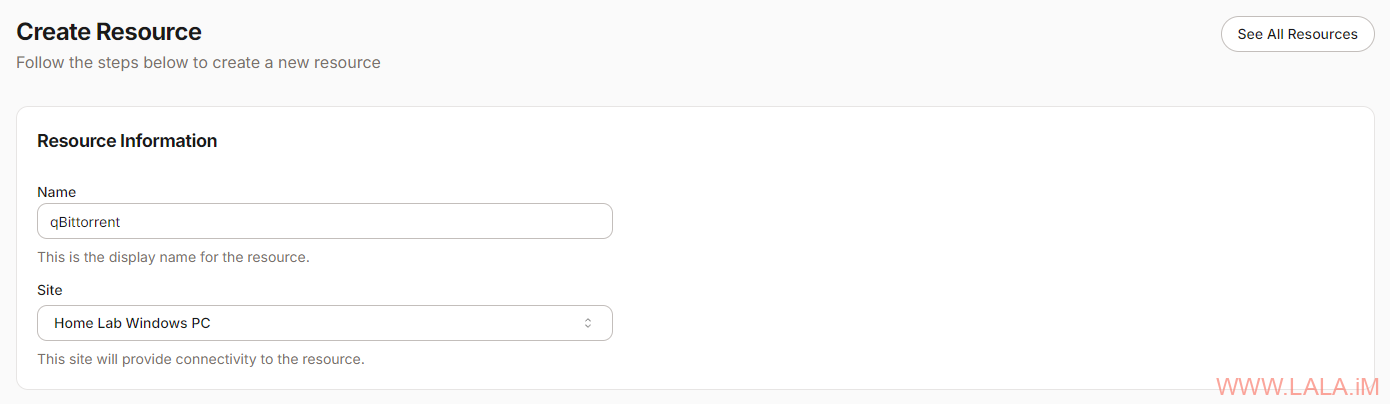
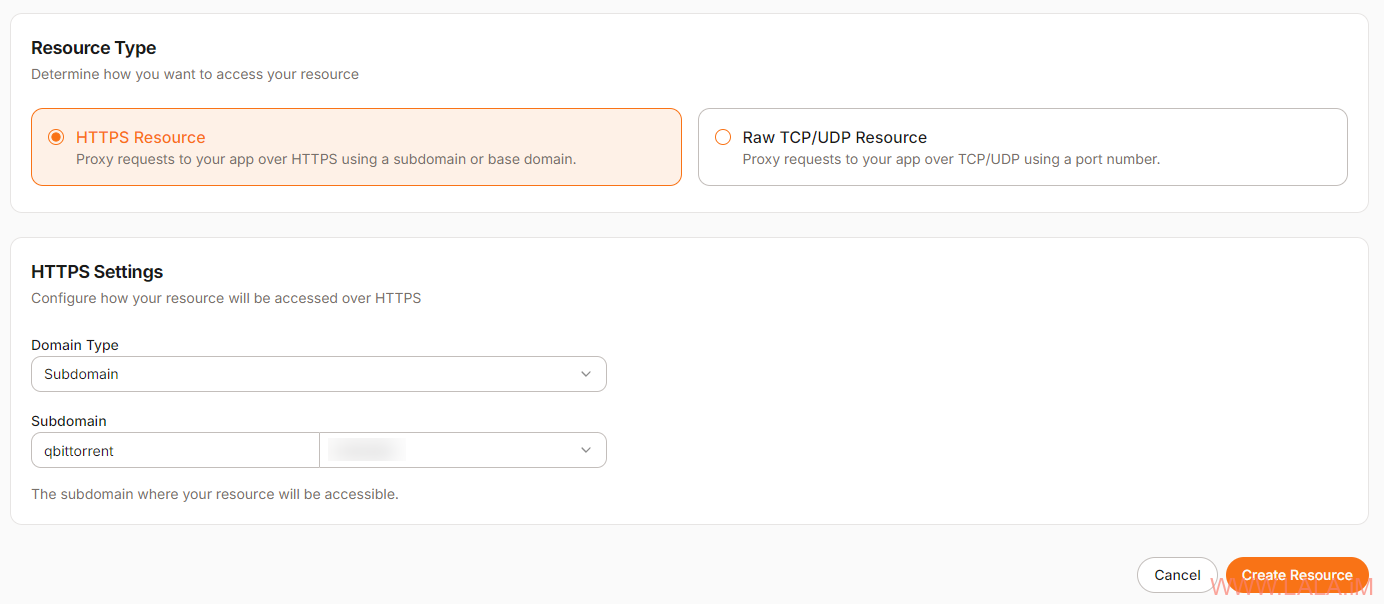
资源类型这里选择HTTPS Resource,然后填写一个子域名,例如:qbittorrent.example.com:
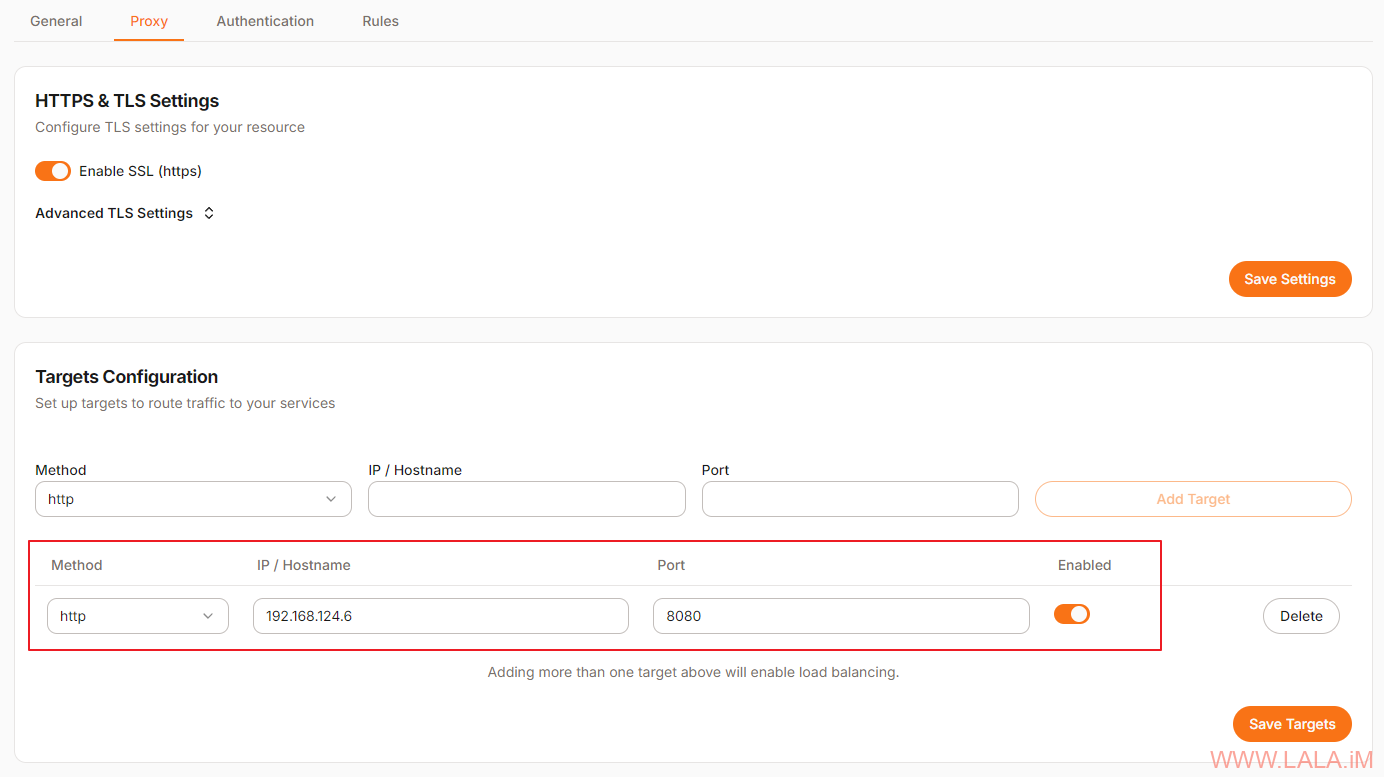
在Proxy->Targets Configuration这里填写这台Windows电脑的内网IP,端口填写qBittorrent Web UI监听的端口:
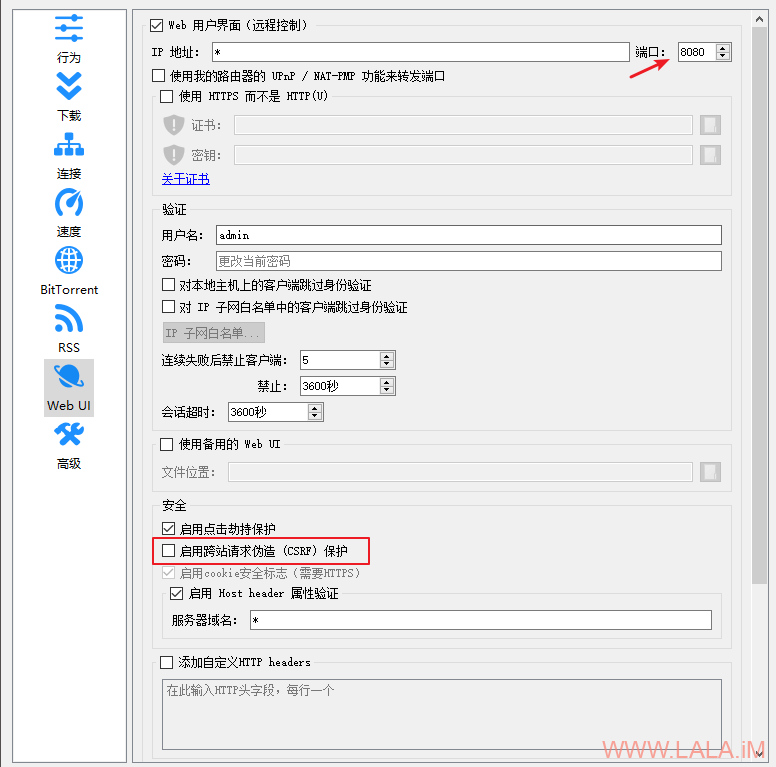
qBittorrent配置,去掉CSRF保护勾选,不然Pangolin反代后会报401未授权:
这样当我在外面的时候,就可以通过qbittorrent.example.com访问到家里的qBittorrent了。
我这里只是简单的演示,实际上Pangolin还有一个非常强大的功能:身份验证。它支持PIN验证、密码验证、一次性密码(邮件)认证等。有需要的可以自己部署之后试试。


还是frp最简单
广告合作点了好几遍没反应呢..
没反应就对了,主题自带的没设置(也没打算挂广告)。。。
Custom Host Header 可以如何替换呢?没找到格式
好问题,我曾经也研究了半天,但是也不知道该怎么填-。-