
AppFlowy是Notion的开源替代品,你可以简单理解成这就是一个笔记软件。然后官方提供了一个自托管(self-host)版本:AppFlowy-Cloud,可以部署在自己的服务器上,无需使用官方的付费服务。
其实我半年前就部署过一次,试用了一会儿,当时就觉得这个程序的客户端UI真的太粗糙了,就没用下去,也懒得写文章记录部署的步骤,这回又故地重游了一次属于是。。心里想着半年过去了,这程序会不会变好一些?结果你猜怎么着?越来越拉了。。说句实话,我觉得这个AppFlowy-Cloud不值得我花这么长时间去部署,看看这个自托管版本的限制就知道了:
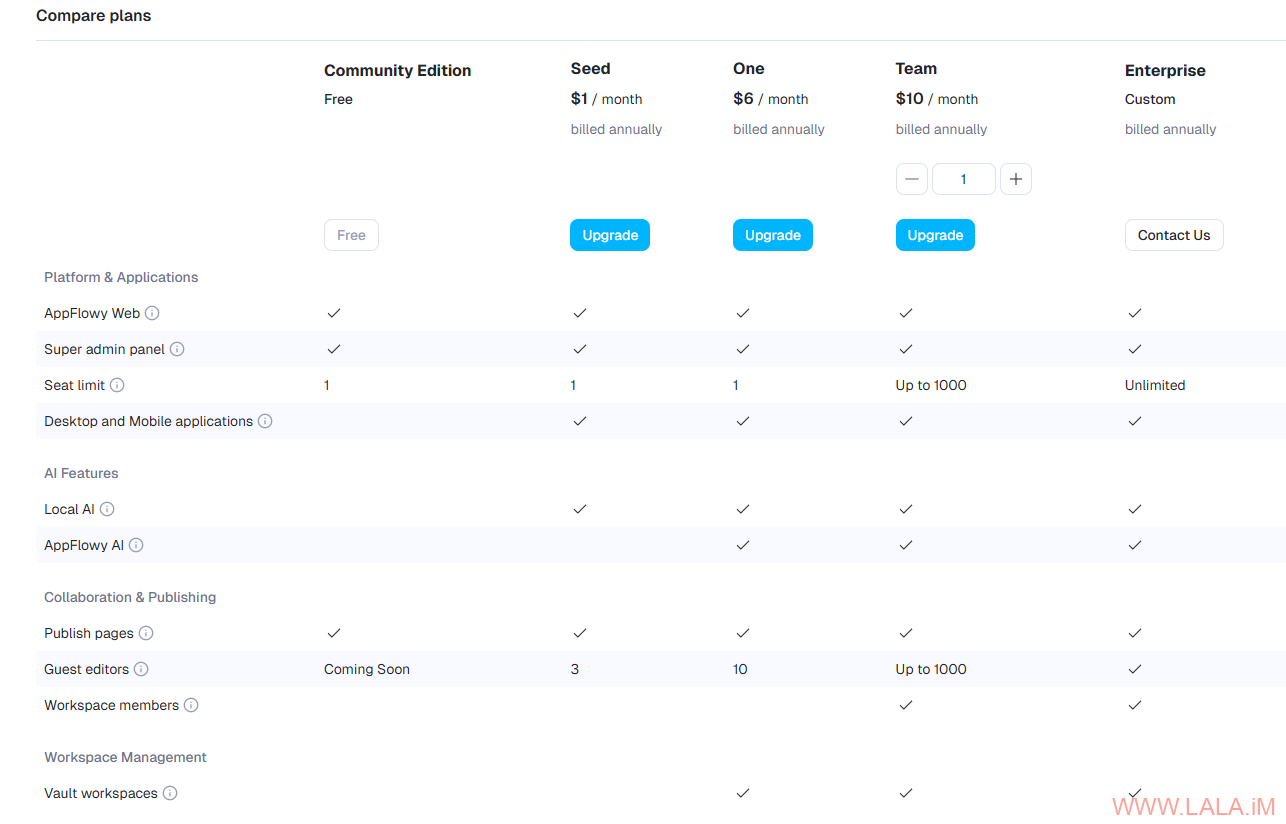
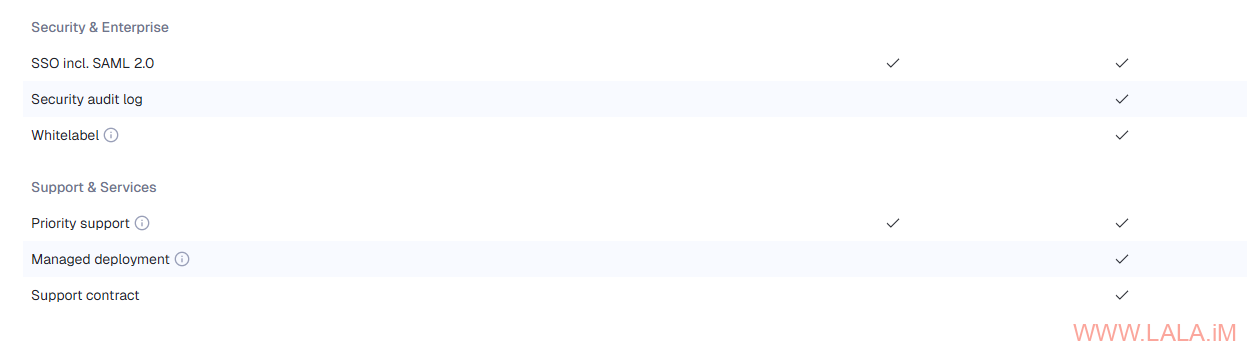
AI功能直接不让用,用户数量也限制只允许1个。。还有一堆其他的限制。。想赚钱能理解,但是你搞个自托管的版本限制成这个屌样,未免也有点太那啥了吧。。最TM骚的是这些限制在部署前找不到任何地方有说明,这是我部署好了后在管理员后台看到的。。你要在醒目的位置标明这些限制我压根就不会去部署了。
替大伙节约时间了,你看到这里可能就已经和我有一样的感受了,估计你也没有部署的欲望了,这东西不花钱真的就像一个大号的文本编辑器。。而且还有很多未知BUG,我刚部署的时候管理员后台直接报错打不开,隔了两天pull了个新的镜像后又能打开了(估计是他们修了BUG)但是还有一个问题是文件上传,只要上传的文件体积稍微大一点(10MB左右)就上传失败。。
遭老罪咯,花这么多时间去折腾这么个玩意,这个程序单说部署步骤也是同类产品中最繁琐的。。我的建议是花钱可以考虑,不花钱就别用了,自托管?搞笑的兄弟!我说的都是非常中肯的评价,好就是好,不好就是不好。
如果你想和我一起受罪,请开始准备工作:
1.一个域名A记录解析到:appflowy.example.com
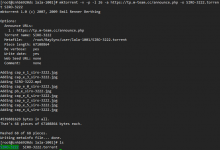
2.系统的内存至少1GB,以下是我部署的全部服务内存占用情况,供参考:

3.系统的以下端口不能被其他程序占用,其中80/443端口用于给主机的NGINX反向代理:
80/443/3000/3001/8000/9999/9000/9001
我使用的系统是Debian13,安装NGINX/Docker:
apt -y update
apt -y install curl nginx python3-certbot-nginx
curl -fsSL https://get.docker.com -o get-docker.sh
sh get-docker.sh
克隆AppFlowy-Cloud项目仓库:
cd /opt
git clone https://github.com/AppFlowy-IO/AppFlowy-Cloud
cd AppFlowy-Cloud
复制一份环境变量配置文件编辑:
cp deploy.env .env
nano .env
需要修改的内容如下,全部写好了注释。其他没有在这里列出的内容可以保持默认值不做修改:
# 设置你的AppFlowy域名
FQDN=appflowy.example.com
# 使用TLS
SCHEME=https
WS_SCHEME=wss
# 数据库密码
POSTGRES_PASSWORD=dbpassword
# MinIO的管理员账号密码,也用作s3存储桶的访问凭据
AWS_ACCESS_KEY=admin
AWS_SECRET=miniopassword
# AppFlowy管理员账号密码
GOTRUE_ADMIN_EMAIL=imlala@example.com
GOTRUE_ADMIN_PASSWORD=appflowyadminpassword
# 使用命令openssl rand -hex 32生成
GOTRUE_JWT_SECRET=0a7a5b32d2a28f51a1250d4d68e68aa7133e033b17eeb7a6e2a0d2ab5cb62cdb
# 关闭自动验证用户账户
GOTRUE_MAILER_AUTOCONFIRM=false
# 关闭用户注册功能
GOTRUE_DISABLE_SIGNUP=true
# GOTRUE的SMTP配置:
GOTRUE_SMTP_HOST=mail.example.com
GOTRUE_SMTP_PORT=587
GOTRUE_SMTP_USER=smtp
GOTRUE_SMTP_PASS=smtppassword
GOTRUE_SMTP_ADMIN_EMAIL=smtp@example.com
# AppFlowy的SMTP配置:
APPFLOWY_MAILER_SMTP_HOST=mail.example.com
APPFLOWY_MAILER_SMTP_PORT=587
APPFLOWY_MAILER_SMTP_USERNAME=smtp
APPFLOWY_MAILER_SMTP_EMAIL=smtp@example.com
APPFLOWY_MAILER_SMTP_PASSWORD=smtppassword
APPFLOWY_MAILER_SMTP_TLS_KIND=opportunistic # "none" "wrapper" "required" "opportunistic"
# AI配置
AI_OPENAI_API_KEY=sk-proj-xxxxx
AI_OPENAI_API_SUMMARY_MODEL=gpt-4o-mini
# 性能优化
APPFLOWY_COLLABORATE_MULTI_THREAD=true
# PGadmin的管理员账号密码
PGADMIN_DEFAULT_EMAIL=imlala@example.com
PGADMIN_DEFAULT_PASSWORD=pgadminpassword
由于我使用外部(主机)的NGINX来反向代理AppFlowy,所以需要编辑compose文件:
nano docker-compose.yml
注释或者删掉compose内的NGINX配置:
services:# nginx: # restart: on-failure # image: nginx # ports: # - ${NGINX_PORT:-80}:80 # Disable this if you are using TLS # - ${NGINX_TLS_PORT:-443}:443 # volumes: # - ./nginx/nginx.conf:/etc/nginx/nginx.conf # - ./nginx/ssl/certificate.crt:/etc/nginx/ssl/certificate.crt # - ./nginx/ssl/private_key.key:/etc/nginx/ssl/private_key.key
将其他服务的端口暴露出来,为安全起见这里全部配置成只监听在本地(127.0.0.1):
services:
...
  minio:
    restart: on-failure
    ...
    ports:
      - "127.0.0.1:9000:9000"
      - "127.0.0.1:9001:9001"
...
  gotrue:
    restart: on-failure
    ...
    ports:
      - "127.0.0.1:9999:9999"
...
  appflowy_cloud:
    restart: on-failure
    ...
    ports:
      - "127.0.0.1:8000:8000"
...
  admin_frontend:
    restart: on-failure
    ...
    ports:
      - "127.0.0.1:3000:3000"
...
  appflowy_web:
    restart: on-failure
    ...
    ports:
      - "127.0.0.1:3001:80"
启动:
docker compose up -d
新建NGINX站点配置文件:
nano /etc/nginx/sites-available/appflowy
写入如下内容:
map $http_upgrade $connection_upgrade {
    default upgrade;
    '' close;
}

server {
    listen 80;
    server_name appflowy.example.com;
    client_max_body_size 0;
    underscores_in_headers on;

    access_log /var/log/nginx/appflowy_access.log;
    error_log /var/log/nginx/appflowy_error.log;

    set $appflowy_cloud_backend "http://127.0.0.1:8000";
    set $gotrue_backend "http://127.0.0.1:9999";
    set $admin_frontend_backend "http://127.0.0.1:3000";
    set $appflowy_web_backend "http://127.0.0.1:3001";
    set $minio_backend "http://127.0.0.1:9001";
    set $minio_api_backend "http://127.0.0.1:9000";
    set $minio_internal_host "minio:9000";

    # GoTrue
    location /gotrue/ {
        proxy_pass $gotrue_backend;
        rewrite ^/gotrue(/.*)$ $1 break;
        # Allow headers like redirect_to to be handed over to the gotrue
        # for correct redirecting
        proxy_set_header Host $http_host;
        proxy_pass_request_headers on;
    }

    # WebSocket
    location /ws {
        proxy_pass $appflowy_cloud_backend;
        proxy_http_version 1.1;
        proxy_set_header Upgrade $http_upgrade;
        proxy_set_header Connection "Upgrade";
        proxy_set_header Host $host;
        proxy_set_header X-Real-IP $remote_addr;
        proxy_set_header X-Forwarded-For $proxy_add_x_forwarded_for;
        proxy_set_header X-Forwarded-Proto $scheme;
        proxy_read_timeout 86400s;
    }

    location /api {
        proxy_pass $appflowy_cloud_backend;
        proxy_set_header X-Request-Id $request_id;
        proxy_set_header Host $http_host;
        location ~* ^/api/workspace/([a-zA-Z0-9_-]+)/publish$ {
            proxy_pass $appflowy_cloud_backend;
            proxy_request_buffering off;
            client_max_body_size 256M;
        }

        # AppFlowy-Cloud
        location /api/chat {
            proxy_pass $appflowy_cloud_backend;
            proxy_http_version 1.1;
            proxy_set_header Connection "";
            chunked_transfer_encoding on;
            proxy_buffering off;
            proxy_cache off;
            proxy_read_timeout 600s;
            proxy_connect_timeout 600s;
            proxy_send_timeout 600s;
        }

        location /api/import {
            proxy_pass $appflowy_cloud_backend;
            # Set headers
            proxy_set_header X-Request-Id $request_id;
            proxy_set_header Host $http_host;
            # Timeouts
            proxy_read_timeout 600s;
            proxy_connect_timeout 600s;
            proxy_send_timeout 600s;
            # Disable buffering for large file uploads
            proxy_request_buffering off;
            proxy_buffering off;
            proxy_cache off;
            client_max_body_size 2G;
        }
    }

    # Minio Web UI
    location /minio/ {
        proxy_pass $minio_backend;
        rewrite ^/minio/(.*) /$1 break;
        proxy_set_header Host $http_host;
        proxy_set_header X-Real-IP $remote_addr;
        proxy_set_header X-Forwarded-For $proxy_add_x_forwarded_for;
        proxy_set_header X-Forwarded-Proto $scheme;
        proxy_set_header X-NginX-Proxy true;
        ## This is necessary to pass the correct IP to be hashed
        real_ip_header X-Real-IP;
        proxy_connect_timeout 300s;
        ## To support websockets in MinIO versions released after January 2023
        proxy_http_version 1.1;
        proxy_set_header Upgrade $http_upgrade;
        proxy_set_header Connection "upgrade";
        # Some environments may encounter CORS errors (Kubernetes + Nginx Ingress)
        # Uncomment the following line to set the Origin request to an empty string
        # proxy_set_header Origin '';
        chunked_transfer_encoding off;
    }

    location /minio-api/ {
        proxy_pass $minio_api_backend;
        # Set the host to internal host because the presigned url was signed against the internal host
        proxy_set_header Host $minio_internal_host;
        proxy_set_header X-Real-IP $remote_addr;
        proxy_set_header X-Forwarded-For $proxy_add_x_forwarded_for;
        proxy_set_header X-Forwarded-Proto $scheme;
        rewrite ^/minio-api/(.*) /$1 break;
        proxy_connect_timeout 300s;
        proxy_http_version 1.1;
        proxy_set_header Connection "";
        chunked_transfer_encoding off;
    }

    # Admin Frontend
    location /console {
        proxy_pass $admin_frontend_backend;
        proxy_set_header X-Scheme $scheme;
        proxy_set_header Host $host;
        proxy_set_header X-Real-IP $remote_addr;
        proxy_set_header X-Forwarded-For $proxy_add_x_forwarded_for;
        proxy_set_header X-Forwarded-Proto $scheme;
    }

    # AppFlowy Web
    location / {
        proxy_pass $appflowy_web_backend;
        proxy_set_header X-Scheme $scheme;
        proxy_set_header Host $host;
        proxy_set_header X-Real-IP $remote_addr;
        proxy_set_header X-Forwarded-For $proxy_add_x_forwarded_for;
        proxy_set_header X-Forwarded-Proto $scheme;
    }
}
启用站点:
ln -s /etc/nginx/sites-available/appflowy /etc/nginx/sites-enabled/appflowy
签发SSL证书:
certbot --nginx --email example@lala.im --agree-tos --no-eff-email
三个WebUI将在如下网址提供访问:
# AppFlowy Web UI
https://appflowy.example.com
# AppFlowy管理员后台
https://appflowy.example.com/console
# MinIO Web UI
https://appflowy.example.com/minio
1.使用GOTRUE_ADMIN_EMAIL/GOTRUE_ADMIN_PASSWORD既可以登录AppFlowy Web UI也可以登录AppFlowy管理员后台。
2.使用AWS_ACCESS_KEY/AWS_SECRET可以登录MinIO Web UI。
效果:
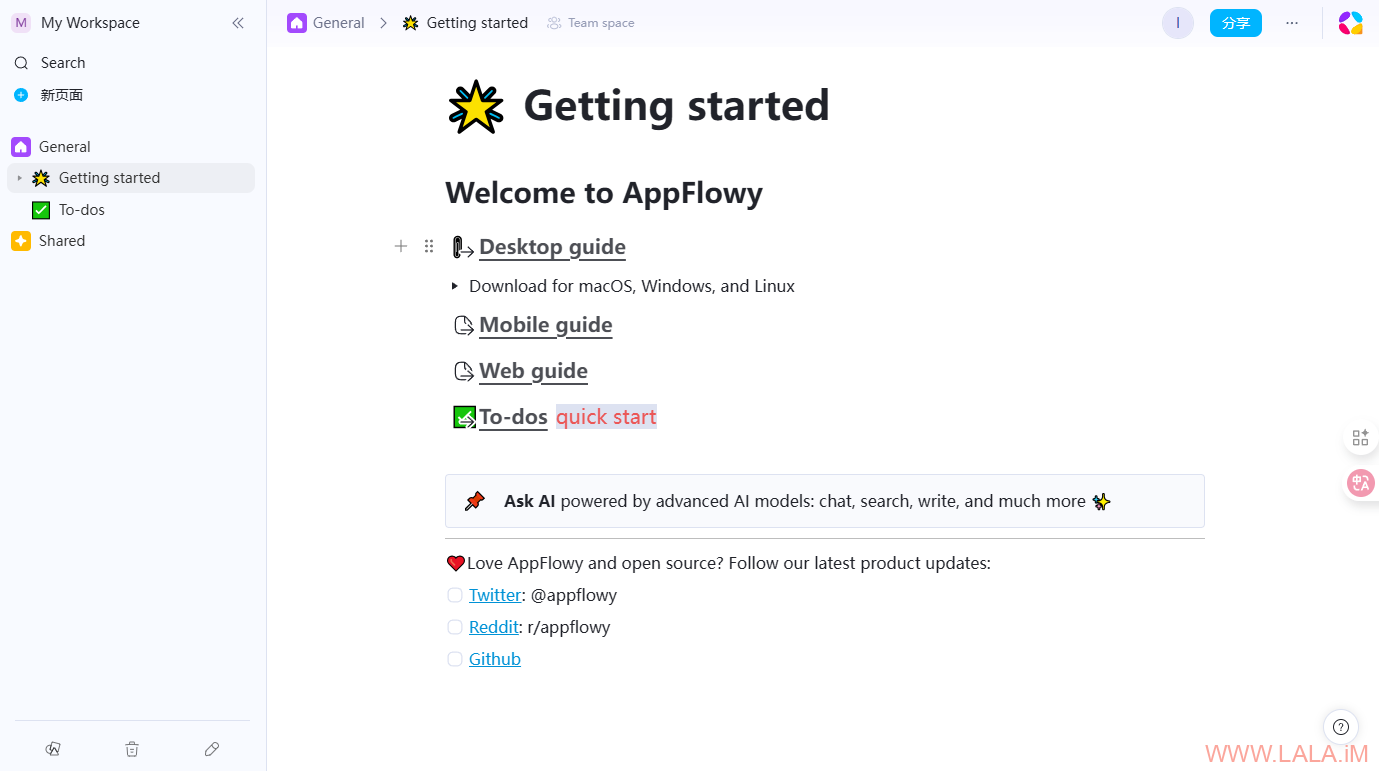


看头像长的好像是还可以= =
所以开源的推荐哪个,affine和siyuan都不怎么顺手,outline好看但是不支持客户端和多标签
推荐不了,不是这有点问题就是那有点问题,没有用着特别顺手的。。最近在关注这个https://github.com/streetwriters/notesnook,但是自建特别麻烦。
不过最近这次的更新可以使用官方的那些template了,年底如果能上全文搜索感觉能凑合用