
这一套环境是我这个博客目前在用的,主要是套了个Varnish做缓存,这个东西有利也有弊吧,利无非就是性能好,用这个做缓存WordPress抗几百个并发不在话下,而弊端是一些WordPress功能无法正常用,例如:文章阅读数统计。总而言之就是:如果你选择用Varnish了,就尽量不要用花哨的博客主题了。。很可能导致一堆功能无法正常用。。
像WordPress的各类缓存插件:WPSuperCache/CometCache/等等等等诸如此类,基本都是基于硬盘的缓存,包括NginxCache也是如此,而Varnish是内存缓存,内存,内存!
以下部署过程基于Debian10(buster)首先安装Varnish/Nginx/MariaDB/Certbot:
apt -y install varnish nginx python-certbot-nginx mariadb-server
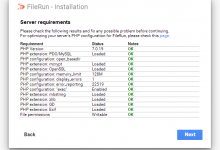
安装PHP7.3:
apt -y install php7.3 php7.3-common php7.3-cli php7.3-cgi php7.3-fpm \
php7.3-gd php7.3-mysql php7.3-sqlite3 php7.3-pgsql php7.3-opcache \
php7.3-mbstring php7.3-curl php7.3-xml php7.3-xmlrpc php7.3-zip \
php7.3-intl php7.3-json php7.3-bz2
设置Nginx/Varnish/MariaDB开机启动:
systemctl enable nginx
systemctl enable varnish
systemctl enable mariadb
给PHP性能简单调优:
nano /etc/php/7.3/fpm/pool.d/www.conf
更改:
pm = dynamic
pm.max_children = 120
pm.start_servers = 12
pm.min_spare_servers = 6
pm.max_spare_servers = 18
pm.max_requests = 500 # 解决内存泄漏问题
编辑php.ini
nano /etc/php/7.3/fpm/php.ini
更改(如果待会你要通过phpMyAdmin上传数据库,而数据库文件的体积很大,则应该适当更改下面的值:)
max_execution_time = 300
post_max_size = 100M
upload_max_filesize = 100M
重启PHP-FPM使更改生效:
systemctl restart php7.3-fpm.service
初始化MariaDB:
mysql_secure_installation
流程:
Enter current password for root (enter for none):回车
Set root password? [Y/n] Y
New password: 设置你的Mariadb数据库root密码
Re-enter new password: 重复输入一次密码
Remove anonymous users? [Y/n] Y
Disallow root login remotely? [Y/n] Y
Remove test database and access to it? [Y/n] Y
Reload privilege tables now? [Y/n] Y
登录到MariaDB的Shell:
mysql -u root -p
创建一个phpMyAdmin用户:
CREATE USER 'phpmyadmin'@'localhost' IDENTIFIED BY '设置你的密码';
GRANT ALL PRIVILEGES ON *.* TO 'phpmyadmin'@'localhost' WITH GRANT OPTION;
FLUSH PRIVILEGES;
quit
下载phpMyAdmin最新版本:
apt -y instlal unzip
cd /var/www
wget https://files.phpmyadmin.net/phpMyAdmin/4.9.0.1/phpMyAdmin-4.9.0.1-all-languages.zip
unzip phpMyAdmin-4.9.0.1-all-languages.zip
rm -rf phpMyAdmin-4.9.0.1-all-languages.zip
mv phpMyAdmin-4.9.0.1-all-languages phpmyadmin
chown -R www-data:www-data phpmyadmin
新建Nginx配置文件:
nano /etc/nginx/conf.d/phpmyadmin.conf
写入:
server {
    listen       2333;
    server_name  你的VPS公网IP;
    root         /var/www/phpmyadmin;
    index        index.html index.htm index.php;
    client_max_body_size 100M; # 如果要上传的数据库文件体积很大,更改此值到合适大小

    location ~ \.php$ {
        root           /var/www/phpmyadmin;
        fastcgi_pass   unix:/run/php/php7.3-fpm.sock;
        fastcgi_index  index.php;
        fastcgi_param  SCRIPT_FILENAME  /var/www/phpmyadmin$fastcgi_script_name;
        include        fastcgi_params;
    }
}
重启nginx:
systemctl restart nginx
你现在应该可以访问到phpMyAdmin的WEB界面,使用你之前创建的phpmyadmin用户即可成功登录。如果是搬家就创建数据库然后把你的数据库导入,如果是新站创建个空数据库就行了。
现在下载WordPress源码:
cd /var/www
wget https://wordpress.org/latest.zip
unzip latest.zip
rm -rf latest.zip
chown -R www-data:www-data wordpress
新建伪静态存放目录/新建WordPress伪静态规则:
mkdir /etc/nginx/conf.d/rewrite
nano /etc/nginx/conf.d/rewrite/wordpress.conf
写入:
location / {
	try_files $uri $uri/ /index.php?$args;
}
新建WordPress配置文件:
nano /etc/nginx/conf.d/wordpress.conf
写入:
server {
    listen       8080;
    server_name  127.0.0.1;
    root   /var/www/wordpress;
    index  index.html index.htm index.php;
    client_max_body_size 100M;
    include /etc/nginx/conf.d/rewrite/wordpress.conf;

    location ~ \.php$ {
        root           /var/www/wordpress;
        fastcgi_pass   unix:/run/php/php7.3-fpm.sock;
        fastcgi_index  index.php;
        fastcgi_param  SCRIPT_FILENAME  /var/www/wordpress$fastcgi_script_name;
        include        fastcgi_params;
    }
}
重启nginx:
systemctl restart nginx
现在来配置Varnish,首先把默认的配置文件做个备份:
cd /etc/varnish
mv default.vcl default.vcl.bak
将我的配置文件上传到/etc/varnish目录,然后编辑:
nano default.vcl
配置文件下载和具体要改的地方我这里懒得写了,因为我一年前就写过一模一样的文章,可以参考:
全部改好后重启varnish:
systemctl restart varnish
接着新建Nginx反向代理配置文件:
nano /etc/nginx/conf.d/proxywordpress.conf
先暂时写入如下配置:
server {
    listen       80;
    server_name  你的站点域名;
    client_max_body_size 100M;
    add_header Referrer-Policy no-referrer;

location / {
    proxy_pass       http://127.0.0.1:6081;
    proxy_redirect             off;
    proxy_http_version         1.1;
    proxy_set_header Upgrade   $http_upgrade;
    proxy_set_header Connection "upgrade";
    proxy_set_header Host      $host;
    proxy_set_header X-Real-IP $remote_addr;
    }
}
重启nginx:
systemctl restart nginx
签发SSL证书:
certbot --nginx --agree-tos --no-eff-email
证书签好后,再次编辑反代配置文件,加入SSL的配置:
nano /etc/nginx/conf.d/proxywordpress.conf
最终这个反代的配置文件内容是如下这样的:
server {
    listen       80;
    listen       443 ssl http2;
    server_name  你的站点域名;
    client_max_body_size 100M;
    add_header Referrer-Policy no-referrer; # 解决新浪微博防盗链

    ssl_certificate    /etc/letsencrypt/live/你的站点域名/fullchain.pem;
    ssl_certificate_key    /etc/letsencrypt/live/你的站点域名/privkey.pem;
    ssl_protocols TLSv1 TLSv1.1 TLSv1.2 TLSv1.3;
    ssl_ciphers ECDHE-RSA-AES128-GCM-SHA256:HIGH:!aNULL:!MD5:!RC4:!DHE;
    ssl_prefer_server_ciphers on;
    ssl_session_cache shared:SSL:10m;
    ssl_session_timeout 10m;
    error_page 497  https://$host$request_uri;

location / {
    proxy_pass       http://127.0.0.1:6081;
    proxy_redirect             off;
    proxy_http_version         1.1;
    proxy_set_header Upgrade   $http_upgrade;
    proxy_set_header Connection "upgrade";
    proxy_set_header Host      $host;
    proxy_set_header X-Real-IP $remote_addr;
    }
}
重启nginx:
systemctl restart nginx
现在访问你的域名即可开始安装WordPress,安装完成之后,你还需要在后台安装三个插件,分别是:
Really Simple SSL:
Proxy Cache Purge:
Proxy Real IP:
其实在水完这篇文章后,我在考虑是否要把Varnish给撤了。。。


其实NginxCache也是可以缓存在内存里的。
路径设成/dev/shm即可,但如果是SSD的话,速度提升不大,也就少了10-20ms。
另外,还有redis。
按照你的php配置优化了一下
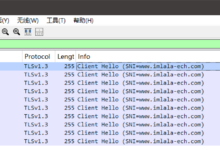
varnish出了一个专门的ssl的server,弥补没有ssl的功能。不过如果流量不是特别大,也没有必要开varnish,记得前阵子你博客不是国内不能访问了,现在又可以了,真好。
刚找了半天硬是没找到有关varnish支持ssl的信息。。为啥你们都说我这个博客国内能访问了?明明还是不能访问的状态啊。。
的确被放出来了8
请问,wordpress.conf端口是8080,而反代理的端口是80,那么我访问到底是哪个端口呢